
ReactNative for OpenHarmony项目鸿蒙化三方库:react-native-pager-view — 流畅的页面滑动体验
📌:本文基于 React Native 0.72.90 版本进行开发适配。
欢迎加入开源鸿蒙跨平台社区:https://openharmonycrossplatform.csdn.net
📌 开发环境声明:本文基于 React Native 0.72.90 版本进行开发适配
🚀 一、开篇引言
在移动应用开发中,页面滑动切换是最常见的交互方式之一。无论是引导页、轮播图还是 Tab 切换,都需要一个高性能的滑动容器组件。本文将带你深入了解如何在 HarmonyOS 平台上集成和使用 react-native-pager-view,实现流畅的页面滑动体验。
1.1 你将学到什么?
- ✅ react-native-pager-view 的核心概念与工作原理
- ✅ HarmonyOS 平台的完整集成流程
- ✅ 多种实战场景的代码实现(引导页、轮播图、Tab切换)
- ✅ 常见问题的解决方案
- ✅ 性能优化技巧
1.2 适用人群
- 正在进行 React Native 鸿蒙化迁移的开发者
- 需要实现页面滑动切换功能的应用开发者
- 对跨平台开发感兴趣的技术爱好者
📦 二、库概览
2.1 基本信息
| 项目 | 内容 |
|---|---|
| 库名称 | react-native-pager-view |
| 维护方 | Callstack |
| 最新版本 | 6.2.5 (RN 0.72) |
| RN 0.72 适配包 | @react-native-ohos/react-native-pager-view@6.2.5 |
| RN 0.77 适配包 | @react-native-ohos/react-native-pager-view@6.7.2 |
| RN 0.82 适配包 | @react-native-ohos/react-native-pager-view@7.0.3 |
| 官方仓库 | https://github.com/callstack/react-native-pager-view |
| 鸿蒙适配仓库 | https://atomgit.com/openharmony-sig/rntpc_react-native-pager-view |
| 开源协议 | MIT |
2.2 核心能力矩阵
| 能力项 | 描述 | HarmonyOS 支持 |
|---|---|---|
| 水平滑动 | 支持水平方向的页面滑动 | ✅ 完全支持 |
| 垂直滑动 | 支持垂直方向的页面滑动 | ✅ 完全支持 |
| 页面切换动画 | 平滑的页面过渡动画 | ✅ 完全支持 |
| 滚动状态监听 | 监听页面滚动状态变化 | ✅ 完全支持 |
| 页面选中监听 | 监听页面选中事件 | ✅ 完全支持 |
| 编程式切换 | 通过代码控制页面切换 | ✅ 完全支持 |
| 键盘联动 | 滑动时自动收起键盘 | ✅ 完全支持 |
| 页面边距 | 设置页面之间的间距 | ⚠️ 部分支持 (0-368px) |
2.3 技术架构图
2.4 与同类方案对比
| 特性 | react-native-pager-view | ScrollView | react-native-swiper |
|---|---|---|---|
| HarmonyOS 支持 | ✅ | ✅ | ✅ |
| 原生性能 | 优秀 | 良好 | 一般 |
| 垂直滑动 | ✅ | ✅ | ⚠️ |
| 编程式控制 | ✅ | ⚠️ | ✅ |
| 内存优化 | 按需加载 | 全部加载 | 可配置 |
| API 简洁度 | 简洁 | 简洁 | 中等 |
⚡ 三、快速开始
3.1 环境要求
| 依赖项 | 版本要求 |
|---|---|
| React Native | 0.72.x |
| RNOH (鸿蒙框架) | 0.72.90 |
| HarmonyOS SDK | 5.0.0+ |
| DevEco Studio | 5.0.3+ |
| Node.js | 16+ |
3.2 一键安装
创建鸿蒙项目的过程不在进行描述了,不懂得看这篇:https://blog.csdn.net/u011178696/article/details/151932277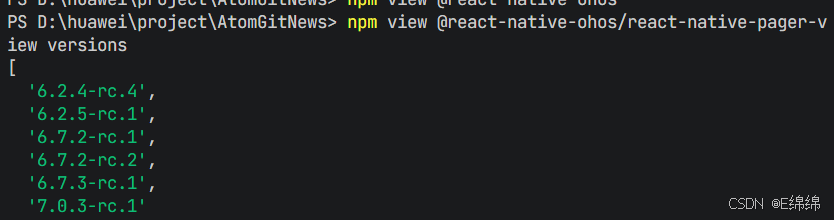
# 安装鸿蒙适配包(已包含原库依赖)
npm install @react-native-ohos/react-native-pager-view@6.2.5-rc.1
3.3 验证安装
# 检查 package.json
type package.json | findstr pager-view

# 预期输出
# "@react-native-ohos/react-native-pager-view": "^6.2.5-rc.1"
🔧 四、HarmonyOS 集成详解
4.1 配置清单
📌 按顺序完成以下配置,缺一不可
| 步骤 | 配置文件 | 操作 | 重要程度 |
|---|---|---|---|
| 1 | harmony/oh-package.json5 | 添加 overrides | ⭐⭐⭐ |
| 2 | harmony/entry/oh-package.json5 | 添加 har 依赖 | ⭐⭐⭐ |
| 3 | harmony/entry/src/main/cpp/CMakeLists.txt | 配置编译链接 | ⭐⭐⭐ |
| 4 | harmony/entry/src/main/cpp/PackageProvider.cpp | 引入头文件 | ⭐⭐⭐ |
| 5 | harmony/entry/src/main/ets/RNPackagesFactory.ts | 注册 Package | ⭐⭐⭐ |
4.2 步骤详解(一定要根据自己的版本来)
步骤一:配置 overrides
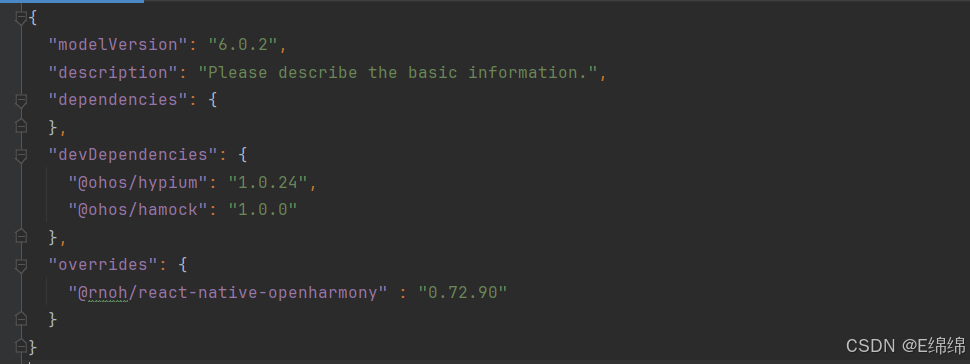
// 文件:harmony/oh-package.json5
{
  "name": "MyApplication",
  "version": "1.0.0",
  "description": "Please describe the basic information.",
  "main": "",
  "author": "",
  "license": "",
  "dependencies": {},
  "overrides": {
    "@rnoh/react-native-openharmony": "0.72.90"
  }
}
步骤二:引入原生端代码
💡 提供两种引入方式,推荐使用 方法一(har 包引入)
方法一:通过 har 包引入(推荐)
📌 har 包位于三方库安装路径的
harmony文件夹下
打开 harmony/entry/oh-package.json5,添加以下依赖:
{
  "name": "entry",
  "version": "1.0.0",
  "description": "Please describe the basic information.",
  "main": "",
  "author": "",
  "license": "",
  "dependencies": {
    "@rnoh/react-native-openharmony": "0.72.90",
    "@react-native-ohos/react-native-pager-view": "file:../../node_modules/@react-native-ohos/react-native-pager-view/harmony/pager_view.har"
  }
}
点击 DevEco Studio 右上角的 Sync Now 按钮,或在终端执行:
cd harmony/entry
ohpm install
方法二:直接链接源码
步骤 1:将 <RN工程>/node_modules/@react-native-ohos/react-native-pager-view/harmony 目录下的源码 pager_view 复制到 harmony 工程根目录下。
步骤 2:在 harmony 工程根目录的 build-profile.json5 添加以下模块:
{
  "app": {
    "signingConfigs": [],
    "products": [],
    "buildModeSet": []
  },
  "modules": [
    {
      "name": "entry",
      "srcPath": "./entry",
      "targets": []
    },
    {
      "name": "pager_view",
      "srcPath": "./pager_view"
    }
  ]
}
步骤 3:打开 harmony/pager_view/oh-package.json5,修改 @rnoh/react-native-openharmony 版本与项目一致: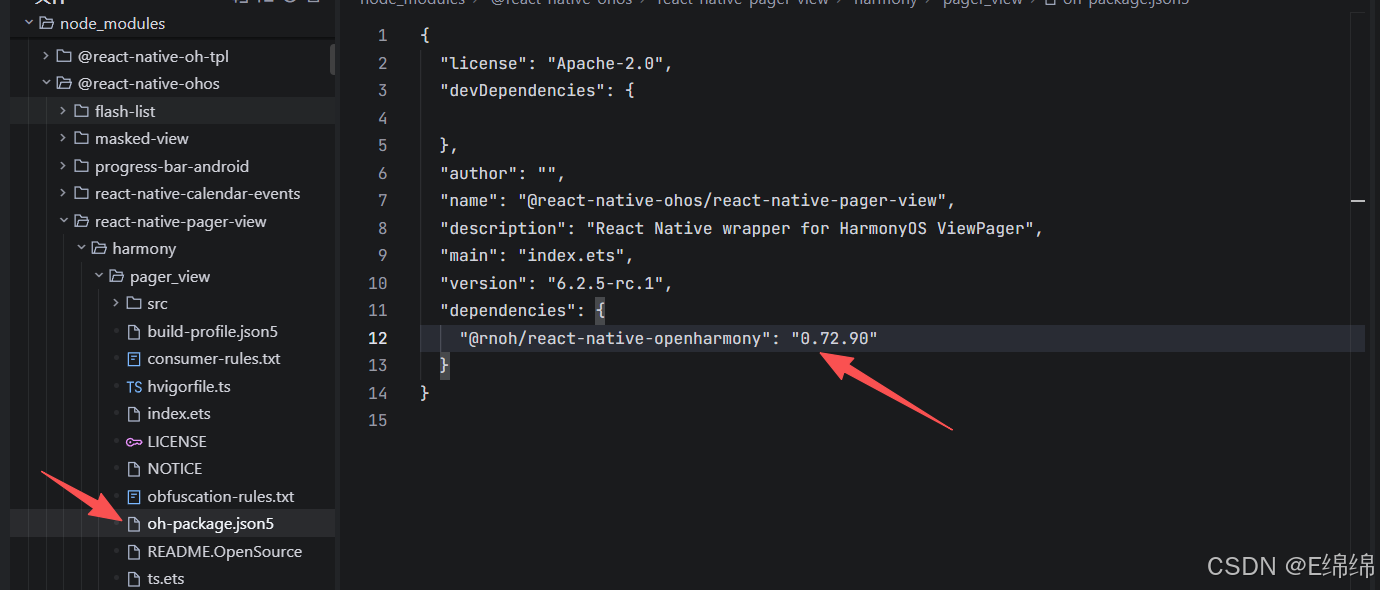
{
  "dependencies": {
    "@rnoh/react-native-openharmony": "0.72.90"
  }
}
步骤 4:打开 harmony/entry/oh-package.json5,添加以下依赖:
{
  "dependencies": {
    "@rnoh/react-native-openharmony": "0.72.90",
    "@react-native-ohos/react-native-pager-view": "file:../pager_view"
  }
}
步骤 5:点击 DevEco Studio 右上角的 Sync Now 按钮
步骤三:配置 CMake 编译
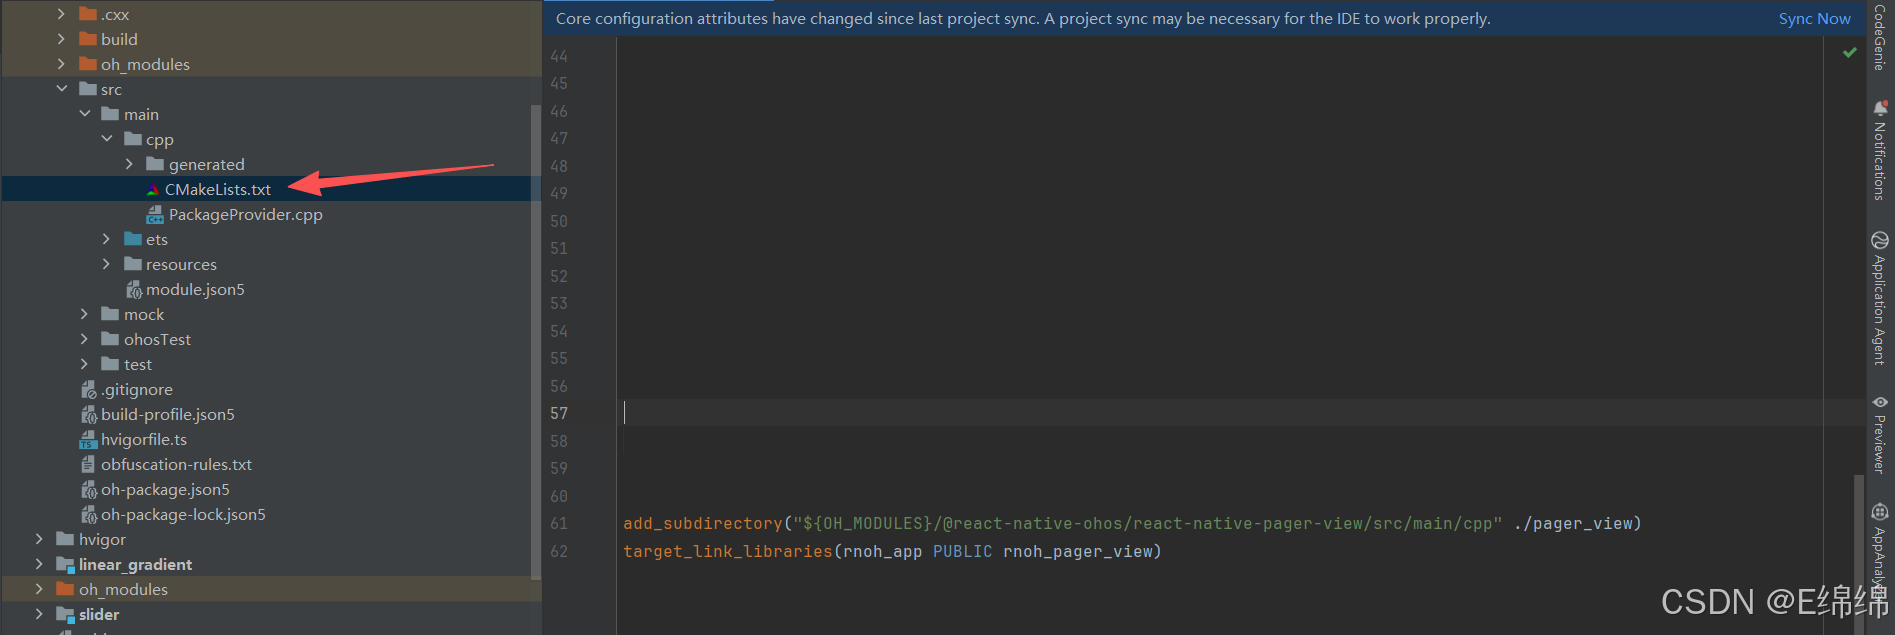
# 文件:harmony/entry/src/main/cpp/CMakeLists.txt

project(rnapp)
cmake_minimum_required(VERSION 3.4.1)
set(CMAKE_SKIP_BUILD_RPATH TRUE)
set(RNOH_APP_DIR "${CMAKE_CURRENT_SOURCE_DIR}")
set(NODE_MODULES "${CMAKE_CURRENT_SOURCE_DIR}/../../../../../node_modules")
+ set(OH_MODULES "${CMAKE_CURRENT_SOURCE_DIR}/../../../oh_modules")
set(RNOH_CPP_DIR "${CMAKE_CURRENT_SOURCE_DIR}/../../../../../../react-native-harmony/harmony/cpp")
set(LOG_VERBOSITY_LEVEL 1)
set(CMAKE_ASM_FLAGS "-Wno-error=unused-command-line-argument -Qunused-arguments")
set(CMAKE_CXX_FLAGS "-fstack-protector-strong -Wl,-z,relro,-z,now,-z,noexecstack -s -fPIE -pie")
set(WITH_HITRACE_SYSTRACE 1)
add_compile_definitions(WITH_HITRACE_SYSTRACE)

add_subdirectory("${RNOH_CPP_DIR}" ./rn)

# RNOH_BEGIN: add_package_subdirectories
add_subdirectory("../../../../sample_package/src/main/cpp" ./sample-package)
+ add_subdirectory("${OH_MODULES}/@react-native-ohos/react-native-pager-view/src/main/cpp" ./pager_view)
# RNOH_END: add_package_subdirectories

file(GLOB GENERATED_CPP_FILES "./generated/*.cpp")

add_library(rnoh_app SHARED
    ${GENERATED_CPP_FILES}
    "./PackageProvider.cpp"
    "${RNOH_CPP_DIR}/RNOHAppNapiBridge.cpp"
)
target_link_libraries(rnoh_app PUBLIC rnoh)

# RNOH_BEGIN: link_packages
target_link_libraries(rnoh_app PUBLIC rnoh_sample_package)
+ target_link_libraries(rnoh_app PUBLIC rnoh_pager_view)
# RNOH_END: link_packages
步骤四:引入 Package
// 文件:harmony/entry/src/main/cpp/PackageProvider.cpp

#include "RNOH/PackageProvider.h"
#include "generated/RNOHGeneratedPackage.h"
#include "SamplePackage.h"
#include "ViewPagerPackage.h"

using namespace rnoh;

std::vector<std::shared_ptr<Package>> PackageProvider::getPackages(Package::Context ctx) {
    return {
        std::make_shared<RNOHGeneratedPackage>(ctx),
        std::make_shared<SamplePackage>(ctx),
        std::make_shared<ViewPagerPackage>(ctx),
    };
}
步骤五:ArkTS 侧注册
// 文件:harmony/entry/src/main/ets/RNPackagesFactory.ts

import { ViewPagerPackage } from '@react-native-ohos/react-native-pager-view/ts';
import type { RNPackageContext, RNPackage } from '@rnoh/react-native-openharmony/ts';

export function createRNPackages(ctx: RNPackageContext): RNPackage[] {
  return [
    new ViewPagerPackage(ctx),
  ];
}
4.3 同步与编译
# 进入 entry 目录
cd harmony/entry

# 执行依赖同步
ohpm install

# 返回项目根目录
cd ../..
在 DevEco Studio 中点击右上角的 Sync Now 按钮,等待同步完成后编译运行。
4.4 添加harmony运行环境
在项目中的package.json中添加运行命令,harmony运行使用
npm run harmony命令
  "scripts": {
    "android": "react-native run-android",
    "ios": "react-native run-ios",
    "lint": "eslint .",
    "start": "react-native start",
    "test": "jest",
    "harmony": "react-native bundle-harmony --dev"
  },
💻 五、实战演练
场景一:应用引导页

需求描述:实现一个应用首次启动时的引导页,用户可以左右滑动查看功能介绍,最后一页显示"立即体验"按钮。
实现代码:
import React, { useRef, useState } from 'react';
import {
  View,
  Text,
  StyleSheet,
  TouchableOpacity,
  StatusBar,
} from 'react-native';
import PagerView, { PagerViewOnPageSelectedEvent } from 'react-native-pager-view';

const guideData = [
  {
    id: 1,
    title: '欢迎使用',
    description: '探索无限可能,开启精彩旅程',
    bgColor: '#4A90D9',
  },
  {
    id: 2,
    title: '智能推荐',
    description: '基于您的喜好,精准推荐内容',
    bgColor: '#50C878',
  },
  {
    id: 3,
    title: '安全保障',
    description: '多重加密保护,数据安全无忧',
    bgColor: '#FF6B6B',
  },
  {
    id: 4,
    title: '即刻启程',
    description: '一切准备就绪,开始您的体验',
    bgColor: '#9B59B6',
  },
];

interface GuideScreenProps {
  onFinish?: () => void;
}

export default function GuideScreen({ onFinish }: GuideScreenProps) {
  const pagerRef = useRef<PagerView>(null);
  const [currentPage, setCurrentPage] = useState(0);

  const onPageSelected = (event: PagerViewOnPageSelectedEvent) => {
    setCurrentPage(event.nativeEvent.position);
  };

  const handleNext = () => {
    if (currentPage < guideData.length - 1) {
      pagerRef.current?.setPage(currentPage + 1);
    } else {
      onFinish?.();
    }
  };

  const handleSkip = () => {
    onFinish?.();
  };

  return (
    <View style={styles.container}>
      <StatusBar translucent backgroundColor="transparent" />

      <PagerView
        ref={pagerRef}
        style={styles.pagerView}
        initialPage={0}
        onPageSelected={onPageSelected}
        orientation="horizontal"
      >
        {guideData.map((item) => (
          <View
            key={`page-${item.id}`}
            style={[styles.page, { backgroundColor: item.bgColor }]}
          >
            <View style={styles.contentContainer}>
              <View style={styles.iconPlaceholder}>
                <Text style={styles.iconText}>{item.id}</Text>
              </View>
              <Text style={styles.title}>{item.title}</Text>
              <Text style={styles.description}>{item.description}</Text>
            </View>
          </View>
        ))}
      </PagerView>

      <View style={styles.bottomContainer}>
        <View style={styles.indicatorContainer}>
          {guideData.map((_, index) => (
            <View
              key={index}
              style={[
                styles.indicator,
                currentPage === index && styles.activeIndicator,
              ]}
            />
          ))}
        </View>

        <View style={styles.buttonContainer}>
          {currentPage < guideData.length - 1 ? (
            <>
              <TouchableOpacity style={styles.skipButton} onPress={handleSkip}>
                <Text style={styles.skipText}>跳过</Text>
              </TouchableOpacity>
              <TouchableOpacity style={styles.nextButton} onPress={handleNext}>
                <Text style={styles.nextText}>下一步</Text>
              </TouchableOpacity>
            </>
          ) : (
            <TouchableOpacity style={styles.startButton} onPress={handleNext}>
              <Text style={styles.startText}>立即体验</Text>
            </TouchableOpacity>
          )}
        </View>
      </View>
    </View>
  );
}

const styles = StyleSheet.create({
  container: {
    flex: 1,
  },
  pagerView: {
    flex: 1,
  },
  page: {
    flex: 1,
    justifyContent: 'center',
    alignItems: 'center',
  },
  contentContainer: {
    alignItems: 'center',
    paddingHorizontal: 40,
  },
  iconPlaceholder: {
    width: 120,
    height: 120,
    borderRadius: 60,
    backgroundColor: 'rgba(255,255,255,0.3)',
    justifyContent: 'center',
    alignItems: 'center',
    marginBottom: 40,
  },
  iconText: {
    fontSize: 48,
    fontWeight: 'bold',
    color: '#FFFFFF',
  },
  title: {
    fontSize: 32,
    fontWeight: 'bold',
    color: '#FFFFFF',
    marginBottom: 16,
    textAlign: 'center',
  },
  description: {
    fontSize: 16,
    color: 'rgba(255,255,255,0.9)',
    textAlign: 'center',
    lineHeight: 24,
  },
  bottomContainer: {
    position: 'absolute',
    bottom: 0,
    left: 0,
    right: 0,
    paddingBottom: 40,
    paddingTop: 20,
    backgroundColor: 'rgba(0,0,0,0.1)',
  },
  indicatorContainer: {
    flexDirection: 'row',
    justifyContent: 'center',
    marginBottom: 30,
  },
  indicator: {
    width: 8,
    height: 8,
    borderRadius: 4,
    backgroundColor: 'rgba(255,255,255,0.5)',
    marginHorizontal: 4,
  },
  activeIndicator: {
    width: 24,
    backgroundColor: '#FFFFFF',
  },
  buttonContainer: {
    flexDirection: 'row',
    justifyContent: 'center',
    paddingHorizontal: 20,
  },
  skipButton: {
    flex: 1,
    paddingVertical: 14,
    marginRight: 10,
    borderRadius: 25,
    borderWidth: 1,
    borderColor: 'rgba(255,255,255,0.5)',
  },
  skipText: {
    fontSize: 16,
    color: '#FFFFFF',
    textAlign: 'center',
  },
  nextButton: {
    flex: 1,
    paddingVertical: 14,
    marginLeft: 10,
    borderRadius: 25,
    backgroundColor: '#FFFFFF',
  },
  nextText: {
    fontSize: 16,
    color: '#333333',
    textAlign: 'center',
    fontWeight: '600',
  },
  startButton: {
    flex: 1,
    paddingVertical: 14,
    borderRadius: 25,
    backgroundColor: '#FFFFFF',
  },
  startText: {
    fontSize: 18,
    color: '#333333',
    textAlign: 'center',
    fontWeight: 'bold',
  },
});
效果说明:
- 用户可以左右滑动查看4个引导页面
- 底部显示页面指示器,当前页高亮
- 前三页显示"跳过"和"下一步"按钮
- 最后一页显示"立即体验"按钮
场景二:图片轮播组件

需求描述:实现一个自动轮播的图片展示组件,支持手动滑动切换和自动播放。
实现代码:
import React, { useRef, useState, useEffect, useCallback } from 'react';
import {
  View,
  Text,
  StyleSheet,
  Dimensions,
  Image,
  TouchableOpacity,
} from 'react-native';
import PagerView, {
  PagerViewOnPageSelectedEvent,
  PageScrollStateChangedNativeEvent,
} from 'react-native-pager-view';

const { width } = Dimensions.get('window');

interface BannerItem {
  id: number;
  title: string;
  subtitle: string;
  image: string;
  bgColor: string;
}

const bannerData: BannerItem[] = [
  {
    id: 1,
    title: '限时特惠',
    subtitle: '全场商品5折起',
    image: 'https://picsum.photos/400/200?random=1',
    bgColor: '#FF6B6B',
  },
  {
    id: 2,
    title: '新品上市',
    subtitle: '2024春季新款首发',
    image: 'https://picsum.photos/400/200?random=2',
    bgColor: '#4ECDC4',
  },
  {
    id: 3,
    title: '会员专享',
    subtitle: '积分兑换好礼',
    image: 'https://picsum.photos/400/200?random=3',
    bgColor: '#45B7D1',
  },
  {
    id: 4,
    title: '品牌特卖',
    subtitle: '大牌低至3折',
    image: 'https://picsum.photos/400/200?random=4',
    bgColor: '#96CEB4',
  },
];

export default function BannerCarousel() {
  const pagerRef = useRef<PagerView>(null);
  const [currentPage, setCurrentPage] = useState(0);
  const [isAutoPlay, setIsAutoPlay] = useState(true);

  const goToPage = useCallback((index: number) => {
    pagerRef.current?.setPage(index);
  }, []);

  useEffect(() => {
    if (!isAutoPlay) return;

    const timer = setInterval(() => {
      const nextPage = (currentPage + 1) % bannerData.length;
      goToPage(nextPage);
    }, 3000);

    return () => clearInterval(timer);
  }, [currentPage, isAutoPlay, goToPage]);

  const onPageSelected = (event: PagerViewOnPageSelectedEvent) => {
    setCurrentPage(event.nativeEvent.position);
  };

  const onPageScrollStateChanged = (event: PageScrollStateChangedNativeEvent) => {
    const { pageScrollState } = event.nativeEvent;
    setIsAutoPlay(pageScrollState === 'idle');
  };

  const handleBannerPress = (item: BannerItem) => {
    console.log('Banner pressed:', item.title);
  };

  return (
    <View style={styles.container}>
      <PagerView
        ref={pagerRef}
        style={styles.pagerView}
        initialPage={0}
        onPageSelected={onPageSelected}
        onPageScrollStateChanged={onPageScrollStateChanged}
        orientation="horizontal"
      >
        {bannerData.map((item) => (
          <View key={`page-${item.id}`} style={styles.pageContainer}>
            <TouchableOpacity
              activeOpacity={0.9}
              onPress={() => handleBannerPress(item)}
              style={[styles.bannerCard, { backgroundColor: item.bgColor }]}
            >
              <View style={styles.textContainer}>
                <Text style={styles.bannerTitle}>{item.title}</Text>
                <Text style={styles.bannerSubtitle}>{item.subtitle}</Text>
              </View>
              <Image
                source={{ uri: item.image }}
                style={styles.bannerImage}
                resizeMode="cover"
              />
            </TouchableOpacity>
          </View>
        ))}
      </PagerView>

      <View style={styles.indicatorContainer}>
        {bannerData.map((_, index) => (
          <TouchableOpacity
            key={index}
            onPress={() => goToPage(index)}
            style={[
              styles.dot,
              currentPage === index && styles.activeDot,
            ]}
          />
        ))}
      </View>
    </View>
  );
}

const styles = StyleSheet.create({
  container: {
    flex: 1,
  },
  pagerView: {
    flex: 1,
  },
  pageContainer: {
    flex: 1,
    justifyContent: 'center',
    alignItems: 'center',
  },
  bannerCard: {
    flex: 1,
    borderRadius: 12,
    flexDirection: 'row',
    overflow: 'hidden',
    elevation: 3,
    shadowColor: '#000',
    shadowOffset: { width: 0, height: 2 },
    shadowOpacity: 0.1,
    shadowRadius: 4,
  },
  textContainer: {
    flex: 1,
    padding: 20,
    justifyContent: 'center',
  },
  bannerTitle: {
    fontSize: 24,
    fontWeight: 'bold',
    color: '#FFFFFF',
    marginBottom: 8,
  },
  bannerSubtitle: {
    fontSize: 14,
    color: 'rgba(255,255,255,0.9)',
  },
  bannerImage: {
    width: 140,
    height: '100%',
  },
  indicatorContainer: {
    flexDirection: 'row',
    justifyContent: 'center',
    alignItems: 'center',
    marginTop: 12,
  },
  dot: {
    width: 6,
    height: 6,
    borderRadius: 3,
    backgroundColor: '#D0D0D0',
    marginHorizontal: 4,
  },
  activeDot: {
    width: 20,
    backgroundColor: '#4A90D9',
  },
});
核心要点:
- 使用
setInterval实现自动轮播 - 通过
onPageScrollStateChanged监听滑动状态,用户滑动时暂停自动播放 - 支持点击指示器快速跳转
场景三:Tab 页面切换
需求描述:实现一个带有顶部 Tab 导航的页面,用户可以点击 Tab 或滑动切换内容。
实现代码:
import React, { useRef, useState, useCallback } from 'react';
import {
  View,
  Text,
  StyleSheet,
  TouchableOpacity,
  ScrollView,
  Dimensions,
  StatusBar,
} from 'react-native';
import PagerView, { PagerViewOnPageSelectedEvent } from 'react-native-pager-view';

const { width } = Dimensions.get('window');

interface TabItem {
  key: string;
  title: string;
}

interface ContentItem {
  id: number;
  title: string;
  desc: string;
}

const tabs: TabItem[] = [
  { key: 'recommend', title: '推荐' },
  { key: 'hot', title: '热门' },
  { key: 'latest', title: '最新' },
  { key: 'following', title: '关注' },
];

const mockData: Record<string, ContentItem[]> = {
  recommend: [
    { id: 1, title: '推荐内容1', desc: '这是推荐内容的描述信息' },
    { id: 2, title: '推荐内容2', desc: '这是推荐内容的描述信息' },
    { id: 3, title: '推荐内容3', desc: '这是推荐内容的描述信息' },
  ],
  hot: [
    { id: 1, title: '热门内容1', desc: '这是热门内容的描述信息' },
    { id: 2, title: '热门内容2', desc: '这是热门内容的描述信息' },
  ],
  latest: [
    { id: 1, title: '最新内容1', desc: '这是最新内容的描述信息' },
    { id: 2, title: '最新内容2', desc: '这是最新内容的描述信息' },
    { id: 3, title: '最新内容3', desc: '这是最新内容的描述信息' },
    { id: 4, title: '最新内容4', desc: '这是最新内容的描述信息' },
  ],
  following: [
    { id: 1, title: '关注内容1', desc: '这是关注内容的描述信息' },
  ],
};

export default function TabPagerScreen() {
  const pagerRef = useRef<PagerView>(null);
  const [activeTab, setActiveTab] = useState(0);

  const handleTabPress = useCallback((index: number) => {
    setActiveTab(index);
    pagerRef.current?.setPageWithoutAnimation(index);
  }, []);

  const onPageSelected = useCallback((event: PagerViewOnPageSelectedEvent) => {
    setActiveTab(event.nativeEvent.position);
  }, []);

  const renderContent = (tabKey: string) => {
    const data = mockData[tabKey] || [];
    return (
      <ScrollView
        key={tabKey}
        style={styles.contentScroll}
        contentContainerStyle={styles.contentContainer}
        showsVerticalScrollIndicator={false}
      >
        {data.map((item) => (
          <View key={item.id} style={styles.contentCard}>
            <View style={styles.cardImagePlaceholder} />
            <View style={styles.cardContent}>
              <Text style={styles.cardTitle}>{item.title}</Text>
              <Text style={styles.cardDesc}>{item.desc}</Text>
            </View>
          </View>
        ))}
        {data.length === 0 && (
          <View style={styles.emptyContainer}>
            <Text style={styles.emptyText}>暂无内容</Text>
          </View>
        )}
      </ScrollView>
    );
  };

  return (
    <View style={styles.container}>
      <StatusBar barStyle="dark-content" backgroundColor="#FFFFFF" />

      <View style={styles.header}>
        <Text style={styles.headerTitle}>发现</Text>
      </View>

      <View style={styles.tabBar}>
        {tabs.map((tab, index) => (
          <TouchableOpacity
            key={tab.key}
            style={styles.tabItem}
            onPress={() => handleTabPress(index)}
            activeOpacity={0.7}
          >
            <Text
              style={[
                styles.tabText,
                activeTab === index && styles.activeTabText,
              ]}
            >
              {tab.title}
            </Text>
            {activeTab === index && <View style={styles.tabIndicator} />}
          </TouchableOpacity>
        ))}
      </View>

      <PagerView
        ref={pagerRef}
        style={styles.pagerView}
        initialPage={0}
        onPageSelected={onPageSelected}
        orientation="horizontal"
        scrollEnabled={true}
      >
        {tabs.map((tab) => (
          <View key={tab.key} style={styles.page}>
            {renderContent(tab.key)}
          </View>
        ))}
      </PagerView>
    </View>
  );
}

const styles = StyleSheet.create({
  container: {
    flex: 1,
    backgroundColor: '#FFFFFF',
  },
  header: {
    paddingTop: 50,
    paddingBottom: 15,
    paddingHorizontal: 16,
    backgroundColor: '#FFFFFF',
  },
  headerTitle: {
    fontSize: 28,
    fontWeight: 'bold',
    color: '#333333',
  },
  tabBar: {
    flexDirection: 'row',
    backgroundColor: '#FFFFFF',
    borderBottomWidth: 1,
    borderBottomColor: '#F0F0F0',
  },
  tabItem: {
    flex: 1,
    paddingVertical: 14,
    alignItems: 'center',
  },
  tabText: {
    fontSize: 15,
    color: '#999999',
  },
  activeTabText: {
    fontSize: 15,
    color: '#333333',
    fontWeight: '600',
  },
  tabIndicator: {
    position: 'absolute',
    bottom: 0,
    width: 24,
    height: 3,
    backgroundColor: '#4A90D9',
    borderRadius: 2,
  },
  pagerView: {
    flex: 1,
  },
  page: {
    flex: 1,
  },
  contentScroll: {
    flex: 1,
  },
  contentContainer: {
    padding: 16,
  },
  contentCard: {
    flexDirection: 'row',
    backgroundColor: '#FFFFFF',
    borderRadius: 12,
    marginBottom: 12,
    padding: 12,
    elevation: 2,
    shadowColor: '#000',
    shadowOffset: { width: 0, height: 1 },
    shadowOpacity: 0.05,
    shadowRadius: 2,
  },
  cardImagePlaceholder: {
    width: 80,
    height: 80,
    borderRadius: 8,
    backgroundColor: '#E8E8E8',
  },
  cardContent: {
    flex: 1,
    marginLeft: 12,
    justifyContent: 'center',
  },
  cardTitle: {
    fontSize: 16,
    fontWeight: '600',
    color: '#333333',
    marginBottom: 6,
  },
  cardDesc: {
    fontSize: 13,
    color: '#999999',
  },
  emptyContainer: {
    height: 200,
    justifyContent: 'center',
    alignItems: 'center',
  },
  emptyText: {
    fontSize: 14,
    color: '#CCCCCC',
  },
});
性能考量:
- 使用
setPageWithoutAnimation实现 Tab 点击时的无动画切换,体验更流畅 - 使用
useCallback优化回调函数,避免不必要的重渲染 - 每个页面使用独立的 ScrollView,确保滚动状态独立
📖 六、API 速查表
6.1 Props 属性
| 属性名 | 类型 | 默认值 | 必填 | 说明 |
|---|---|---|---|---|
| initialPage | number | 0 | 否 | 初始显示的页面索引 |
| scrollEnabled | boolean | true | 否 | 是否允许滑动切换 |
| orientation | ‘horizontal’| ‘vertical’ | ‘horizontal’ | 否 | 滑动方向 |
| pageMargin | number | 0 | 否 | 页面之间的间距(HarmonyOS 支持 0-368) |
| keyboardDismissMode | ‘none’| ‘on-drag’ | ‘none’ | 否 | 滑动时是否收起键盘 |
| overScrollMode | ‘auto’| ‘always’ | ‘never’ | ‘auto’ | 否 | 过度滚动模式 |
| overdrag | boolean | false | 否 | 是否允许过度拖拽 |
| layoutDirection | ‘ltr’| ‘rtl’ | ‘locale’ | ‘locale’ | 否 | 布局方向 |
| offscreenPageLimit | number | - | 否 | 预加载页面数(HarmonyOS 暂不支持) |
6.2 事件回调
| 事件名 | 参数 | 触发时机 |
|---|---|---|
| onPageSelected | { nativeEvent: { position } } | 页面切换完成时 |
| onPageScroll | { nativeEvent: { position, offset } } | 页面滚动时 |
| onPageScrollStateChanged | { nativeEvent: { pageScrollState } } | 滚动状态变化时 |
6.3 方法(通过 ref 调用)
| 方法名 | 参数 | 说明 |
|---|---|---|
| setPage | index: number | 带动画切换到指定页面 |
| setPageWithoutAnimation | index: number | 无动画切换到指定页面 |
| setScrollEnabled | enabled: boolean | 动态设置是否可滑动 |
❓ 七、常见问题 FAQ
Q1: 页面切换时卡顿怎么办?
现象:滑动切换页面时感觉不流畅
原因:页面内容过于复杂或图片未优化
解决方案:
// 1. 使用 React.memo 优化子组件
const PageContent = React.memo(({ data }) => {
  return (
    <View>
      {/* 页面内容 */}
    </View>
  );
});

// 2. 图片使用合适的尺寸
<Image
  source={{ uri: imageUrl, width: 400, height: 200 }}
  resizeMode="cover"
/>

// 3. 避免在滑动过程中执行耗时操作
const onPageScroll = (event) => {
  // 不要在这里执行复杂计算
};
Q2: 如何实现无限轮播?
解决方案:
// 使用取模运算实现无限循环
useEffect(() => {
  const timer = setInterval(() => {
    const nextPage = (currentPage + 1) % totalPages;
    pagerRef.current?.setPage(nextPage);
  }, 3000);
  return () => clearInterval(timer);
}, [currentPage]);
Q3: pageMargin 在 HarmonyOS 上设置无效?
原因:HarmonyOS 平台对 pageMargin 有范围限制
解决方案:确保 pageMargin 值在 0-368 范围内(屏幕宽度限制)
🎯 八、最佳实践
8.1 性能优化建议
-
按需渲染:对于复杂页面,使用懒加载策略
const [loadedPages, setLoadedPages] = useState(new Set([0])); const onPageSelected = (event) => { const position = event.nativeEvent.position; setLoadedPages(prev => new Set([...prev, position])); }; -
避免过度渲染:使用
React.memo和useCallback -
图片优化:使用合适的图片尺寸和格式
8.2 代码规范
// ✅ 推荐:使用 key 属性标识页面
<PagerView>
  {pages.map((page) => (
    <View key={page.id}>
      <PageContent data={page} />
    </View>
  ))}
</PagerView>

// ❌ 不推荐:使用 index 作为 key
<PagerView>
  {pages.map((page, index) => (
    <View key={index}>
      <PageContent data={page} />
    </View>
  ))}
</PagerView>
8.3 内存管理
- 及时清理定时器,避免内存泄漏
- 对于大量页面,考虑使用虚拟化方案

作为“人工智能6S店”的官方数字引擎,为AI开发者与企业提供一个覆盖软硬件全栈、一站式门户。
更多推荐


 1
1 0
0- 0


 已为社区贡献37条内容

所有评论(0)