
鸿蒙应用开发UI基础第十七节:基于 PixelMap 实现图片合成、GIF生成
本文介绍了鸿蒙Image组件的进阶使用,主要包括PixelMap精细化处理、图片加载状态监听和异常兜底等功能。通过工程结构准备和导航页面设计,详细展示了如何实现圆形头像裁剪、分层图片叠加、多帧动画生成等复杂场景。重点讲解了PixelMap的加载与释放机制,强调内存管理的重要性,并提供了网络图片解码为PixelMap的完整代码示例。文章还涵盖了图片加载性能优化方案,帮助开发者解决大图片解码、内存泄漏
·
【学习目标】
- 掌握PixelMap精细化处理、图片加载状态监听、异常兜底的实战能力,解决圆形头像、加载占位、大图片解码等高频开发问题;
- 能基于Image组件实现分层叠加、多帧动画生成、保存、滤镜效果等进阶功能,适配复杂业务场景的图片展示需求;
- 掌握图片加载性能优化方案,解决内存泄漏、大图片解码、渲染异常等高频问题。
一、工程结构与环境准备
延用上一节工程将API版本号最低兼容修改到18、本节gif生成图片保存需要基于API18+才可以使用。
ImageApplication/
├── AppScope/
│   └── app.json5  // 应用全局配置
├── entry/
│   ├── src/
│   │   ├── main/
│   │   │   ├── ets/
│   │   │   │   ├── entryability/
│   │   │   │   │   └── EntryAbility.ets  // 应用入口
│   │   │   │   ├── pages/  // 功能演示页面
│   │   │   │   │   ├── Index.ets  // 导航主页面(仅展示进阶页面路由)
│   │   │   │   │   ├── ImagePixelMapPage.ets // PixelMap处理
│   │   │   │   │   ├── ImageEventPage.ets  // 事件&异常处理
│   │   │   │   │   ├── LayeredImagePage.ets  // 分层图片
│   │   │   │   │   ├── AnimatedImagePage.ets // 多帧动画图片
│   │   │   ├── resources/
│   │   │   │   ├── media/  // 分层图片素材(foreground/background)
│   │   │   │   └── rawfile/
│   │   │   │       └── images/ // 多帧动画图片素材(IMG_8999~9045.jpg)
│   │   │   └── module.json5  // 权限声明(沿用)
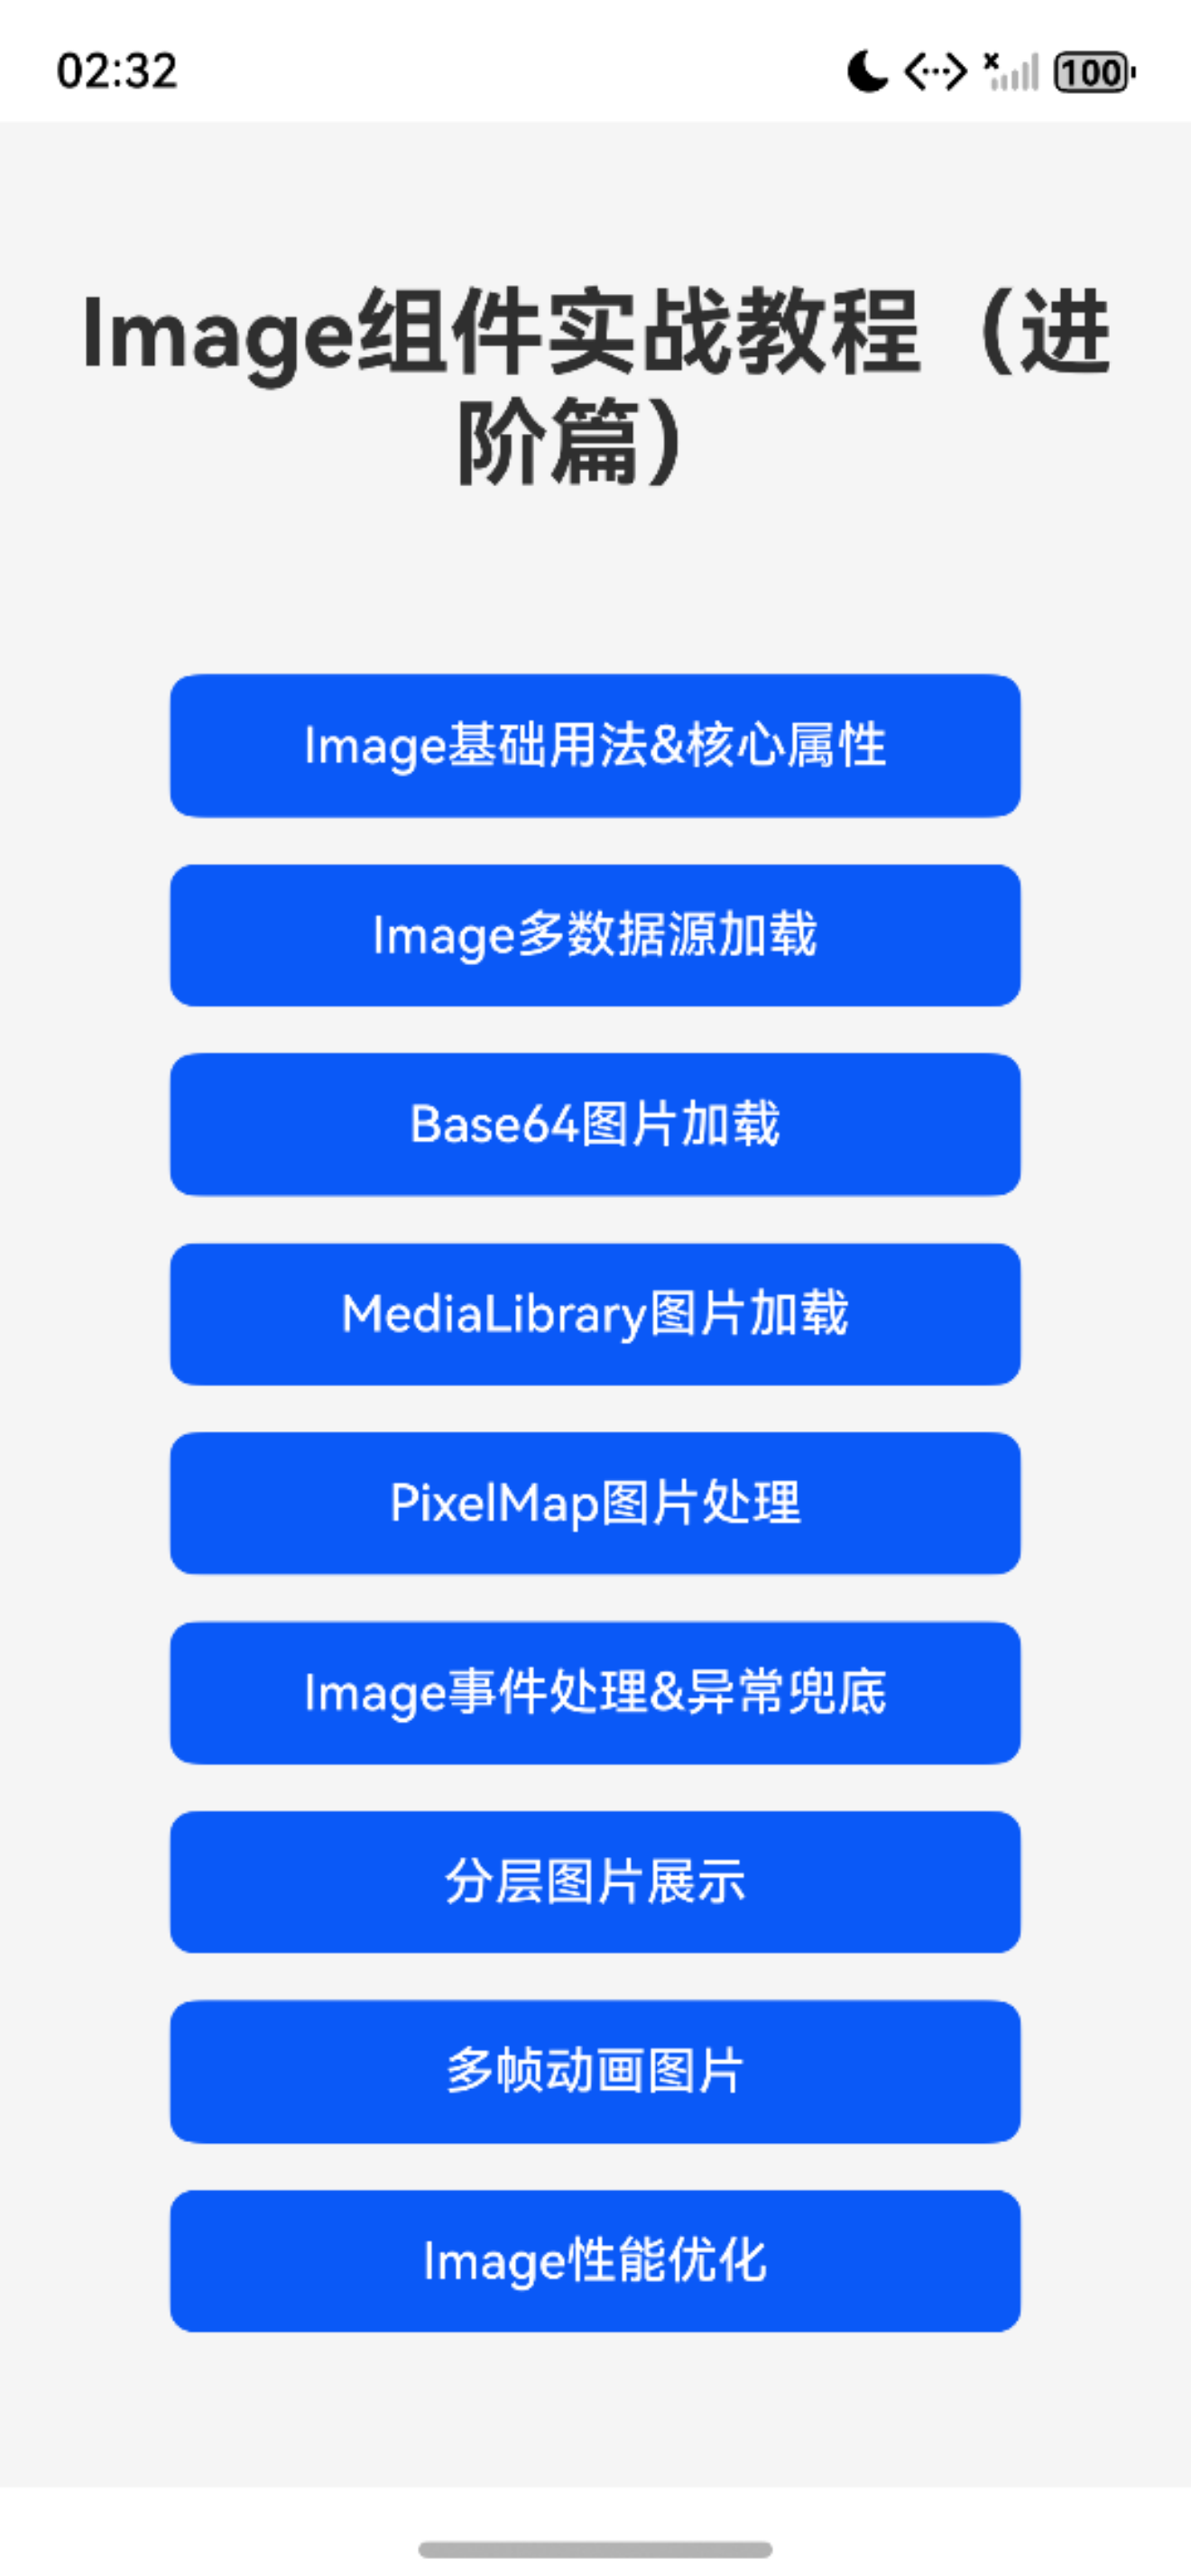
1.3 导航主页面(Index.ets 进阶部分)
import {router } from '@kit.ArkUI';

interface RouterButton {
  title: string;
  url: string;
}

@Entry
@Component
struct Index {
  private buttonList: RouterButton[] = [
    // 基础篇路由(上节)
    { title: "Image基础用法&核心属性", url: 'pages/ImageBasicPage' },
    { title: "Image多数据源加载", url: 'pages/ImageSourcePage' },
    { title: "Base64图片加载", url: 'pages/Base64ImagePage' },
    { title: "MediaLibrary图片加载", url: 'pages/ImageMediaLibrary' },
    // 进阶篇路由(本节)
    { title: "PixelMap图片处理", url: 'pages/ImagePixelMapPage' },
    { title: "Image事件处理&异常兜底", url: 'pages/ImageEventPage' },
    { title: "分层图片展示", url: 'pages/LayeredImagePage' },
    { title: "多帧动画图片", url: 'pages/AnimatedImagePage' },
    { title: "Image性能优化", url: 'pages/ImageOptPage' }

  ];

  build() {

     Column({ space: 15 }) {
      Text("Image组件实战教程(进阶篇)")
        .fontSize(30)
        .fontWeight(FontWeight.Bold)
        .margin({ bottom: 40 })
        .textAlign(TextAlign.Center);

      ForEach(
        this.buttonList,
        (item: RouterButton) => {
          Button(item.title)
            .width('80%')
            .height(45)
            .backgroundColor($r('sys.color.brand'))
            .fontColor(Color.White)
            .fontSize(16)
            .borderRadius(8)
            .shadow({ radius: 2, color: '#00000010', offsetX: 0, offsetY: 2 })
            .onClick(() => {
              router.pushUrl({
                url: item.url,
                params: { title: item.title }
              });
            })
        },
        (item:RouterButton) => item.url
      );
    }
    .width('100%')
    .height('100%')
    .justifyContent(FlexAlign.Center)
    .backgroundColor('#F5F5F5')
    .padding(20);
  }
}
运行效果
二、PixelMap资源加载与精细化处理
2.1 核心认知
PixelMap是鸿蒙中像素级图片数据载体,支持图片裁剪、滤镜、像素修改等精细化操作,适合需要自定义处理图片的场景;使用后必须手动释放,否则会导致内存泄漏。
2.2 实战代码(ImagePixelMapPage.ets)
import { image } from '@kit.ImageKit';
import { http } from '@kit.NetworkKit';
import { BusinessError } from '@kit.BasicServicesKit';
@Entry
@Component
struct ImagePixelMapPage {
@State pixelMap: image.PixelMap | undefined = undefined;
// 页面显示时加载
aboutToAppear() {
this.loadImageToPixelMap();
}
// 页面销毁时释放内存
aboutToDisappear() {
if (this.pixelMap) {
this.pixelMap.release();
this.pixelMap = undefined;
}
}
// 从网络加载图片并解码为PixelMap
loadImageToPixelMap() {
// 创建HTTP请求
const httpRequest = http.createHttp();
httpRequest.request(
'https://q8.itc.cn/q_70/images03/20250114/d9d8d1106f454c2b83ea395927bfc020.jpeg',
{ method: http.RequestMethod.GET }
).then((data) => {
if (data.responseCode === http.ResponseCode.OK) {
// 解码为PixelMap
const imageSource = image.createImageSource(data.result as ArrayBuffer);
const decodeOptions: image.DecodingOptions = {
desiredSize: { width: 100, height: 100 }, // 解码尺寸
desiredPixelFormat: image.PixelMapFormat.RGBA_8888
};
imageSource.createPixelMap(decodeOptions)
.then((pm) => {
this.pixelMap = pm;
})
.catch((err:Error) => {
console.error(`解码失败:${err.message}`);
});
}
}).catch((err: BusinessError) => {
console.error(`网络请求失败:${err.message}`);
}).finally(() => {
httpRequest.destroy(); // 销毁HTTP实例
});
}
build() {
Column({ space: 20 }) {
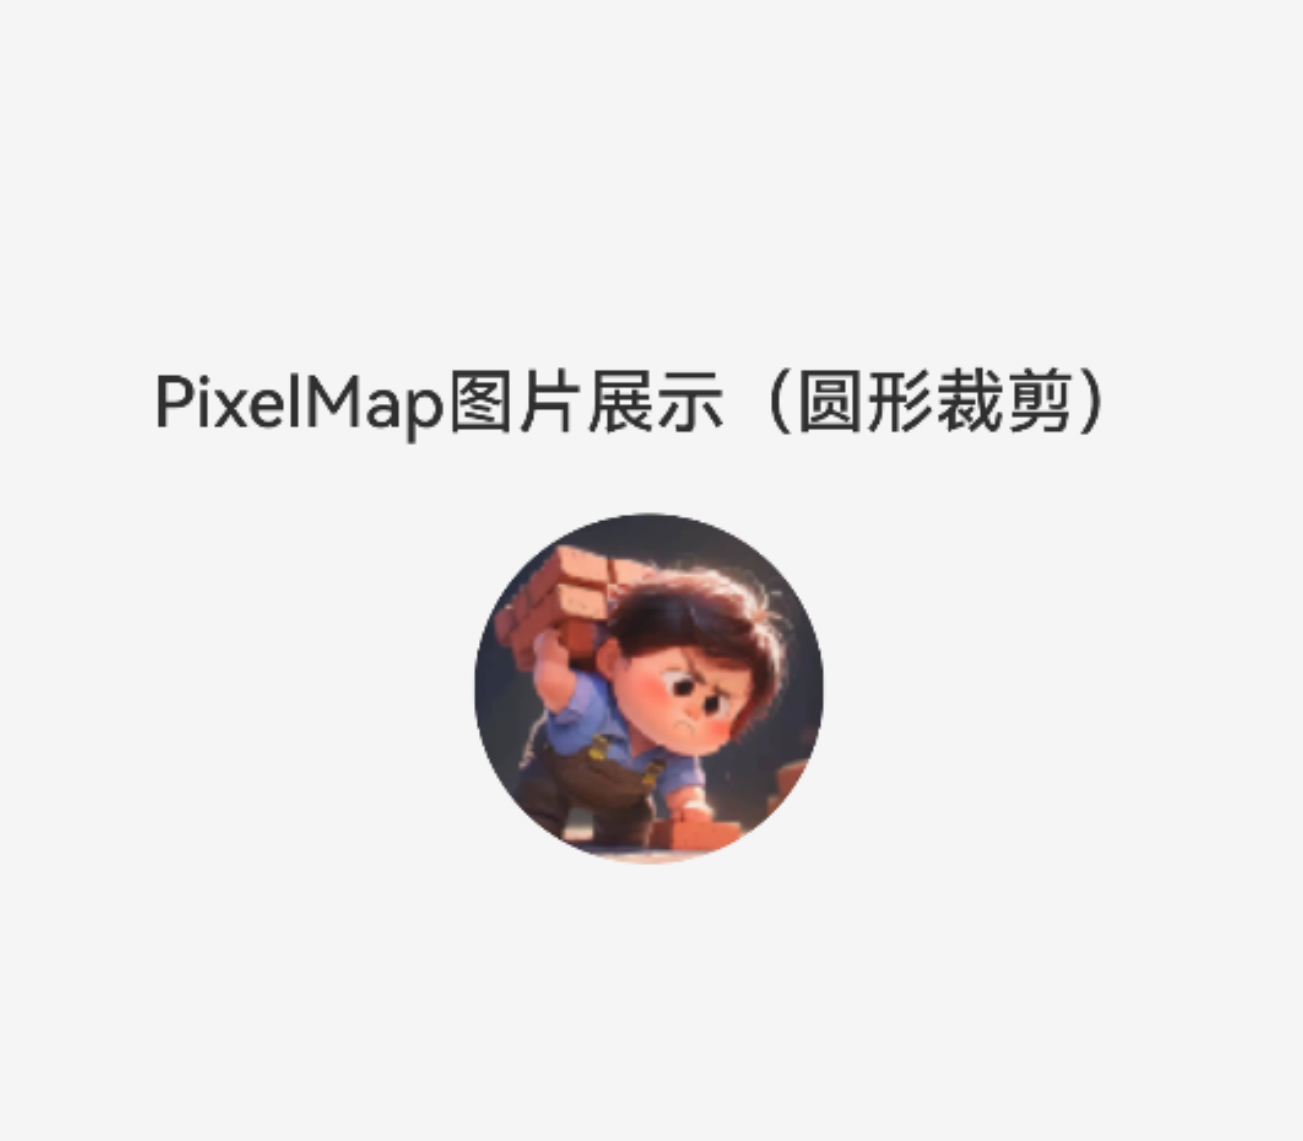
Text("PixelMap图片展示(圆形裁剪)")
.fontSize(20)
.fontWeight(FontWeight.Medium);
if (this.pixelMap) {
Image(this.pixelMap)
.width(100)
.height(100)
.borderRadius(50) // 圆形效果
.objectFit(ImageFit.Cover)
.backgroundColor('#f5f5f5');
} else {
Text("图片加载中...")
.fontSize(14)
.fontColor('#666');
}
}
.width('100%')
.height('100%')
.justifyContent(FlexAlign.Center)
.backgroundColor('#F5F5F5');
}
}
运行效果
三、图片加载事件与异常兜底
3.1 核心事件说明
| 事件名 | 功能说明 | 实战用途 |
|---|---|---|
| onComplete | 加载成功回调 | 获取图片真实尺寸、触发后续逻辑 |
| onError | 加载失败回调 | 显示兜底图片、提示用户 |
| onFinish | 加载完成(成功/失败)回调 | 隐藏加载动画、通用收尾逻辑 |
3.2 图片加载回调示例(ImageEventPage.ets)
import { promptAction } from '@kit.ArkUI';

@Entry
@Component
struct ImageEventPage {
  // 加载状态:false-未加载/加载完成/失败;true-加载中
  @State isLoading: boolean = false;
  // 加载失败状态:false-未失败;true-加载失败
  @State loadFailed: boolean = false;
  // 图片尺寸信息
  @State imgInfo: string = '';
  // 基础图片链接(正常可访问)
  private normalImageUrl: string = 'https://res.vmallres.com/FssCdnProxy/vmall_product_uom/pmsCdn/09EFE73EA18A31D59FF3D60F7F54566A.jpg';
  // 当前使用的图片链接(动态切换)
  @State currentImageUrl: string = '';
  // 兜底占位图资源
  @State altImage: Resource = $r('app.media.load_fail');
  // 加载状态文本
  @State loadStatus: string = "点击按钮加载图片";

  // 模拟图片加载(30%概率使用错误链接)
  async mockImageLoad() {
    // 1. 重置所有状态 + 清空当前链接
    this.isLoading = true;
    this.loadFailed = false;
    this.imgInfo = '';
    this.loadStatus = "图片加载中...";
    this.currentImageUrl = ''; // 清空链接,让Image组件先卸载/重置

   // 2. 30%概率切换为错误链接,70%使用正常链接
    setTimeout(() => {
      const randomFail = Math.random() <= 0.3;
      this.currentImageUrl = randomFail
        ? `https://res.vmallres.com/error_invalid_image_path${Math.random()}.jpg`
        : this.normalImageUrl;
    }, 100); // 100ms延迟,确保Image组件感知到链接清空
  }

  build() {
    Column({ space: 20 }) {
      // 加载触发按钮
      Button("加载网络图片")
        .width('80%')
        .height(45)
        .backgroundColor($r('sys.color.brand'))
        .fontColor(Color.White)
        .borderRadius(8)
        .onClick(() => this.mockImageLoad());

      // 图片容器(Stack分层)
      Stack({ alignContent: Alignment.Center }) {
        // 仅当链接有值时渲染Image(避免空链接报错)
        if (this.currentImageUrl) {
          Image(this.currentImageUrl)
            .width('90%')
            .height(200)
            .objectFit(ImageFit.Cover)
            .backgroundColor('#f5f5f5')
            .sourceSize({ width: 720, height: 480 }) // 按展示尺寸解码
            .alt(this.altImage) // 加载失败时显示兜底图
            .onComplete((msg) => {
              // 加载成功回调
              this.isLoading = false;
              this.loadFailed = false;
              this.imgInfo = `尺寸:${msg?.width}x${msg?.height}`;
              this.loadStatus = "图片加载成功";
              console.log(`图片加载成功:${this.imgInfo}`);
            })
            .onError(() => {
              // 加载失败回调(错误链接触发)
              this.isLoading = false;
              this.loadFailed = true;
              this.loadStatus = '图片加载失败,请重试';
              promptAction.showToast({ message: '图片加载失败', duration: 2000 });
              console.log("真实加载失败(错误链接触发)");
            })
            .onFinish(() => {
              console.log("加载流程结束");
            });
        }

        // 加载状态层(仅加载中显示)
        Column() {
          LoadingProgress()
            .width(40)
            .height(40)
            .color($r('sys.color.brand'));

          Text(this.loadStatus)
            .fontSize(14)
            // 失败时红色,加载中/成功时灰色,区分状态
            .fontColor(this.loadFailed ? Color.Red : '#666')
            .margin({ top: 10 });
        }.visibility(this.isLoading ? Visibility.Visible : Visibility.Hidden)
      }
      .width('100%')
      .height(200)
      .backgroundColor('#f5f5f5')
      .borderRadius(8);

      // 图片尺寸信息展示
      if (this.imgInfo) {
        Text(this.imgInfo)
          .fontSize(14)
          .fontColor('#666')
          .margin({ top: 10 });
      }
    }
    .width('100%')
    .height('100%')
    .padding(20)
    .backgroundColor('#F5F5F5')
    .justifyContent(FlexAlign.Center);
  }
}
运行效果
| Image加载失败 | Image加载成功 |
|---|---|
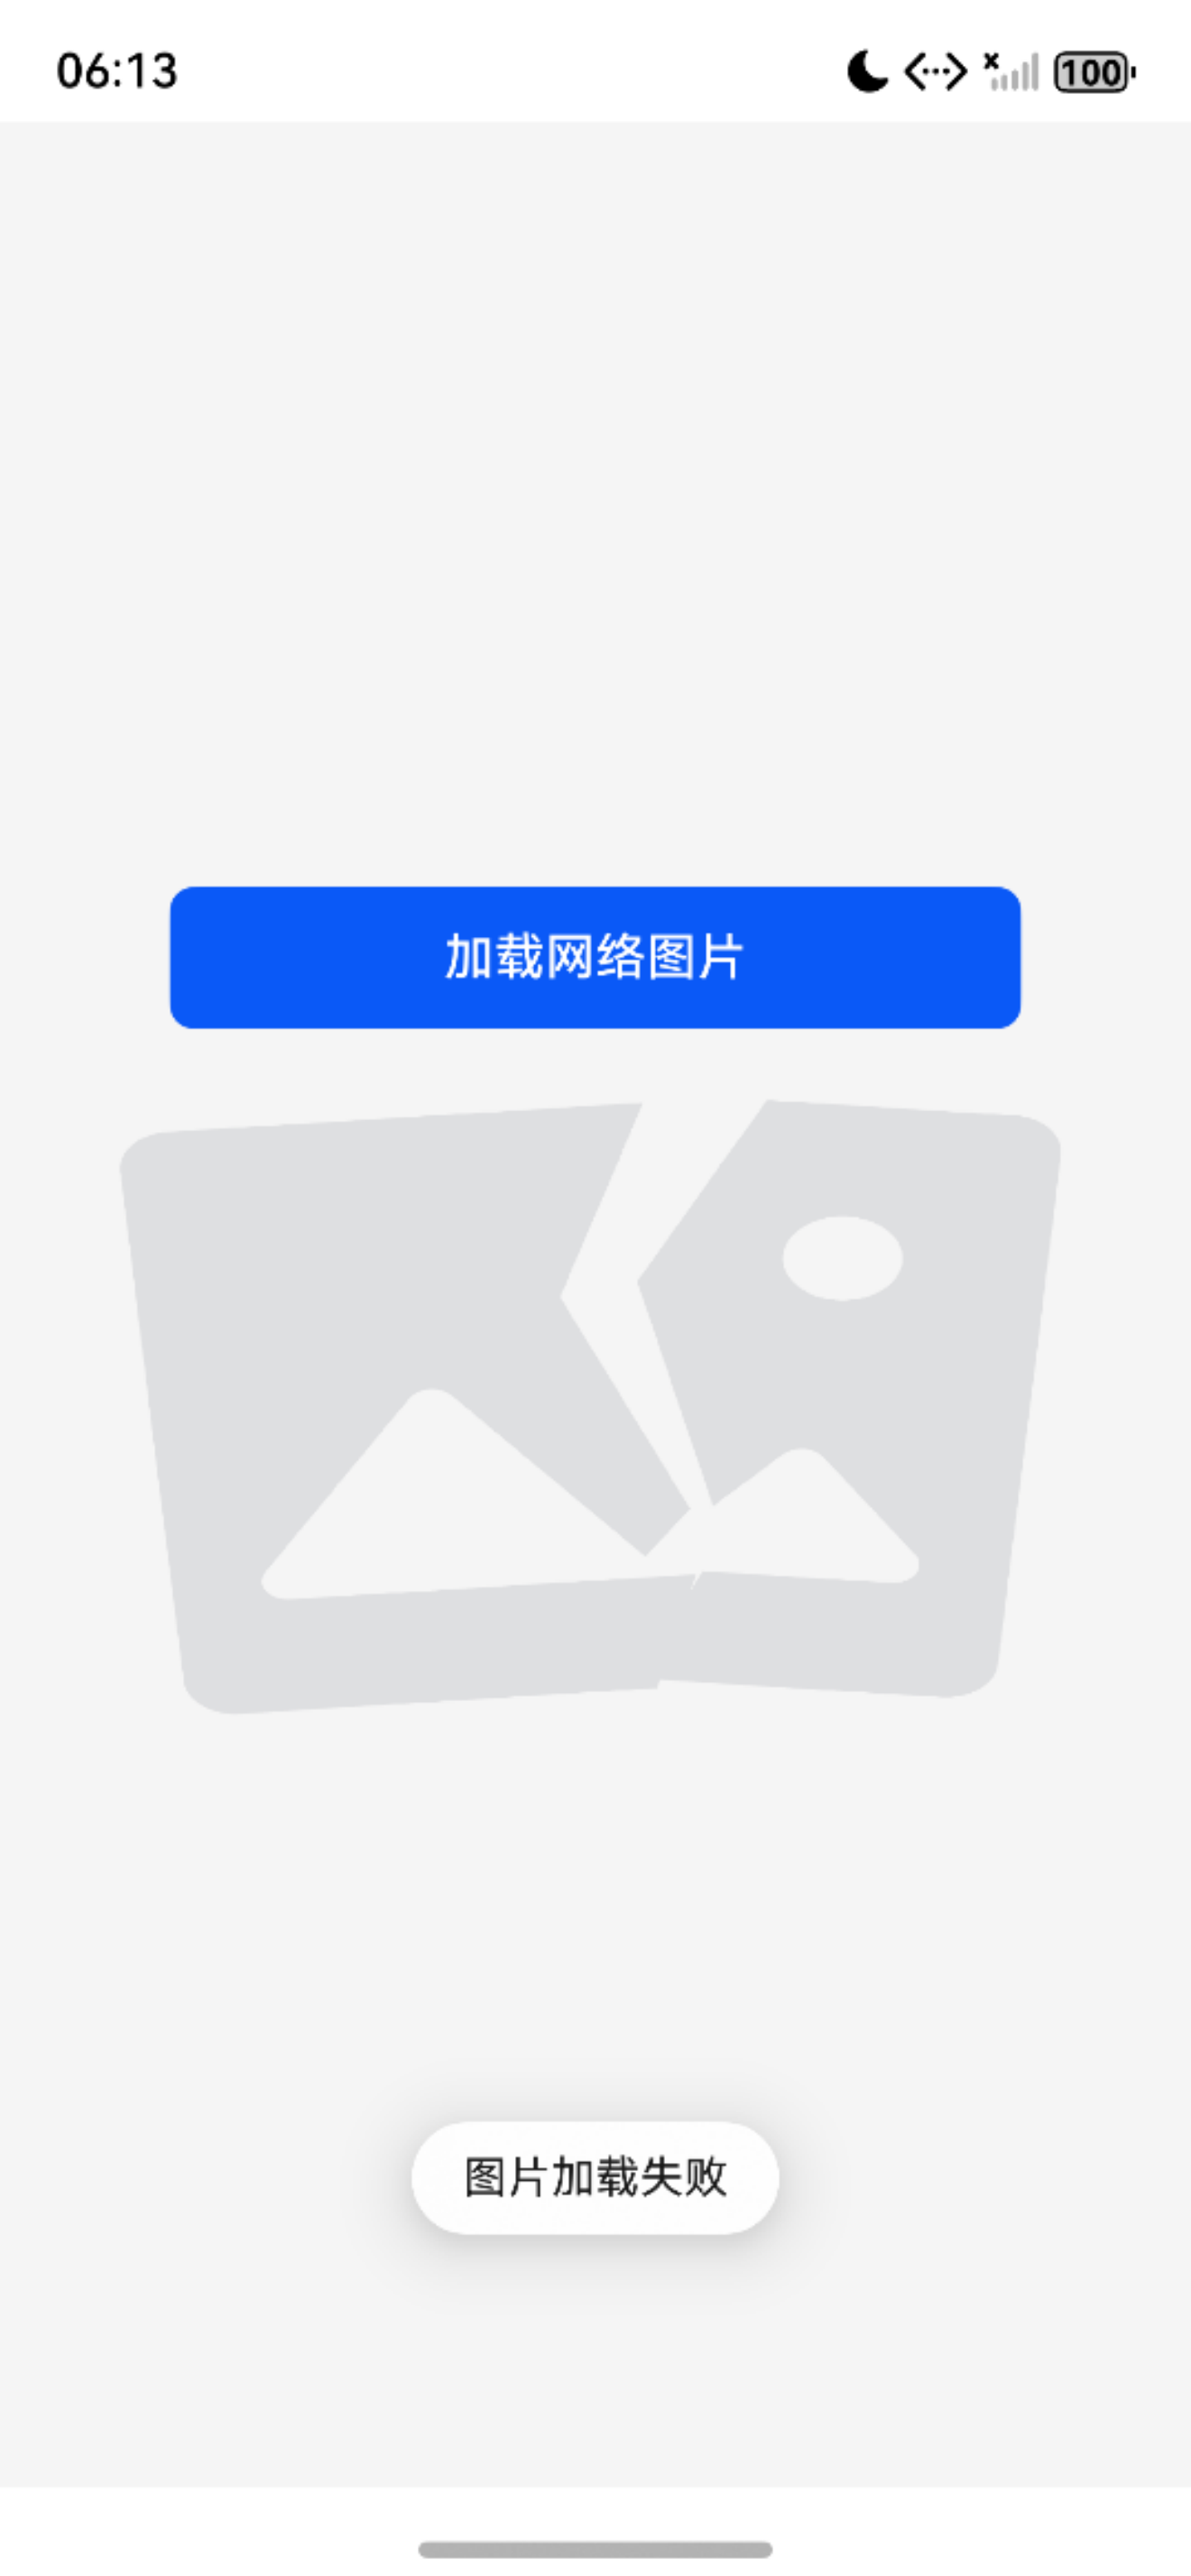 |
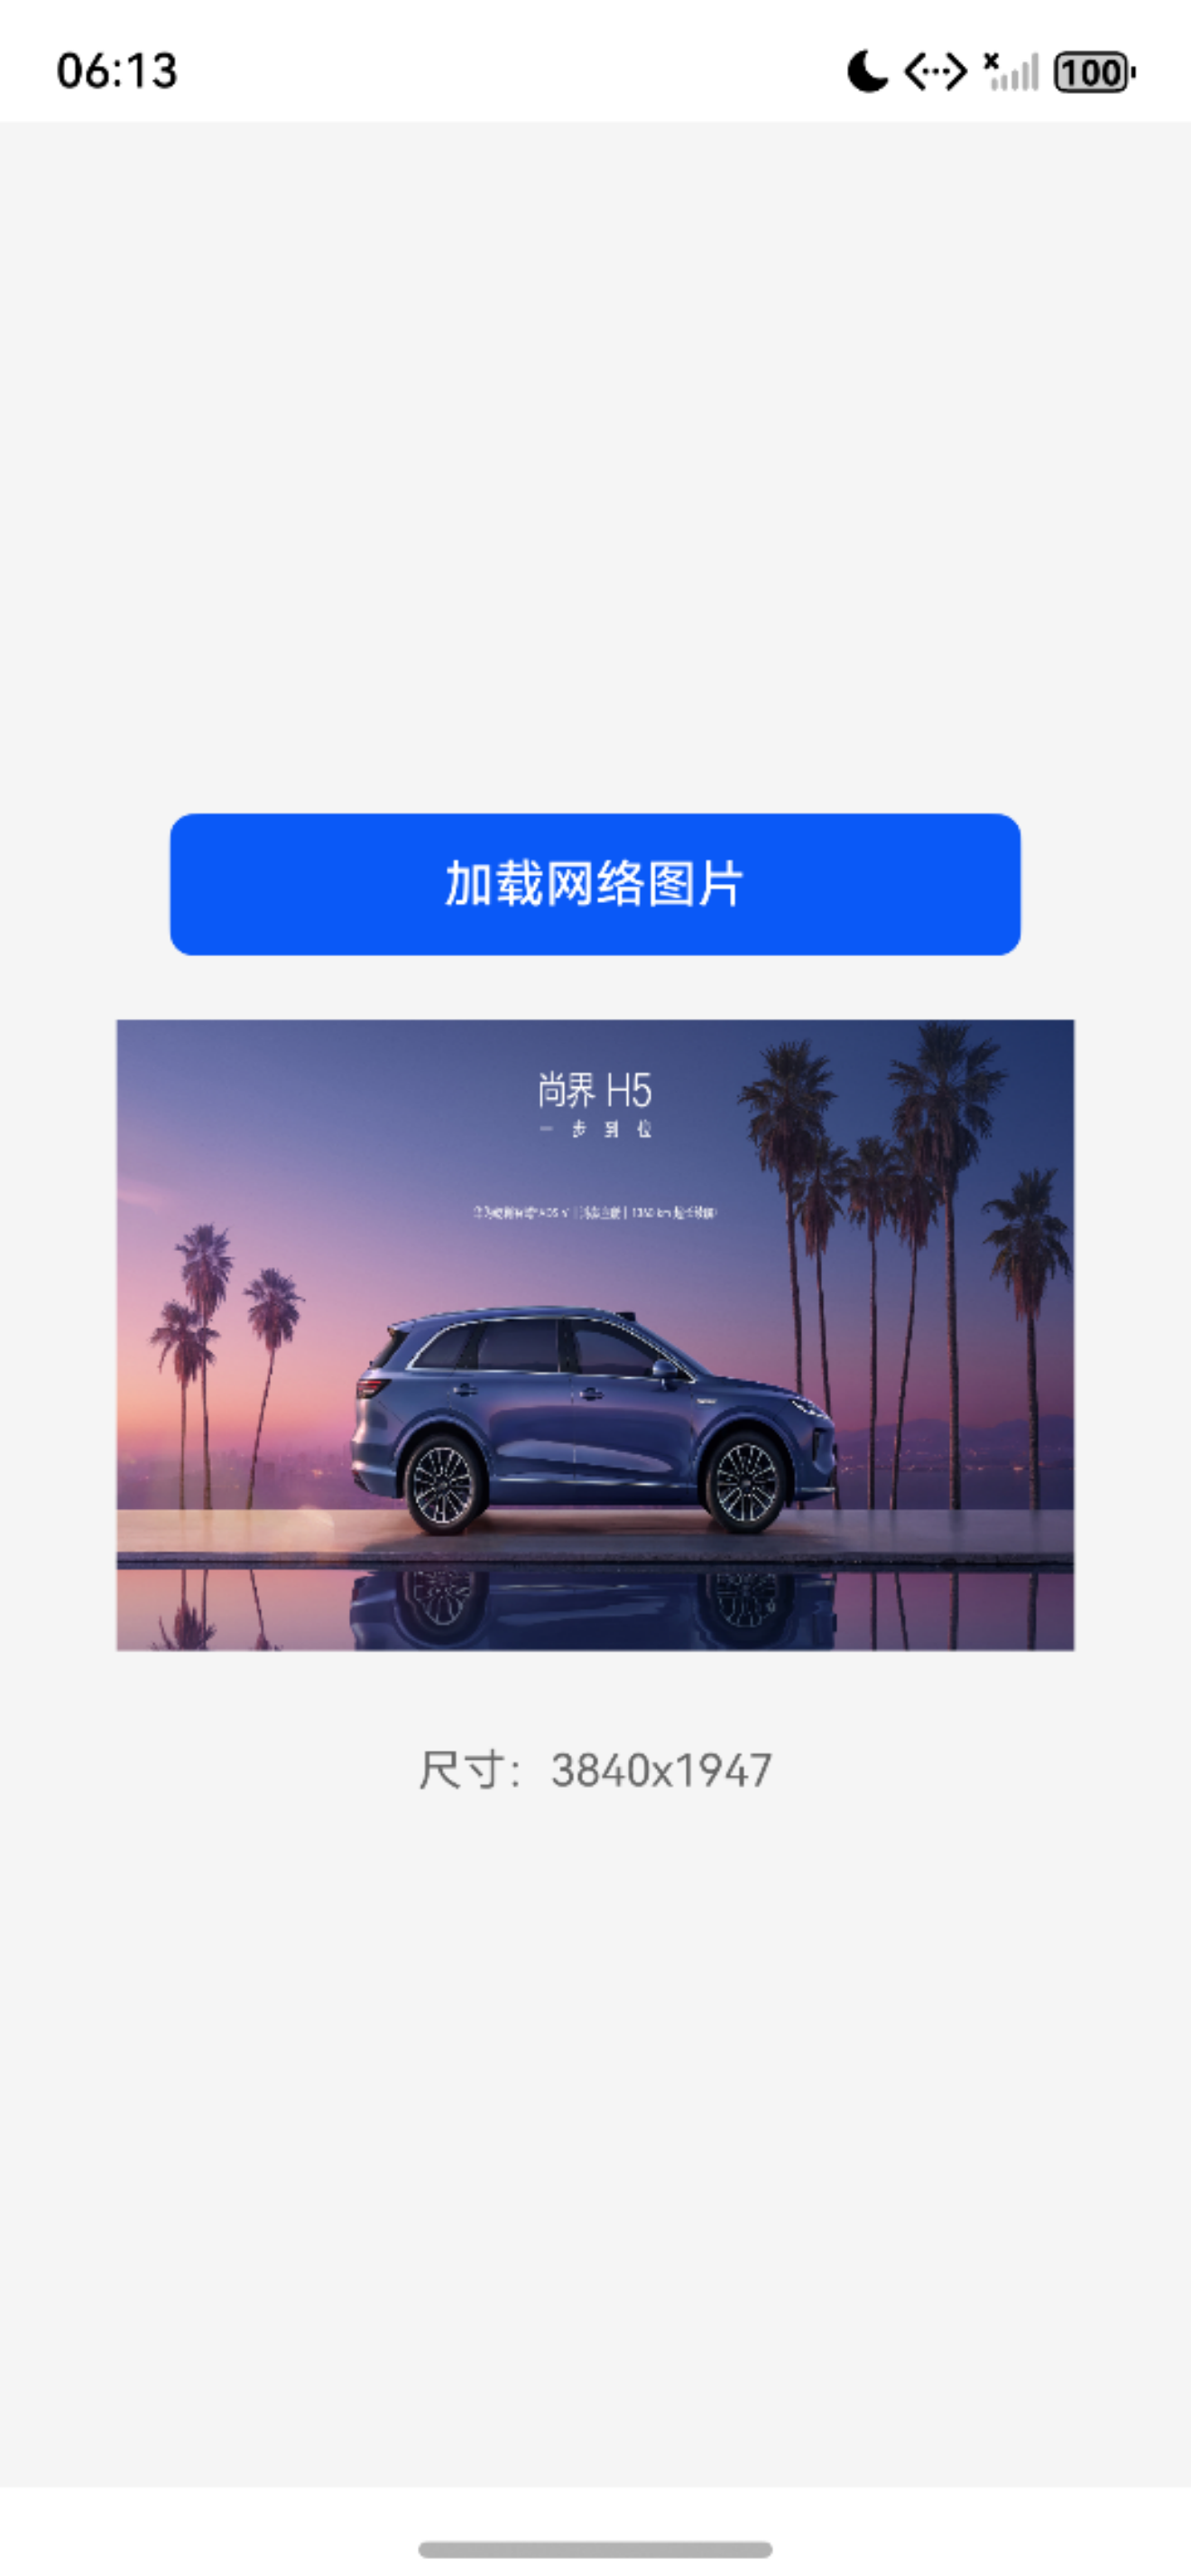 |
四、进阶功能实战
4.1 分层图片(LayeredImagePage.ets)
实现图片叠加效果(如背景+水印、头像+徽章):
import {
  DrawableDescriptor,
  LayeredDrawableDescriptor,
} from '@kit.ArkUI';
@Entry
@Component
struct LayeredImagePage {
  @State layeredDesc: LayeredDrawableDescriptor | null = null;
  aboutToAppear(): void {
    this.createLayeredDrawable()
  }
  // 创建分层图片
  async createLayeredDrawable() {
    try {
      // 获取前景和背景PixelMap 合成默认的Appicon
      const foreground = await this.getDrawableDescriptor($r('app.media.foreground'));
      const background = await this.getDrawableDescriptor($r('app.media.background'));
      if (foreground && background) {
        // 创建分层描述符
        this.layeredDesc = new LayeredDrawableDescriptor(
          foreground, // 前景
          background    // 背景
        );
      }
    } catch (err) {
      console.error(`创建分层图片失败:${err.message}`);
    }
  }

  // 辅助方法:获取DrawableDescriptor
  private async getDrawableDescriptor(resource: Resource): Promise<DrawableDescriptor | null> {
    try {
      const resManager = this.getUIContext().getHostContext()?.resourceManager;
      if (!resManager) {
        return null;
      };
      return resManager.getDrawableDescriptor(resource.id)
    } catch (error) {
      return null
      // TODO: Implement error handling.
    }
  };

  build() {
    Column({ space: 20 }) {
      Image(this.layeredDesc)
        .width(200)
        .height(200)
        .objectFit(ImageFit.Cover)
        .borderRadius(8);
    }
    .width('100%')
    .height('100%')
    .padding(20)
    .backgroundColor('#F5F5F5')
    .justifyContent(FlexAlign.Center);
  }
}
运行效果
| 前景图(透明背景) | 背景图 | 合成后 |
|---|---|---|
 |
 |
 |
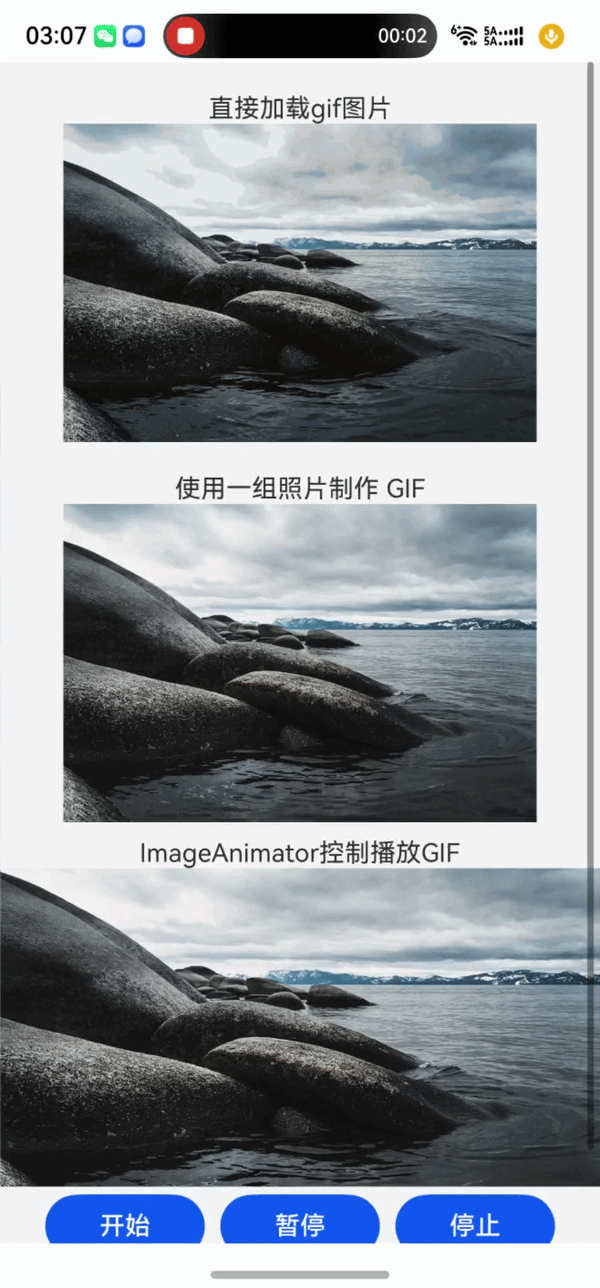
4.2 多帧动画图片(AnimatedImagePage.ets)
- Image直接加载gif格式图片。
- 通过一组图片获取PixelMap图片资源利用AnimatedDrawableDescriptor加载动画
- 通过一组图片获取PixelMap利用ImageAnimator组件加载可控动图
- 通过
image.PackingOptionsForSequence和image.createImagePacker生成gif并保存到沙盒
import { AnimatedDrawableDescriptor, AnimationOptions, promptAction } from '@kit.ArkUI';
import { image } from '@kit.ImageKit';
import { fileIo as fs } from '@kit.CoreFileKit';
@Entry
@Component
struct AnimatedImagePage {
@State animatedDesc: AnimatedDrawableDescriptor | null = null;
@State images: Array<ImageFrameInfo> = [];
@State state: AnimationStatus = AnimationStatus.Initial;
@State reverse: boolean = false;
@State iterations: number = 1;
private pixelMapList:image.PixelMap[] = []
// 动画配置持续10秒动画,无限循环 自动播放
private animationOptions: AnimationOptions = {
duration: 10000,
iterations: -1, // 无限循环
autoPlay: true
};
/**
* 将PixelMap数组打包为GIF文件
* @param pixelMapList 多帧PixelMap数组
* @param frameDelay 每帧延迟时间(ms),默认10ms
* @returns 是否保存成功
*/
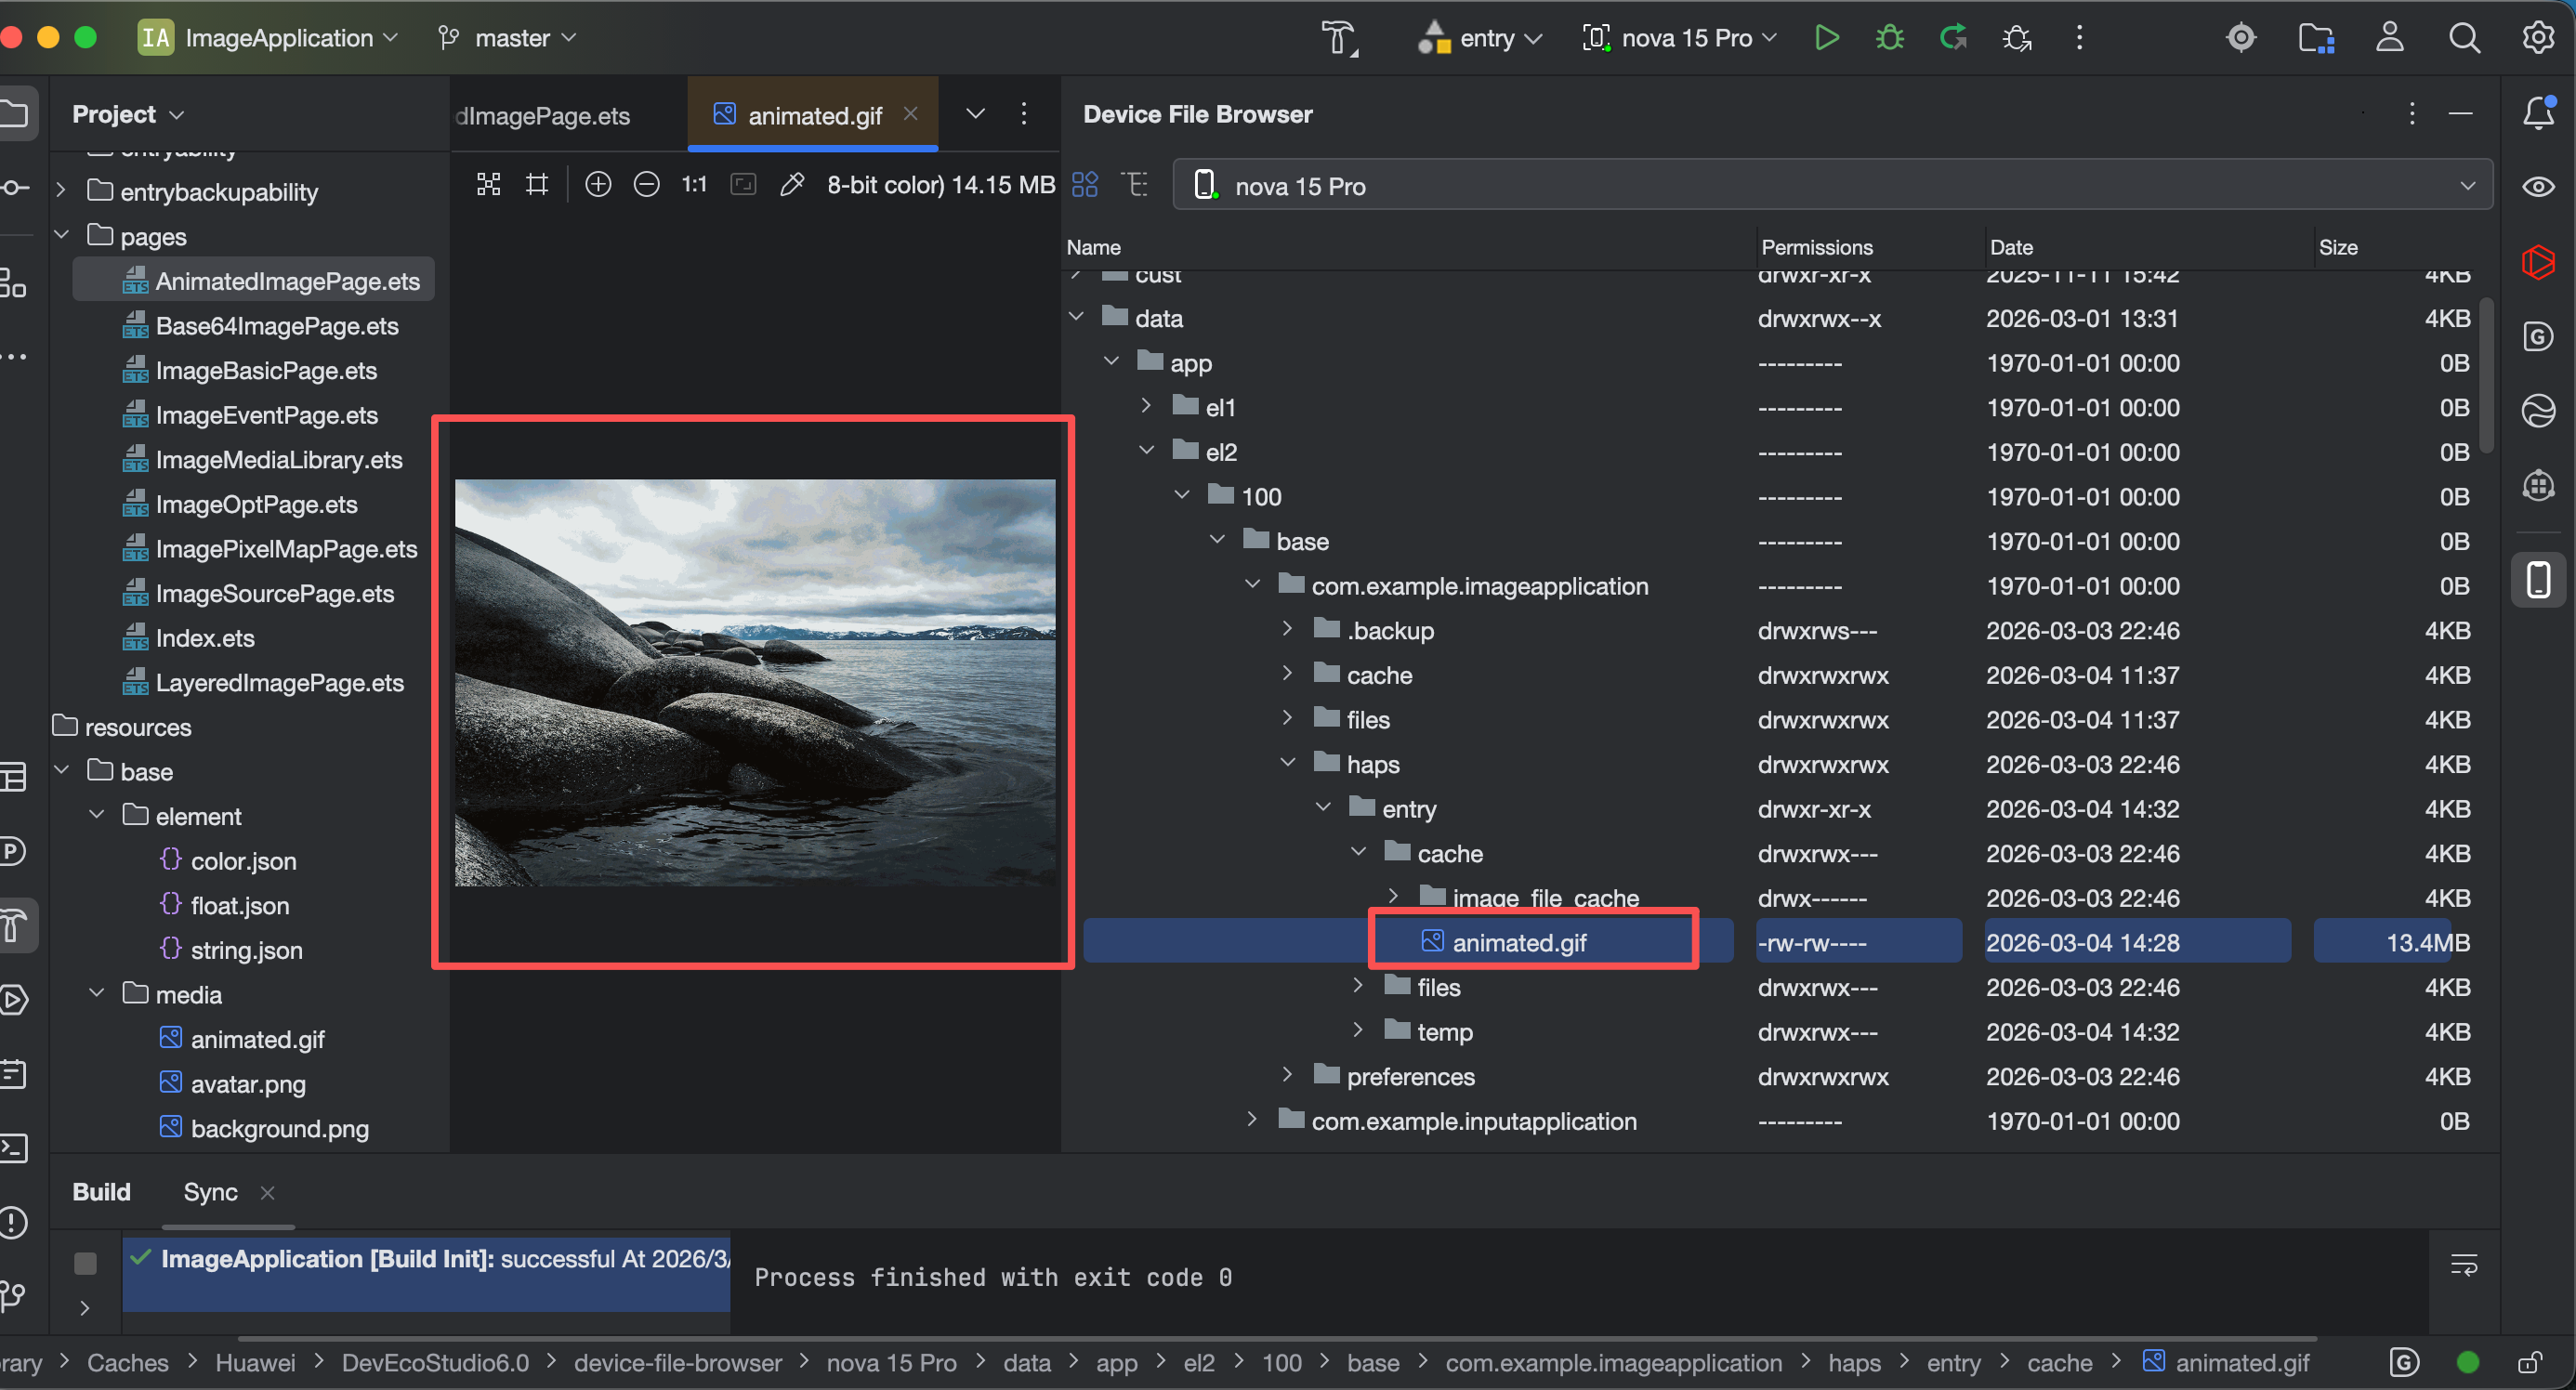
async savePixelMapsToGif(
pixelMapList: image.PixelMap[],
frameDelay: number = 10
): Promise<boolean> {
// 前置校验:空值/空数组直接返回失败
if (!pixelMapList || pixelMapList.length === 0) {
promptAction.showToast({ message: 'GIF帧数据为空' });
return false;
}
// 1. 构建私有缓存目录路径
const hostContext = this.getUIContext().getHostContext();
if (!hostContext) {
promptAction.showToast({ message: '上下文获取失败' });
return false;
}
const dirPath = hostContext.cacheDir;
if (!dirPath) {
promptAction.showToast({ message: '存储路径异常' });
return false;
}
const filePath = `${dirPath}/animated.gif`;
let imagePacker: image.ImagePacker | undefined;
let file: fs.File | undefined;
try {
// 2. 创建并打开文件且重名覆盖
file = fs.openSync(filePath, fs.OpenMode.CREATE | fs.OpenMode.READ_WRITE | fs.OpenMode.TRUNC);
if (!file.fd) {
promptAction.showToast({ message: '文件打开失败' });
return false;
}
/**
* frameCount: 有多少帧动画
* delayTimeList:每帧延迟多少毫秒
* disposalTypes:每帧模式
* loopCount:0=无限循环,1=播放1次,>0=指定循环次数
* 在项目工程中推荐使用全局常量方便维护修改,我这里为了省事直接写数字了。
* delayTimeList disposalTypes 都是数组可以针对单独每一帧做具体数据,也可以使用同一数组处理。
* 1 保留模式:当前帧保留,下一帧直接叠加绘制
* 2 清除背景:显示下一帧前,将当前帧区域恢复为背景色
* 3 恢复上一帧:显示下一帧前,将画布恢复到前一帧状态
*/
// 3. 配置GIF序列打包参数
const frameCount = pixelMapList.length;
const options: image.PackingOptionsForSequence = {
frameCount: frameCount, // 帧数
delayTimeList: [frameDelay], // 每帧延迟时间(ms)
disposalTypes: [3], // 帧处理方式 3:将画布恢复到前一帧状态
loopCount: 0 // 0=无限循环,1=播放1次,>1 指定循环次数
};
// 4. 创建图像打包器并编码
imagePacker = image.createImagePacker();
await imagePacker.packToFileFromPixelmapSequence(
pixelMapList,
file.fd,
options
);
promptAction.showToast({ message: `GIF保存成功(${frameCount}帧)`, duration: 2000 });
if (imagePacker) {
imagePacker.release()
}
return true;
} catch (error) {
// 详细错误捕获
const err = error as BusinessError;
promptAction.showToast({ message: `GIF保存失败:${err.message}`, duration: 2000 });
return false;
} finally {
// 关闭文件
if (file && file.fd) {
fs.closeSync(file);
}
}
}
// 创建多帧动画
async createAnimatedDrawable() {
try {
for (let index = 8999; index <= 9045; index++) {
const pixelMap = await this.getPixelMapFromImages(`images/IMG_${index}.jpg`);
if (pixelMap) {
this.pixelMapList.push(pixelMap)
this.images.push({ src: this.pixelMapList[this.pixelMapList.length-1] });
}
}
// 创建动画描述符
this.animatedDesc = new AnimatedDrawableDescriptor(this.pixelMapList,this.animationOptions);
await this.savePixelMapsToGif(this.pixelMapList,15)
} catch (err) {
console.error(`创建动画失败:${err.message}`);
}
}
// 从rawfile获取PixelMap
private async getPixelMapFromImages(path: string): Promise<image.PixelMap | null> {
try {
// 1. 空值校验:确保resourceMgr存在
const resourceMgr = this.getUIContext().getHostContext()?.resourceManager;
if (!resourceMgr) {
console.error("获取ResourceManager失败");
return null;
}
const unit8Array = await this.getUIContext().getHostContext()?.resourceManager.getRawFileContent(path);
if (!unit8Array) {
return null;
};
// 3. 创建ImageSource
const imageSource = image.createImageSource(unit8Array.buffer.slice(0, unit8Array.buffer.byteLength));
const imageInfo = await imageSource.getImageInfo(0);
console.log(`[${path}] 宽:${imageInfo.size.width} 高:${imageInfo.size.height}`);
const decodingOptions: image.DecodingOptions = {
desiredPixelFormat: image.PixelMapFormat.RGBA_8888
};
const pixelMap = await imageSource.createPixelMap(decodingOptions);
await imageSource.release();
return pixelMap
} catch (error) {
console.error('创建失败:', (error as BusinessError).message);
return null
// TODO: Implement error handling.
}
}
aboutToAppear(): void {
this.createAnimatedDrawable()
}
aboutToDisappear(): void {
this.pixelMapList.forEach((pm)=>{
pm.release()
})
}
build() {
Scroll(){
Column() {
Text("直接加载gif图片")
.margin({ top: 20 })
Image($r('app.media.animated'))
.width('100%')
.height(200)
.objectFit(ImageFit.Contain)
Text('使用一组照片制作 GIF')
.margin({ top: 20 })
Image(this.animatedDesc)
.width('100%')
.height(200)
.alt($rawfile('images/IMG_8999.jpg'))
.objectFit(ImageFit.Contain)
Text('ImageAnimator控制播放GIF')
.margin({ top: 10 })
ImageAnimator()
.images( this.images)
.duration(10000)
.state(this.state)
.reverse(this.reverse)
.fillMode(FillMode.None)
.iterations(this.iterations)
.width('100%')
.height(200)
.onStart(() => {
console.info('开始');
})
.onPause(() => {
console.info('暂停');
})
.onRepeat(() => {
console.info('重复');
})
.onCancel(() => {
console.info('取消');
})
.onFinish(() => {
console.info('完成');
this.state = AnimationStatus.Stopped;
})
Row() {
Button('开始').width(100).padding(5).onClick(() => {
this.state = AnimationStatus.Running;
}).margin(5)
Button('暂停').width(100).padding(5).onClick(() => {
this.state = AnimationStatus.Paused; // 显示当前帧图片
}).margin(5)
Button('停止').width(100).padding(5).onClick(() => {
this.state = AnimationStatus.Stopped; // 显示动画的起始帧图片
}).margin(5)
}
Row() {
Button('反向播放').padding(5).onClick(() => {
this.reverse = !this.reverse;
}).margin(5)
Button('播放一次').padding(5).onClick(() => {
this.iterations = 1;
}).margin(5)
Button('无限循环').padding(5).onClick(() => {
this.iterations = -1; // 无限循环播放
}).margin(5)
}
}
.width('100%')
.justifyContent(FlexAlign.Center);
}
.width('100%')
.height('100%')
.backgroundColor('#F5F5F5')
}
}
运行效果
检查合成gif图片
五、性能优化与最佳实践
5.1 核心优化点
(1)大图片解码优化:按需解码降低内存占用
核心逻辑:
- 通过
sourceSize指定图片解码尺寸(单位:vp,鸿蒙虚拟像素),系统会根据设备像素倍率(densityPixels)自动将vp转换为物理像素(px),仅在目标尺寸小于原图尺寸时生效(不支持放大解码); - 配合
ImageFit.None可让图片保持解码后的原始尺寸显示(不拉伸、不缩放、居中展示),直观验证解码效果。
使用注意: - 支持场景:网络图片、本地图片(
app.media/rawfile); - 不支持场景:SVG格式图片、PixelMap像素对象、动图(AnimatedDrawableDescriptor)。
(2)内存缓存优化:设置解码图片缓存上限
| 接口名称 | 作用说明 | 推荐配置值 |
|---|---|---|
setImageCacheCount |
解码后图片的内存缓存数量上限 | 100(根据业务调整) |
setImageRawDataCacheSize |
解码前图片原始二进制数据的内存缓存上限 | 20MB(1024*1024*20) |
setImageFileCacheSize |
磁盘上解码前图片文件的缓存大小上限 | 50MB(1024*1024*50) |
(3)示例代码
import { App, display } from '@kit.ArkUI';
@Entry
@Component
struct ImageOptPage {
aboutToAppear() {
// 缓存优化:按APP业务场景调整,避免缓存过大导致内存溢出
App.setImageCacheCount(100); // 解码后图片的缓存数量上限:100张
App.setImageRawDataCacheSize(1024 * 1024 * 20); // 解码前原始数据缓存上限:20MB
App.setImageFileCacheSize(1024 * 1024 * 50); // 磁盘文件缓存上限:50MB
}
build() {
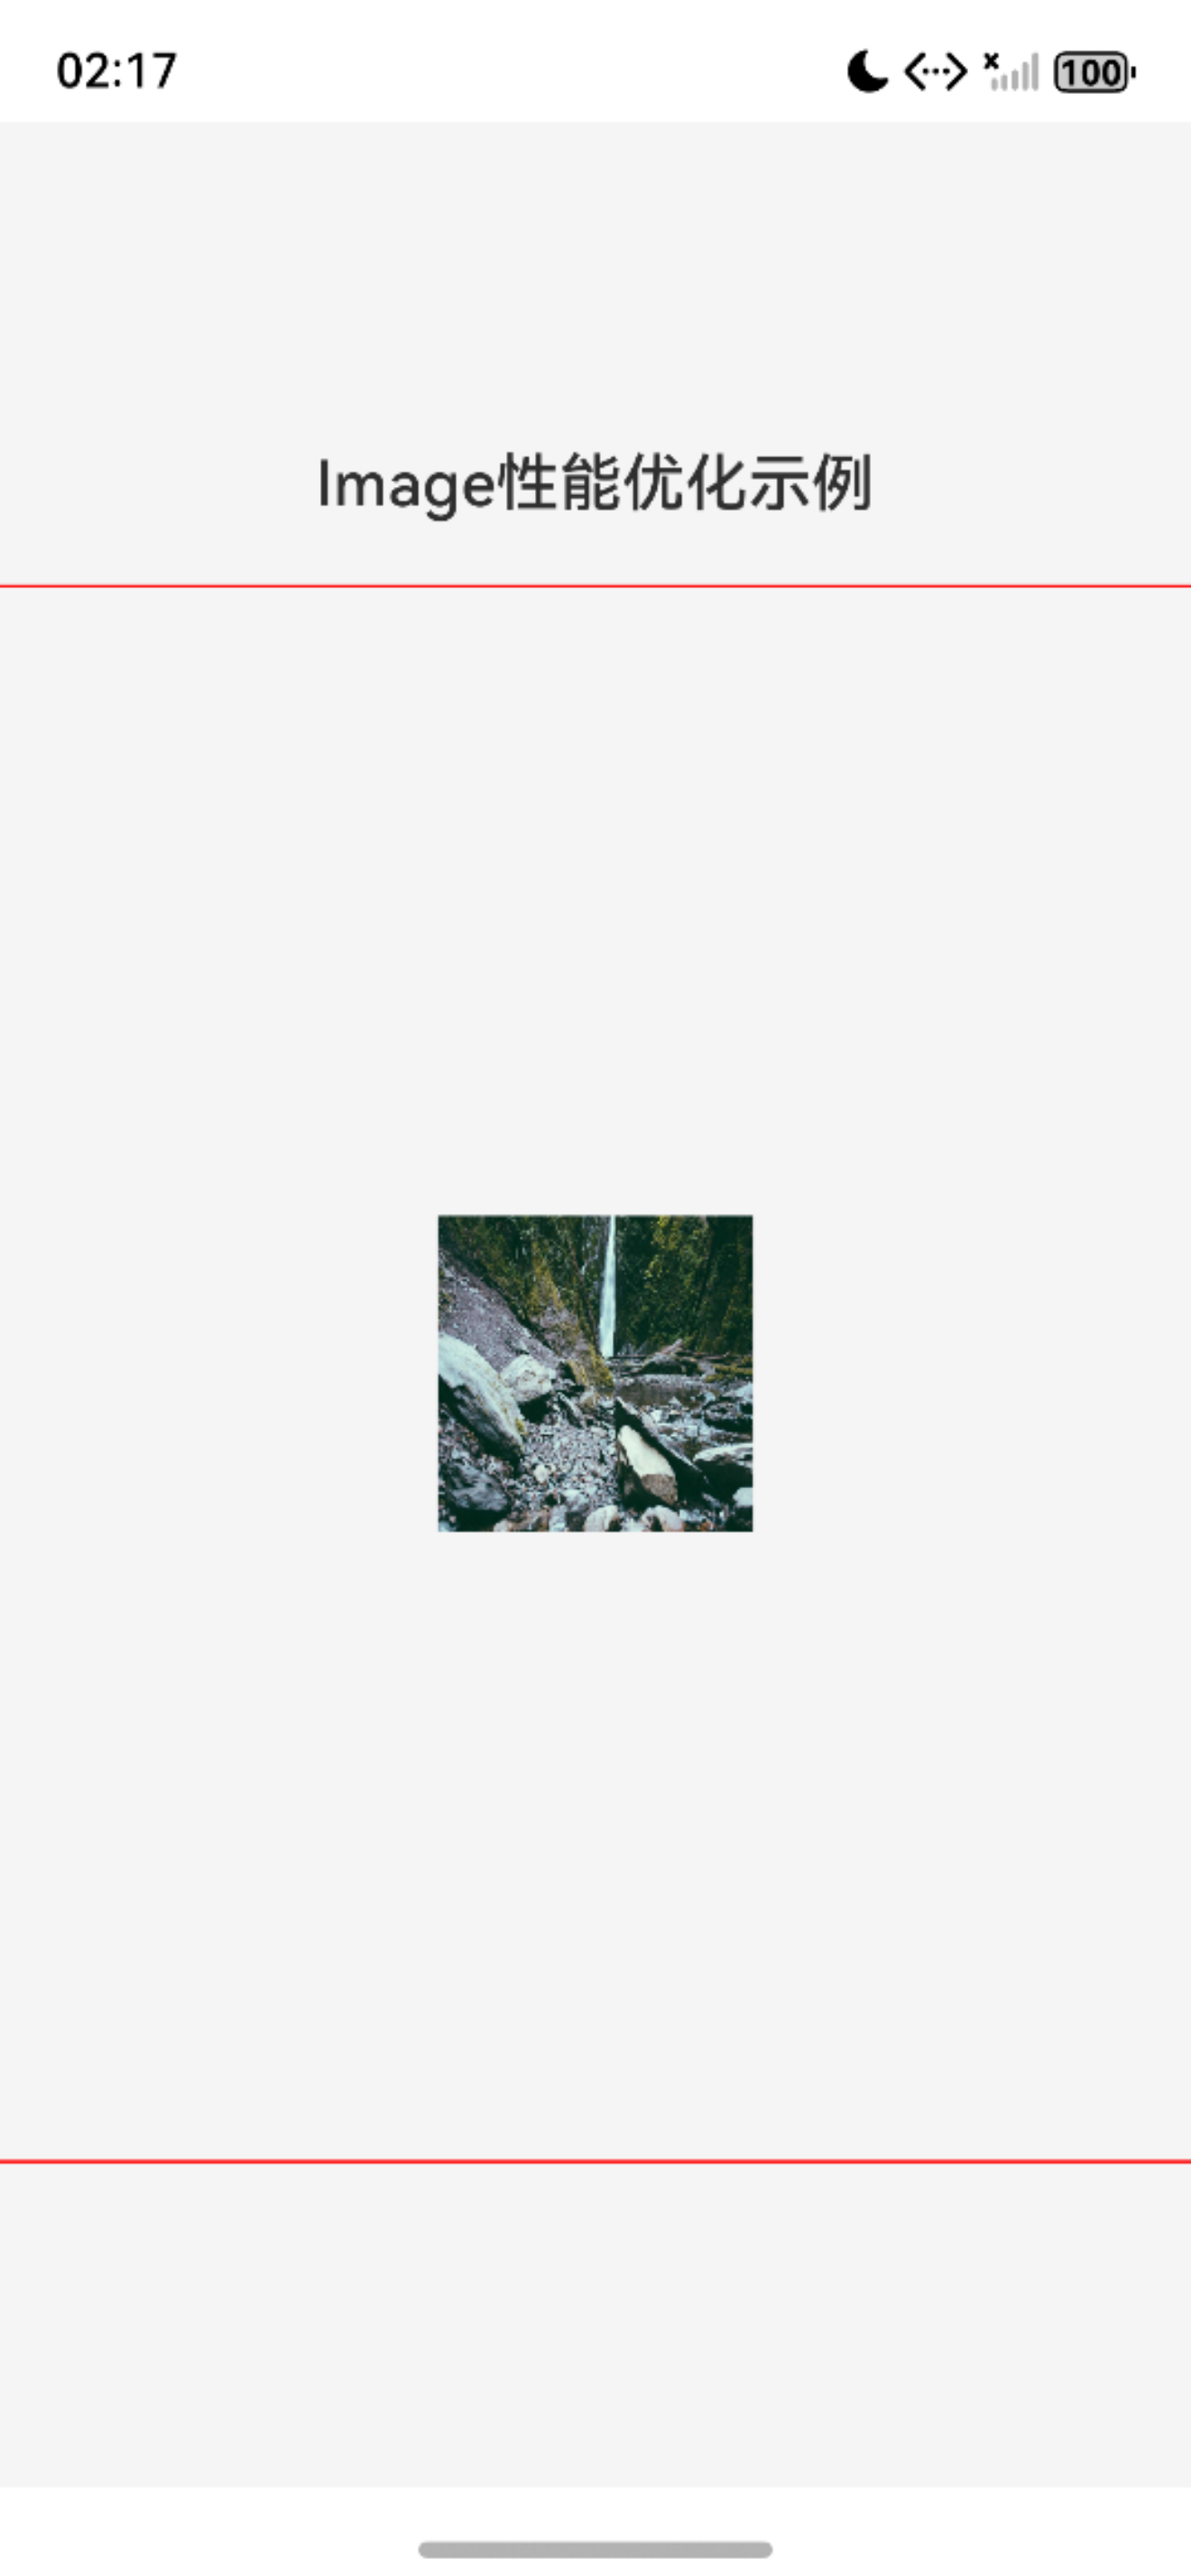
Column({ space: 20 }) {
Text("Image性能优化示例")
.fontSize(20)
.fontWeight(FontWeight.Medium);
// 1920×1080px 高清网络图
Image('https://picsum.photos/id/15/1920/1080')
.width(500) // 固定组件宽度(vp),避免父布局拉伸
.height(500) // 固定组件高度(vp)
.border({ width: 1, color: '#ff0000' }) // 红色边框,可视化容器范围
.onComplete((event)=>{
console.log("onComplete:" + JSON.stringify(event));
// 手动计算解码后真实尺寸(增加异常兜底)
let pixelRatio = 1.0;
try {
pixelRatio = display.getDefaultDisplaySync().densityPixels;
} catch (err) {
console.warn('获取设备像素倍率失败:', err);
}
console.log("sourceSize配置尺寸(vp):100×100");
console.log("手动计算解码后物理像素(px):", 100*pixelRatio + "×" + (100*pixelRatio));
// contentWidth/height单位为px,数值等价于100vp×设备倍率
console.log(`实际解码后显示尺寸(px) width:${event?.contentWidth} height:${event?.contentHeight}` );
})
.onError(() => {
console.error('图片加载失败,显示兜底图');
})
.sourceSize({ width: 100, height: 100 }) // 核心:按需解码(vp)
.objectFit(ImageFit.None) // 保持解码后原始尺寸,不缩放
.syncLoad(false) // 异步加载,禁止设置为true(避免阻塞UI)
.alt($r('app.media.loading')); // 加载失败/中占位图
}
.width('100%')
.height('100%')
.backgroundColor('#F5F5F5')
.justifyContent(FlexAlign.Center);
}
}
(4)运行结果与日志
// onComplete回调:核心参数释义
onComplete:{
  "width":1920,          // 原图物理像素宽度(px)
  "height":1080,         // 原图物理像素高度(px)
  "componentWidth":1750, // 组件最终渲染宽度(px)500vp×3.5倍 = 1750px
  "componentHeight":1750,// 组件最终渲染高度(px)500vp×3.5倍 = 1750px
  "loadingStatus":1,     // 加载状态:1=成功,0=失败
  "contentWidth":350,    // 解码后图片显示宽度(px)=100vp×3.5(设备倍率)
  "contentHeight":350,   // 解码后图片显示高度(px)=100vp×3.5(设备倍率)
  "contentOffsetX":700,  // 水平居中偏移:(1750-350)/2=700(px)
  "contentOffsetY":700   // 垂直居中偏移:(1750-350)/2=700(px)
}

// 解码尺寸验证(核心结论:sourceSize生效)
sourceSize配置尺寸(vp):100×100
手动计算解码后物理像素(px): 350×350
实际解码后显示尺寸(px)width:350height:350
(5)其他优化规则
- 内存管理:使用
PixelMap/ImageSource后,需在aboutToDisappear中调用release()释放资源,避免内存泄漏; - 异步加载:
syncLoad保持默认false,禁止对大图设置syncLoad=true(会阻塞UI线程); - 缓存策略:简单场景使用系统默认缓存即可,复杂场景(实现自主可控的缓存管理)推荐使用开源库 ImageKnifePro;
5.2 常见问题解决方案
| 问题现象 | 根因分析 | 可落地解决方案 |
|---|---|---|
| 图片加载白块 | 异步加载未设置占位、图片解码耗时过长 | 1. 必配alt属性设置加载中/失败占位图;2. 首屏图片通过 ImageSource提前预解码;3. 用 sourceSize降低解码尺寸减少耗时 |
| 内存泄漏 | PixelMap/ImageSource未释放、数据源未清空 | 1. 页面销毁时调用pixelMap.release()/imageSource.release();2. aboutToDisappear中清空图片相关状态变量;3. 禁止全局存储PixelMap对象 |
| 网络图片加载失败 | 未声明网络权限、网络异常、URL无效/过期 | 1. 在module.json5中声明ohos.permission.INTERNET权限;2. 增加 onError回调,显示兜底图;3. 结合 @kit.NetworkKit做网络状态检测 |
| SVG图标改色无效 | 渲染模式错误、改色属性错误、非单色SVG | 1. 必须设置renderMode(ImageRenderMode.Template);2. 使用 fillColor改色(而非backgroundColor);3. 确保SVG文件为单色矢量格式(无内置填充色) |
| sourceSize不生效 | 配置尺寸大于原图、本地图片未手动解码 | 1. 确保sourceSize配置值(转px后)小于原图尺寸;2. 本地图片需通过 ImageSource手动解码(sourceSize对本地图支持有限);3. 避免组件尺寸被父布局拉伸导致换算异常 |
六、代码仓库
- 工程名称:ImageApplication
- 仓库地址:https://gitee.com/HarmonyOS-UI-Basics/harmony-os-ui-basics.git
七、下节预告
下一节我们将学习表单交互核心组件(Button / Radio / Toggle),从操作触发、单选选择、状态开关三个维度,系统掌握鸿蒙最常用的交互组件:
- 掌握 Button 四种类型、自定义样式、禁用状态与点击事件,完成提交按钮、图标按钮、组合按钮等实战;
- 理解 Radio 分组互斥原理,熟练实现单选场景(性别、支付方式、模式选择等);
- 学会 Toggle 三种形态(Switch、Checkbox、Button),用于开关、勾选、状态切换等高频场景;

作为“人工智能6S店”的官方数字引擎,为AI开发者与企业提供一个覆盖软硬件全栈、一站式门户。
更多推荐


 1
1 0
0- 0


 已为社区贡献17条内容

所有评论(0)