
Flutter for OpenHarmony:bdd_widget_test 非技术人员也能看懂的测试用例(Gherkin 行为驱动开发) 深度解析与鸿蒙适配指南
摘要: bdd_widget_test是一款基于Gherkin语法的Flutter测试框架,让非技术人员也能参与测试编写。它通过自然语言描述测试场景(如"Given-When-Then"),自动生成Dart测试代码。框架包含解析器、代码生成器和测试运行器三部分,支持内置常用步骤和自定义复杂逻辑。以计数器功能为例,展示了从编写.feature文件到生成_test.dart的完整流
欢迎加入开源鸿蒙跨平台社区:https://openharmonycrossplatform.csdn.net
前言
单元测试(Unit Test)往往只能验证函数逻辑,而 Widget 测试(Widget Test)又因为使用了大量的 expect(find.text('Login'), findsOneWidget) 等代码,对产品经理或测试人员来说如同天书。
bdd_widget_test 引入了 Gherkin 语法(Given-When-Then),让你用接近自然语言的方式描述测试场景,然后自动生成 Dart 测试代码。这不仅是文档,更是可执行的规范。
一、核心原理与 Gherkin 语法解析
1.1 Gherkin 语言:人话即代码
Gherkin 是一种用于描述软件行为的结构化语言。它的核心与实现无关,任何人都能读懂。
一个典型的 .feature 文件结构如下:
Feature: 用户登录
  为了保护我的账户安全
  作为一个注册用户
  我希望能够登录 App

  Scenario: 密码错误提示
    Given App 处于登录页面
    When 我输入用户名 "admin"
    And 我输入密码 "wrong_password"
    And 我点击 "登录" 按钮
    Then 我应该看到错误提示 "密码错误"
1.2 bdd_widget_test 的工作机制
bdd_widget_test 利用 Dart 的 build_runner 代码生成机制。
- Parse: 解析
.feature文件中的每一行 Step。 - Match: 查找对应的 Step Definition(Dart 函数)。
- 内置 Step:框架自带了
I tap {text},I see {text}等常用步骤。 - 自定义 Step:用户编写的 Dart 函数,用来处理复杂逻辑。
- 内置 Step:框架自带了
- Generate: 生成标准的
testWidgets代码文件(_test.dart)。 - Run: 使用普通的
flutter test命令运行生成的测试文件。
二、核心 API 详解与进阶用法
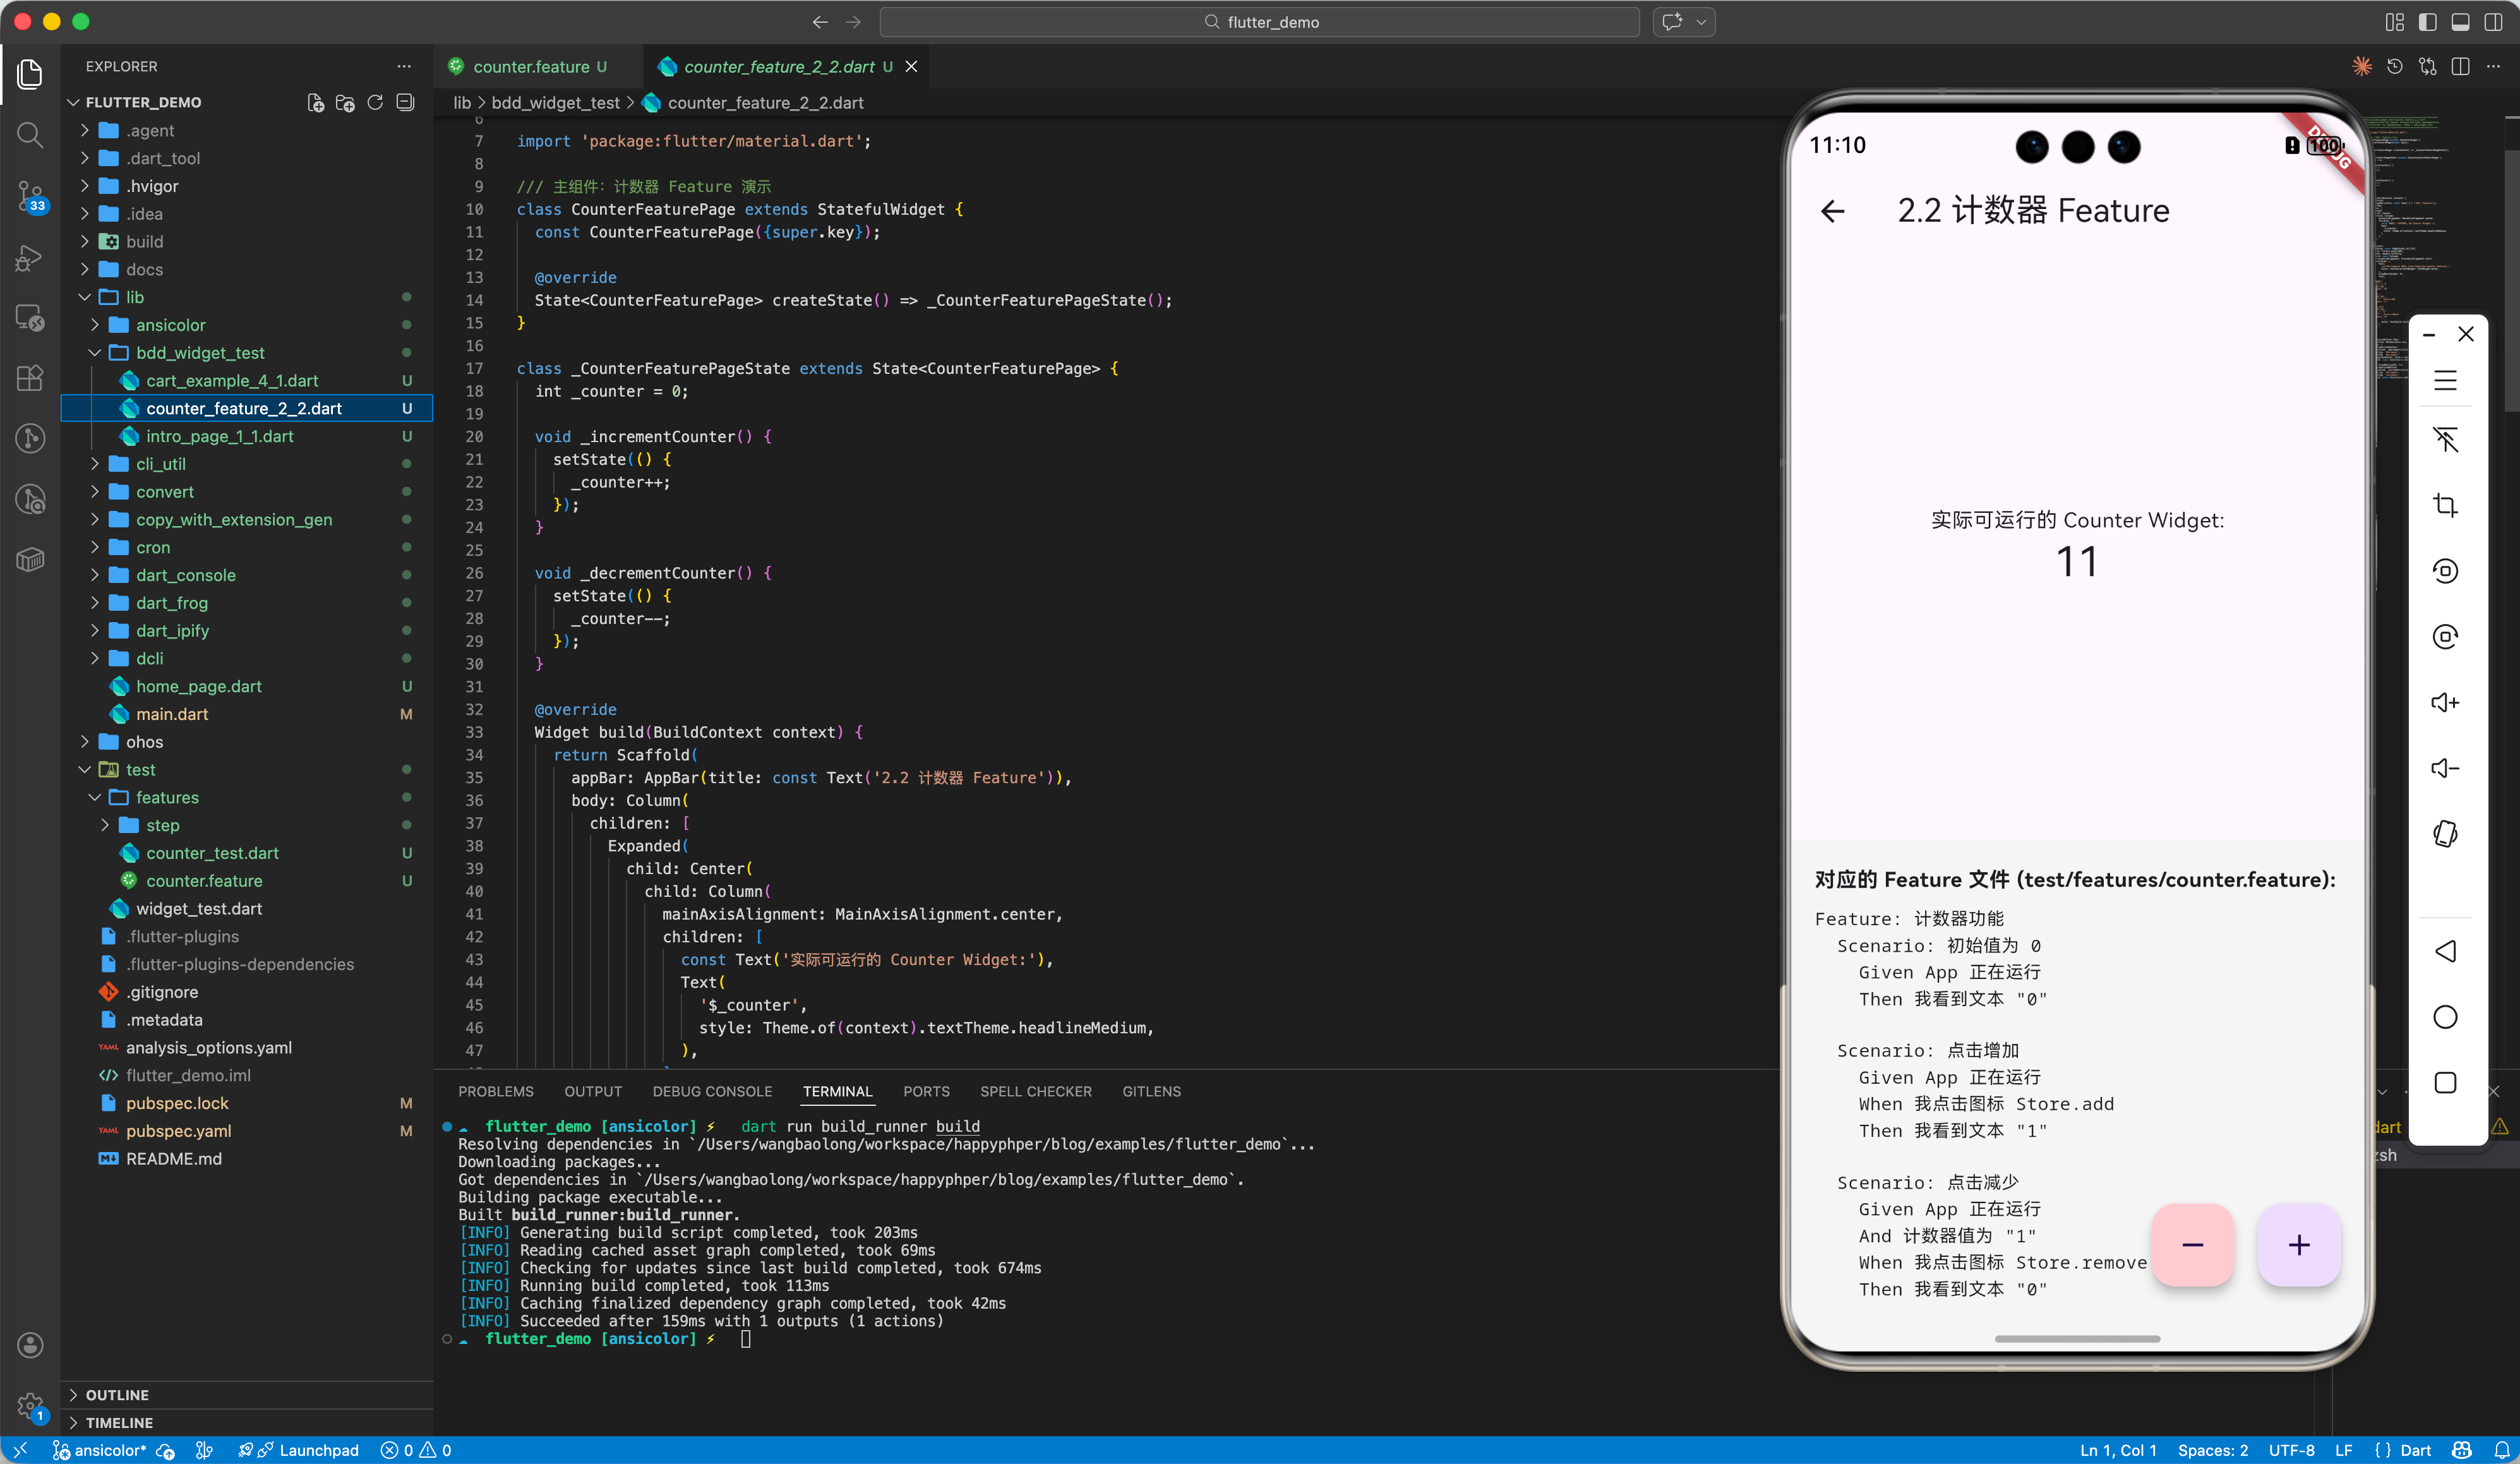
假设我们已有的功能或者即将要开发的功能如下:
import 'package:flutter/material.dart';
/// 主组件:计数器 Feature 演示
class CounterFeaturePage extends StatefulWidget {
const CounterFeaturePage({super.key});
State<CounterFeaturePage> createState() => _CounterFeaturePageState();
}
class _CounterFeaturePageState extends State<CounterFeaturePage> {
int _counter = 0;
void _incrementCounter() {
setState(() {
_counter++;
});
}
void _decrementCounter() {
setState(() {
_counter--;
});
}
Widget build(BuildContext context) {
return Scaffold(
appBar: AppBar(title: const Text('2.2 计数器 Feature')),
body: Column(
children: [
Expanded(
child: Center(
child: Column(
mainAxisAlignment: MainAxisAlignment.center,
children: [
const Text('实际可运行的 Counter Widget:'),
Text(
'$_counter',
style: Theme.of(context).textTheme.headlineMedium,
),
],
),
),
),
Container(
padding: const EdgeInsets.all(16),
color: Colors.grey[100],
width: double.infinity,
child: const Column(
crossAxisAlignment: CrossAxisAlignment.start,
children: [
Text(
'对应的 Feature 文件 (test/features/counter.feature):',
style: TextStyle(fontWeight: FontWeight.bold),
),
],
),
),
],
),
floatingActionButton: Row(
mainAxisSize: MainAxisSize.min,
children: [
FloatingActionButton(
onPressed: _decrementCounter,
tooltip: 'Decrement',
heroTag: 'decrement',
backgroundColor: Colors.red[100],
child: const Icon(Icons.remove),
),
const SizedBox(width: 16),
FloatingActionButton(
onPressed: _incrementCounter,
tooltip: 'Increment',
heroTag: 'increment',
child: const Icon(Icons.add),
),
],
),
);
}
}
2.1 依赖安装
dev_dependencies:
  build_runner: ^2.4.0
  bdd_widget_test: ^1.6.0
  flutter_test:
    sdk: flutter
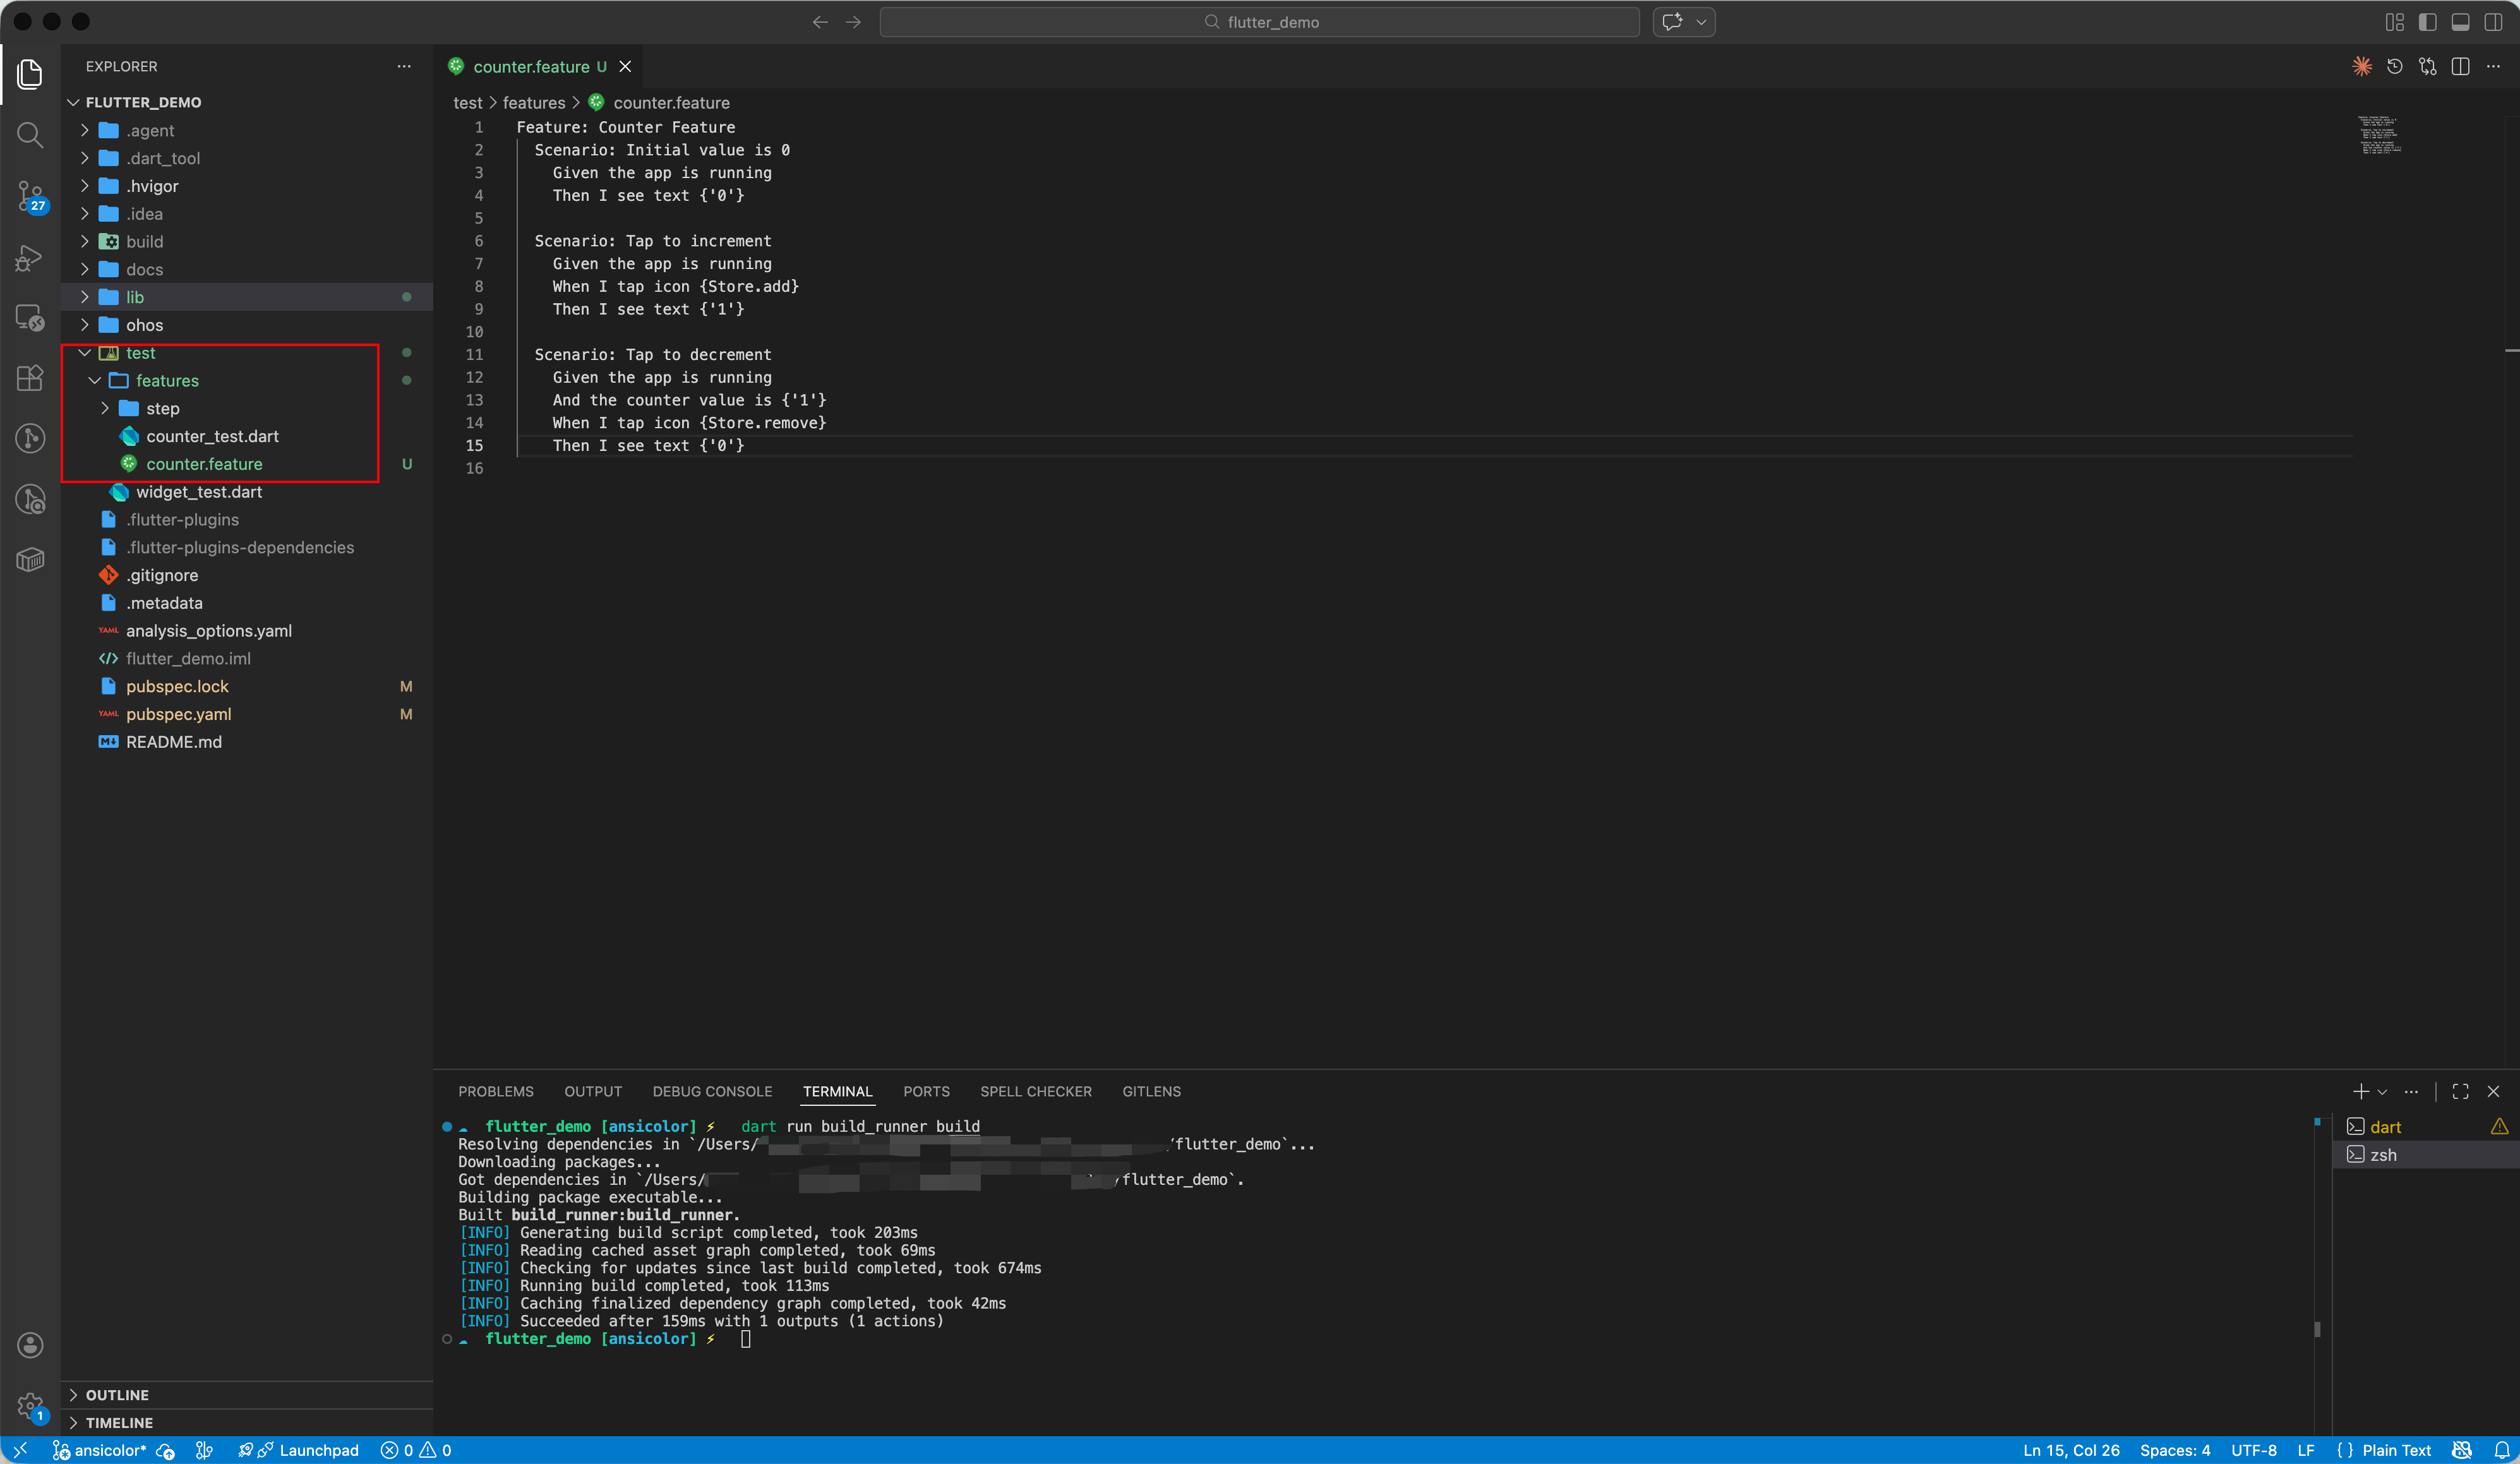
2.2 编写第一个 Feature
创建 test/features/counter.feature:
Feature: Counter Feature
  Scenario: Initial value is 0
    Given the app is running
    Then I see text {'0'}

  Scenario: Tap to increment
    Given the app is running
    When I tap icon {Store.add}
    Then I see text {'1'}

  Scenario: Tap to decrement
    Given the app is running
    And the counter value is {'1'}
    When I tap icon {Store.remove}
    Then I see text {'0'}
2.3 生成与自定义 Step
运行 dart run build_runner build,框架内置了英文 Step(如 Given the app is running),生成目录结构如下:
test/features
├── counter.feature
├── counter_test.dart
└── step
    ├── i_see_text.dart
    ├── i_tap_icon.dart
    ├── the_app_is_running.dart
    └── the_counter_value_is.dart

2 directories, 6 files
我们需要实现 Given the app is running 这个步骤。
注意: 在编写这个 Step 时,有一点至关重要:你需要启动包含该 Feature 功能的具体页面,而不是整个 App 的入口。
test/features/step/the_app_is_running.dart:
import 'package:flutter_test/flutter_test.dart';
// 引入具体的 Feature 页面
import 'package:flutter_demo/bdd_widget_test/counter_feature_2_2.dart';
import 'package:flutter/material.dart';

Future<void> theAppIsRunning(WidgetTester tester) async {
  // ❌ 错误示范:启动整个 App (可能导致找不到页面)
  // await tester.pumpWidget(MyApp());

  // ✅ 正确做法:只启动待测试的 Feature 页面
  await tester.pumpWidget(const MaterialApp(home: CounterFeaturePage()));
}
注意: 如果你在 Feature 中使用了类似 {Store.add} 的自定义参数类型,生成的测试代码可能会报错 Undefined name 'Store'。这是因为代码生成器忠实地复制了你的参数,但不知道 Store 是什么。
解决方法:创建一个简单的 Dart 类来定义这些常量。
test/features/step/store.dart:
import 'package:flutter/material.dart';

class Store {
  static const IconData add = Icons.add;
  static const IconData remove = Icons.remove;
}
然后在生成的测试代码中引入该文件即可。
此外,生成的 Step 代码默认会抛出 UnimplementedError。这是一个特性,提醒你手动实现具体的测试逻辑(“填空题”)。
test/features/step/the_counter_value_is.dart:
import 'package:flutter_test/flutter_test.dart';

import 'store.dart';

/// Usage: the counter value is {'1'}
Future<void> theCounterValueIs(WidgetTester tester, String param1) async {
  int targetValue = int.parse(param1);
  for (int i = 0; i < targetValue; i++) {
    await tester.tap(find.byIcon(Store.add));
    await tester.pump();
  }
}
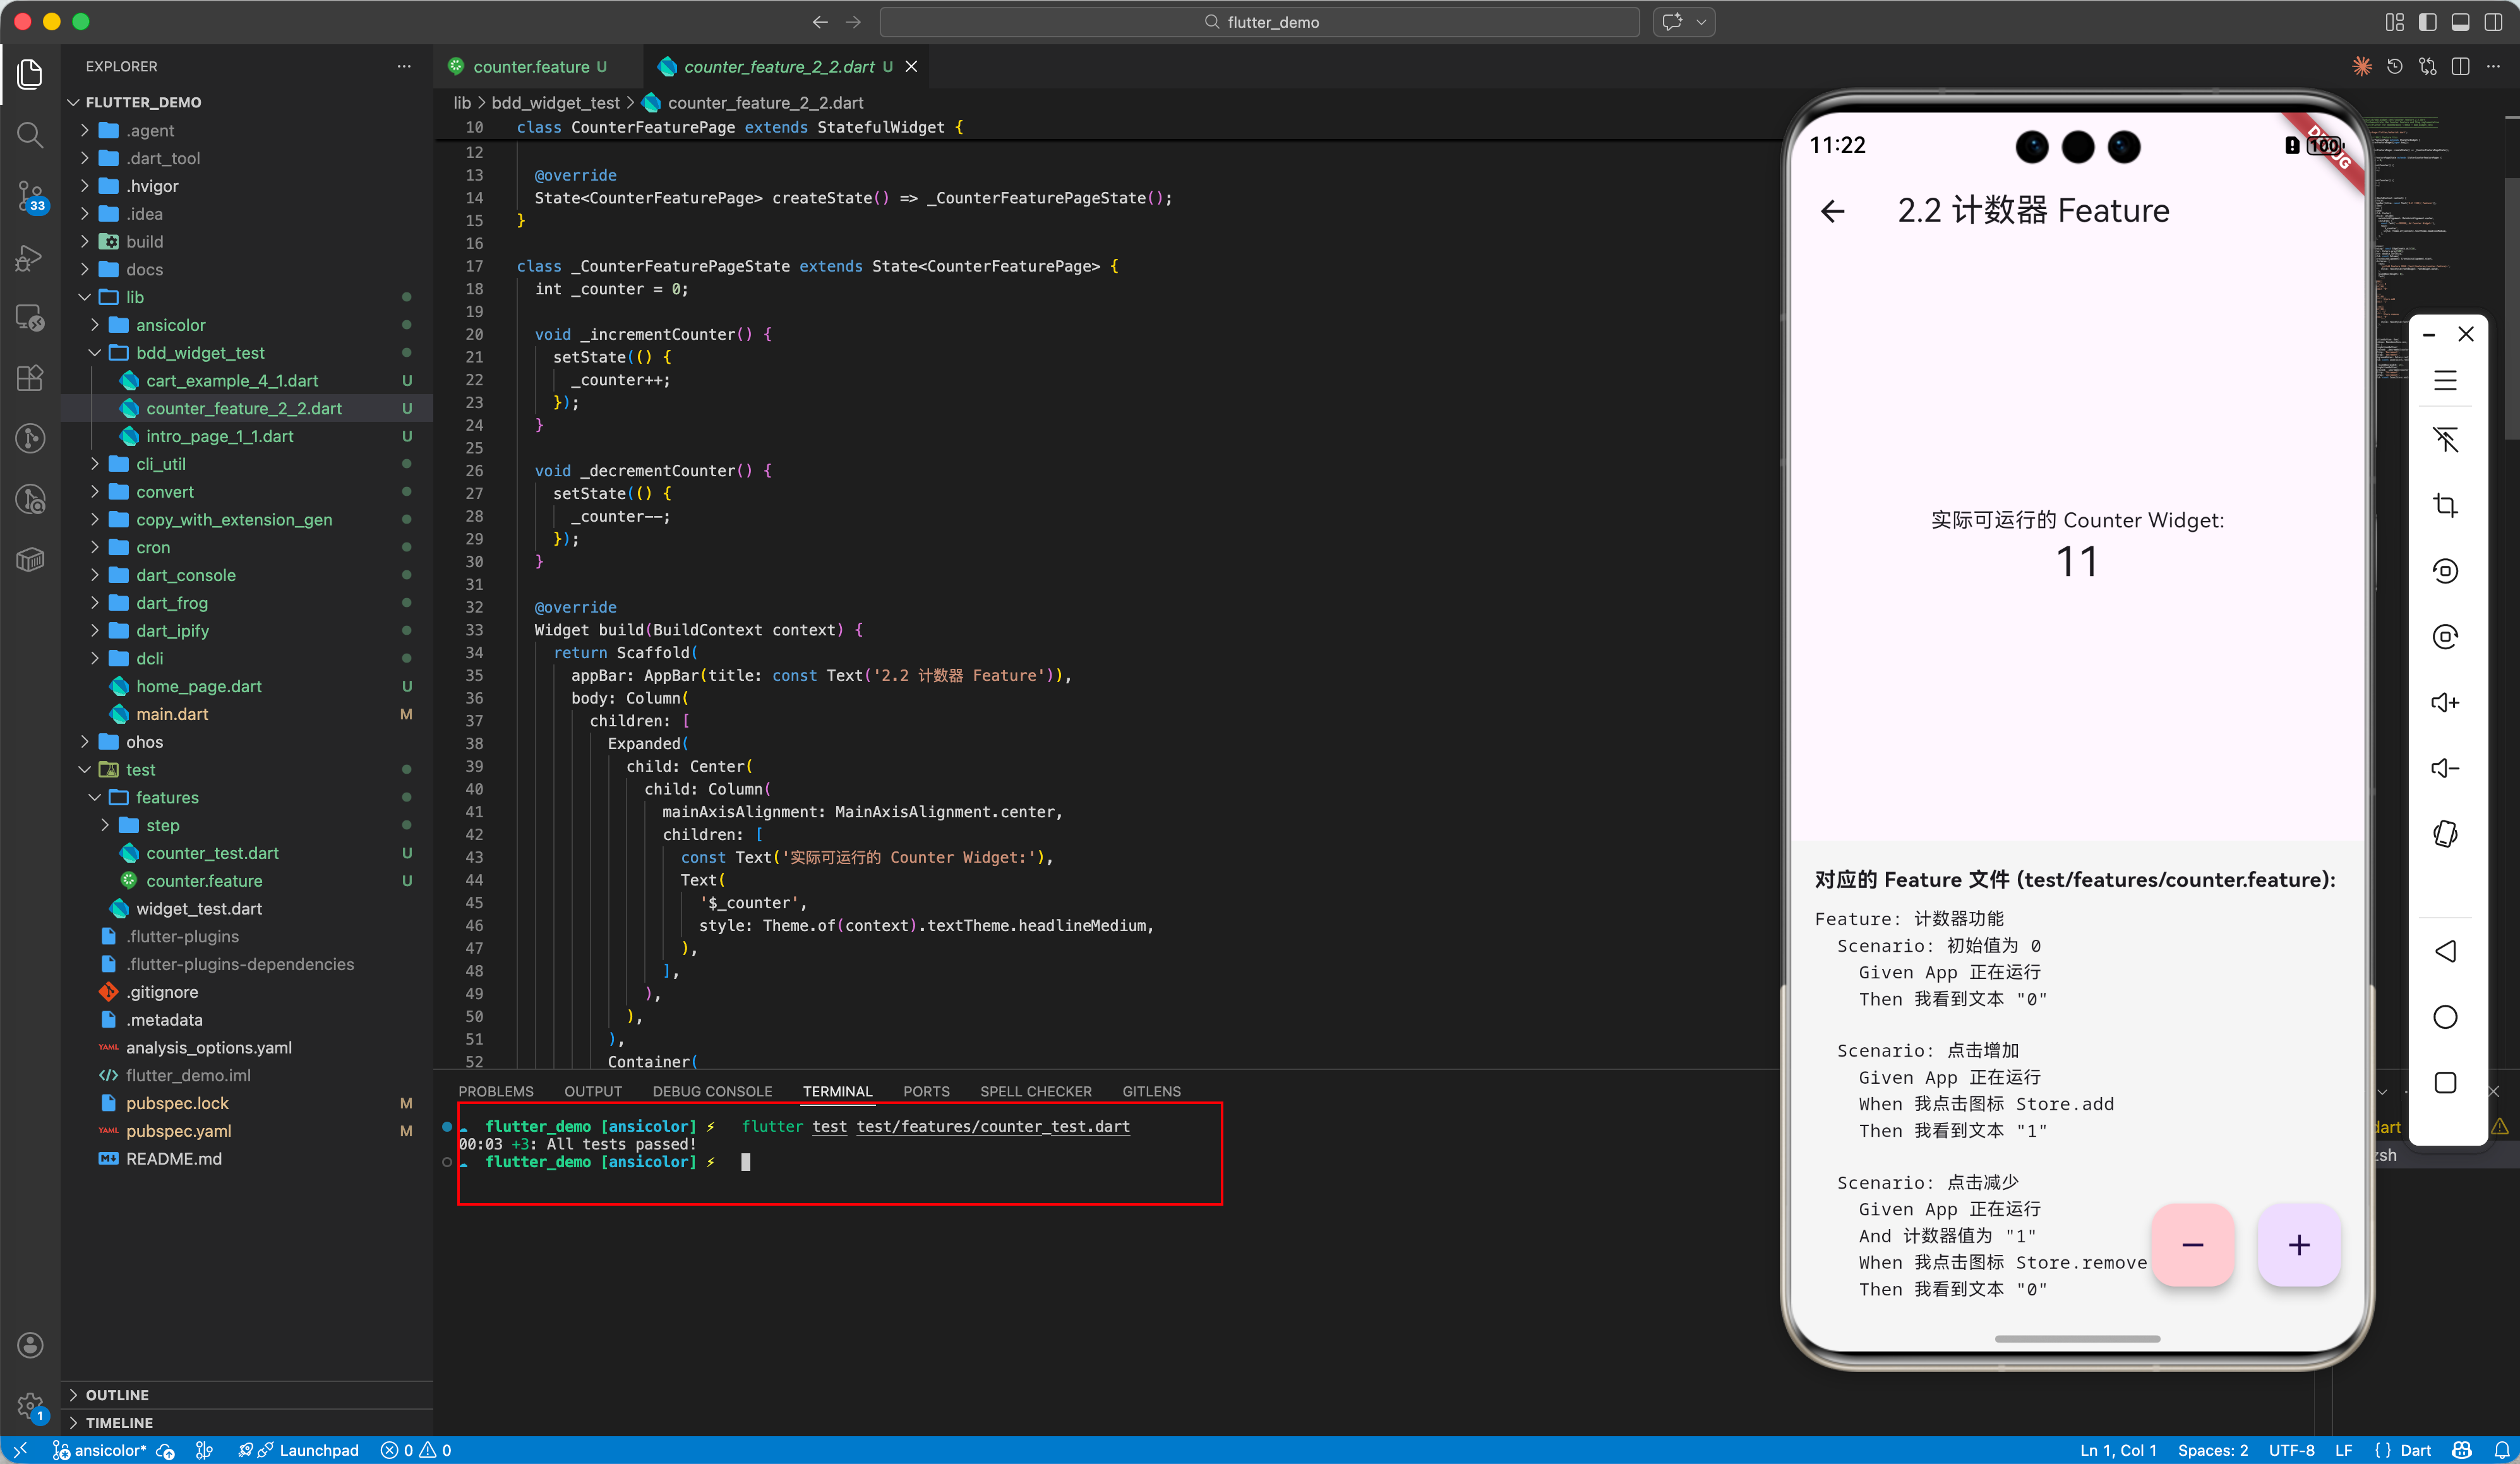
再次运行flutter test,看到绿色的 All tests passed! 也就是大功告成!
2.4 数据驱动测试 (Scenario Outline)
这是 BDD 最强大的特性之一。你可以用表格定义一组测试数据,避免复制粘贴。
Scenario Outline: 输入验证
  Given App 处于登录页
  When 我输入邮箱 <email>
  Then 我看到错误 <error>

  Examples:
  | email          | error          |
  | "invalid"      | "格式错误"     |
  | ""             | "必填项"       |
  | "user@163.com" | "未注册"       |
框架会自动生成 3 个独立的测试用例(testWidgets),分别代入数据运行。
解读:Examples 表中的每一行数据都会生成一个独立的 testWidgets。例如第一行数据 email="invalid" 和 error="Format error" 会生成一个测试用例,运行步骤如下:
- Check input “invalid” -> Expect “Format error”
- (测试结束,清理环境)
- Check input “” -> Expect “Required”
- …
这种方式极其适合测试边界条件(Boundary Testing)!
2.5 进阶:编写通用的页面跳转 Step
在实际项目中,我们有很多页面。如果为每个页面都写一个 Given xxx is running 会很麻烦。
我们可以利用参数化 Step 来实现一个通用的跳转步骤。
Feature 写法:Given App is at {CounterFeaturePage}
Step 定义 (test/features/step/app_is_at.dart):
import 'package:flutter_test/flutter_test.dart';
import 'package:flutter/material.dart';
import 'package:flutter_demo/bdd_widget_test/counter_feature_2_2.dart';
import 'package:flutter_demo/home_page.dart';

Future<void> appIsAt(WidgetTester tester, String pageName) async {
  Widget page;
  switch (pageName) {
    case 'CounterFeaturePage':
      page = const CounterFeaturePage();
      break;
    case 'HomePage':
      page = const HomePage();
      break;
    default:
      throw Exception('Unknown page: $pageName');
  }
  await tester.pumpWidget(MaterialApp(home: page));
}
这样,你的所有 Feature 文件都可以复用这一个 Step,只需传入不同的页面类名即可!
三、OpenHarmony 平台适配指南
3.1 跨平台测试策略
bdd_widget_test 生成的是 Widget Test,它运行在宿主机的 Dart VM 上(Headless),不依赖真实设备。
这一特点对 OpenHarmony 开发极为有利:你可以在 MacBook/Windows 上跑完 90% 的业务逻辑测试,无需频繁连接鸿蒙真机。
3.2 字体与图标适配
鸿蒙系统使用 HarmonyOS Sans 字体,而 Flutter 测试环境默认使用 Ahem 字体(方块字)。
如果在 Step 中使用了 I see {text},可能会因为字体渲染问题导致 find.text() 失败。
解决方案:在测试启动时加载字体。
Future<void> loadFonts() async {
  final fontLoader = FontLoader('HarmonyOS_Sans');
  fontLoader.addFont(rootBundle.load('assets/fonts/HarmonyOS_Sans.ttf'));
  await fontLoader.load();
}
3.3 集成测试 (Integration Test)
如果你想在 鸿蒙真机 上运行 BDD 测试(例如测试蓝牙功能,必须真机),可以将生成的 _test.dart 放入 integration_test 目录,并使用 integration_test 库运行。
# 在连接的鸿蒙设备上运行
flutter test integration_test/login_test.dart -d ohos
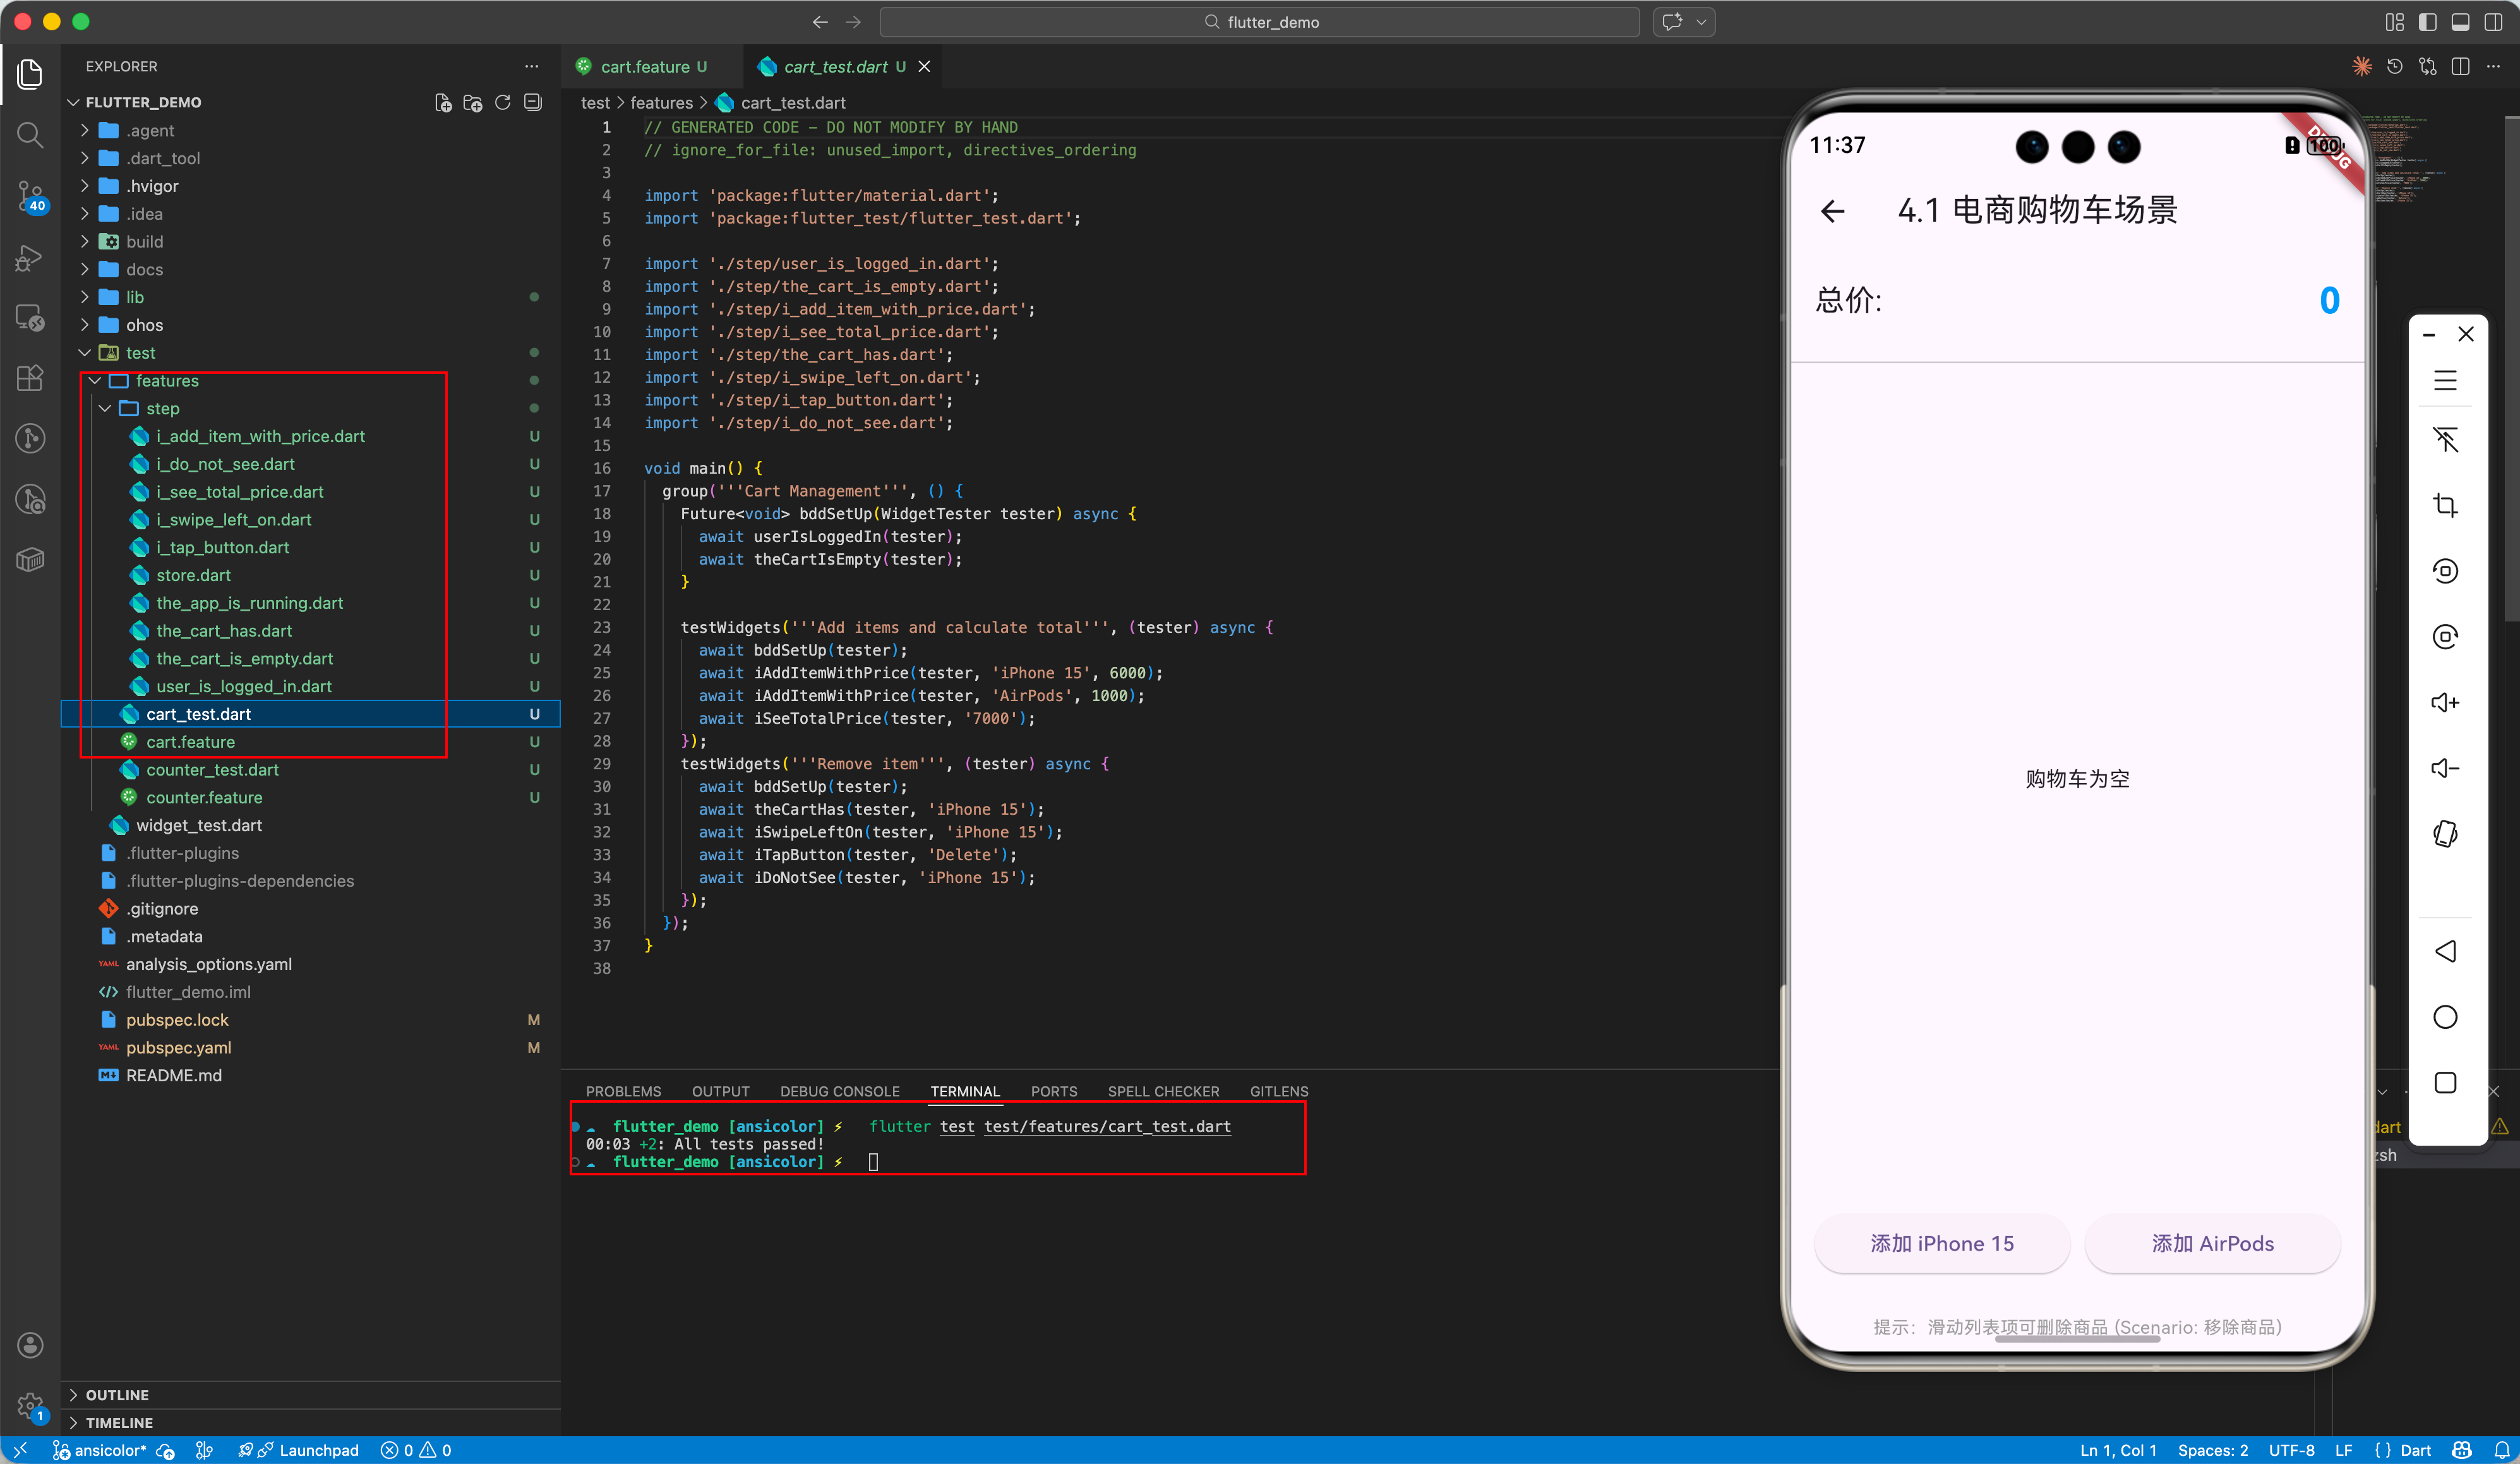
四、生产环境实战:电商购物车测试
我们将模拟一个复杂的购物车场景:添加商品、计算总价、删除商品。
4.1 Feature 描述
test/features/cart.feature:
Feature: Cart Management

  Background:
    Given user is logged in
    And the cart is empty

  Scenario: Add items and calculate total
    When I add item {'iPhone 15'} with price {6000}
    And I add item {'AirPods'} with price {1000}
    Then I see total price {'7000'}

  Scenario: Remove item
    Given the cart has {'iPhone 15'}
    When I swipe left on {'iPhone 15'}
    And I tap {'Delete'} button
    Then I do not see {'iPhone 15'}
4.2 关键 Step 实现
test/features/step/i_add_item_with_price.dart:
import 'package:flutter_test/flutter_test.dart';
import 'package:flutter/material.dart';

// 对应 Step: When I add item {'iPhone 15'} with price {6000}
Future<void> iAddItemWithPrice(
  WidgetTester tester,
  String name,
  int price
) async {
  // In the demo UI, we have hardcoded buttons for specific items for simplicity
  if (name.contains('iPhone')) {
    await tester.tap(find.byKey(const Key('add_iphone_btn')));
  } else if (name.contains('AirPods')) {
    await tester.tap(find.byKey(const Key('add_airpods_btn')));
  }
  await tester.pump();
}
test/features/step/user_is_logged_in.dart:
Future<void> userIsLoggedIn(WidgetTester tester) async {
  // In a real app, you might set up a provider or mock auth service here.
  // For this UI test, we just assume we start at the Cart page.
  await tester.pumpWidget(const MaterialApp(home: CartExamplePage()));
}
test/features/step/the_cart_has.dart:
Future<void> theCartHas(WidgetTester tester, String param1) async {
  // Pre-condition: Add the item. Since we are in UI test, we just tap the add button.
  if (param1.contains('iPhone')) {
    await tester.tap(find.byKey(const Key('add_iphone_btn')));
  } else if (param1.contains('AirPods')) {
    await tester.tap(find.byKey(const Key('add_airpods_btn')));
  }
  await tester.pump();
}
test/features/step/i_swipe_left_on.dart:
Future<void> iSwipeLeftOn(WidgetTester tester, String param1) async {
  // Find the widget (ListTile or Text)
  final itemFinder = find.text(param1);
  // Dismissible requires dragging. Swipe left means dragging by (-offset, 0)
  await tester.drag(itemFinder, const Offset(-500.0, 0.0));
  await tester.pumpAndSettle();
}
其他简单的验证步骤(如 iSeeTotalPrice, iDoNotSee)则使用标准的 expect(find.text(...), findsOneWidget) 即可。
4.3 运行结果验证
在 CI/CD 流水线中(如 GitLab CI),我们可以设置每当 .feature 文件更新时,自动运行测试。如果测试失败,不仅控制台报错,还能结合 junit_report 生成可视化的测试报告。
五、进阶技巧与最佳实践
5.1 页面对象模式 (Page Object Model)
Step 定义多了以后会很乱。建议引入 POM 模式,将页面元素查找封装起来。
class LoginPage {
  final Finder usernameInput = find.byKey(Key('username'));
  final Finder loginBtn = find.text('Login');

  Future<void> login(WidgetTester t, String name) async {
    await t.enterText(usernameInput, name);
    await t.tap(loginBtn);
  }
}
5.2 Mock 网络请求
在 Widget Test 中,网络请求必须 Mock。我们可以自定义一个 Background Step 来注入 Mock Client。
Background:
  Given API 返回用户数据
Future<void> apiReturnsUserData(WidgetTester tester) async {
  final mockClient = MockDio();
  when(mockClient.get('/user')).thenAnswer((_) async => Response(data: {'name': 'User'}));

  // 注入 Service Locator
  GetIt.I.registerSingleton<Dio>(mockClient);
}
六、总结
bdd_widget_test 不仅仅是一个测试框架,它重新定义了开发流程。它强制我们先思考业务(Feature),再编写代码。
对于 OpenHarmony 应用,质量是生命线。通过 BDD,我们构建了一套可执行的活文档(Living Documentation)。即使半年后回看项目,只需看一眼 .feature 文件,就能秒懂业务逻辑。
核心收益:
- 沟通顺畅:PM、Dev、QA 使用统一语言。
- 回归安全:改 Bug 不怕引入新 Bug,跑一遍测试几秒钟。
- 代码质量:为了让代码可测,你会自然地写出低耦合的代码。

作为“人工智能6S店”的官方数字引擎,为AI开发者与企业提供一个覆盖软硬件全栈、一站式门户。
更多推荐


 65
65 0
0- 0


 已为社区贡献71条内容

所有评论(0)