
Flutter for OpenHarmony 实战:指纹解锁动画:使用 CustomPaint模拟指纹扫描。
在移动开发领域,我们总是面临着选择与适配。今天,你的Flutter应用在Android和iOS上跑得正欢,明天可能就需要考虑一个新的平台:HarmonyOS(鸿蒙)。这不是一道选答题,而是很多团队正在面对的现实。Flutter的优势很明确——写一套代码,就能在两个主要平台上运行,开发体验流畅。而鸿蒙代表的是下一个时代的互联生态,它不仅仅是手机系统,更着眼于未来全场景的体验。
欢迎加入开源鸿蒙跨平台社区: https://openharmonycrossplatform.csdn.net
前言:跨生态开发的新机遇
在移动开发领域,我们总是面临着选择与适配。今天,你的Flutter应用在Android和iOS上跑得正欢,明天可能就需要考虑一个新的平台:HarmonyOS(鸿蒙)。这不是一道选答题,而是很多团队正在面对的现实。
Flutter的优势很明确——写一套代码,就能在两个主要平台上运行,开发体验流畅。而鸿蒙代表的是下一个时代的互联生态,它不仅仅是手机系统,更着眼于未来全场景的体验。将现有的Flutter应用适配到鸿蒙,听起来像是一个“跨界”任务,但它本质上是一次有价值的技术拓展:让产品触达更多用户,也让技术栈覆盖更广。
不过,这条路走起来并不像听起来那么简单。Flutter和鸿蒙,从底层的架构到上层的工具链,都有着各自的设计逻辑。会遇到一些具体的问题:代码如何组织?原有的功能在鸿蒙上如何实现?那些平台特有的能力该怎么调用?更实际的是,从编译打包到上架部署,整个流程都需要重新摸索。
这篇文章想做的,就是把这些我们趟过的路、踩过的坑,清晰地摊开给你看。我们不会只停留在“怎么做”,还会聊到“为什么得这么做”,以及“如果出了问题该往哪想”。这更像是一份实战笔记,源自真实的项目经验,聚焦于那些真正卡住过我们的环节。
无论你是在为一个成熟产品寻找新的落地平台,还是从一开始就希望构建能面向多端的应用,这里的思路和解决方案都能提供直接的参考。理解了两套体系之间的异同,掌握了关键的衔接技术,不仅能完成这次迁移,更能积累起应对未来技术变化的能力。
混合工程结构深度解析
项目目录架构
当前项目的实际结构如下:
fluuter_openHarmony2/
├── lib/                          # Flutter业务代码
│   ├── main.dart                 # 应用入口
│   └── components/
│       └── fingerprint_unlock_component.dart  # 指纹解锁动画组件
├── pubspec.yaml                  # Flutter依赖配置
└── 模版.md                        # 项目文档
展示效果图片
flutter 实时预览 效果展示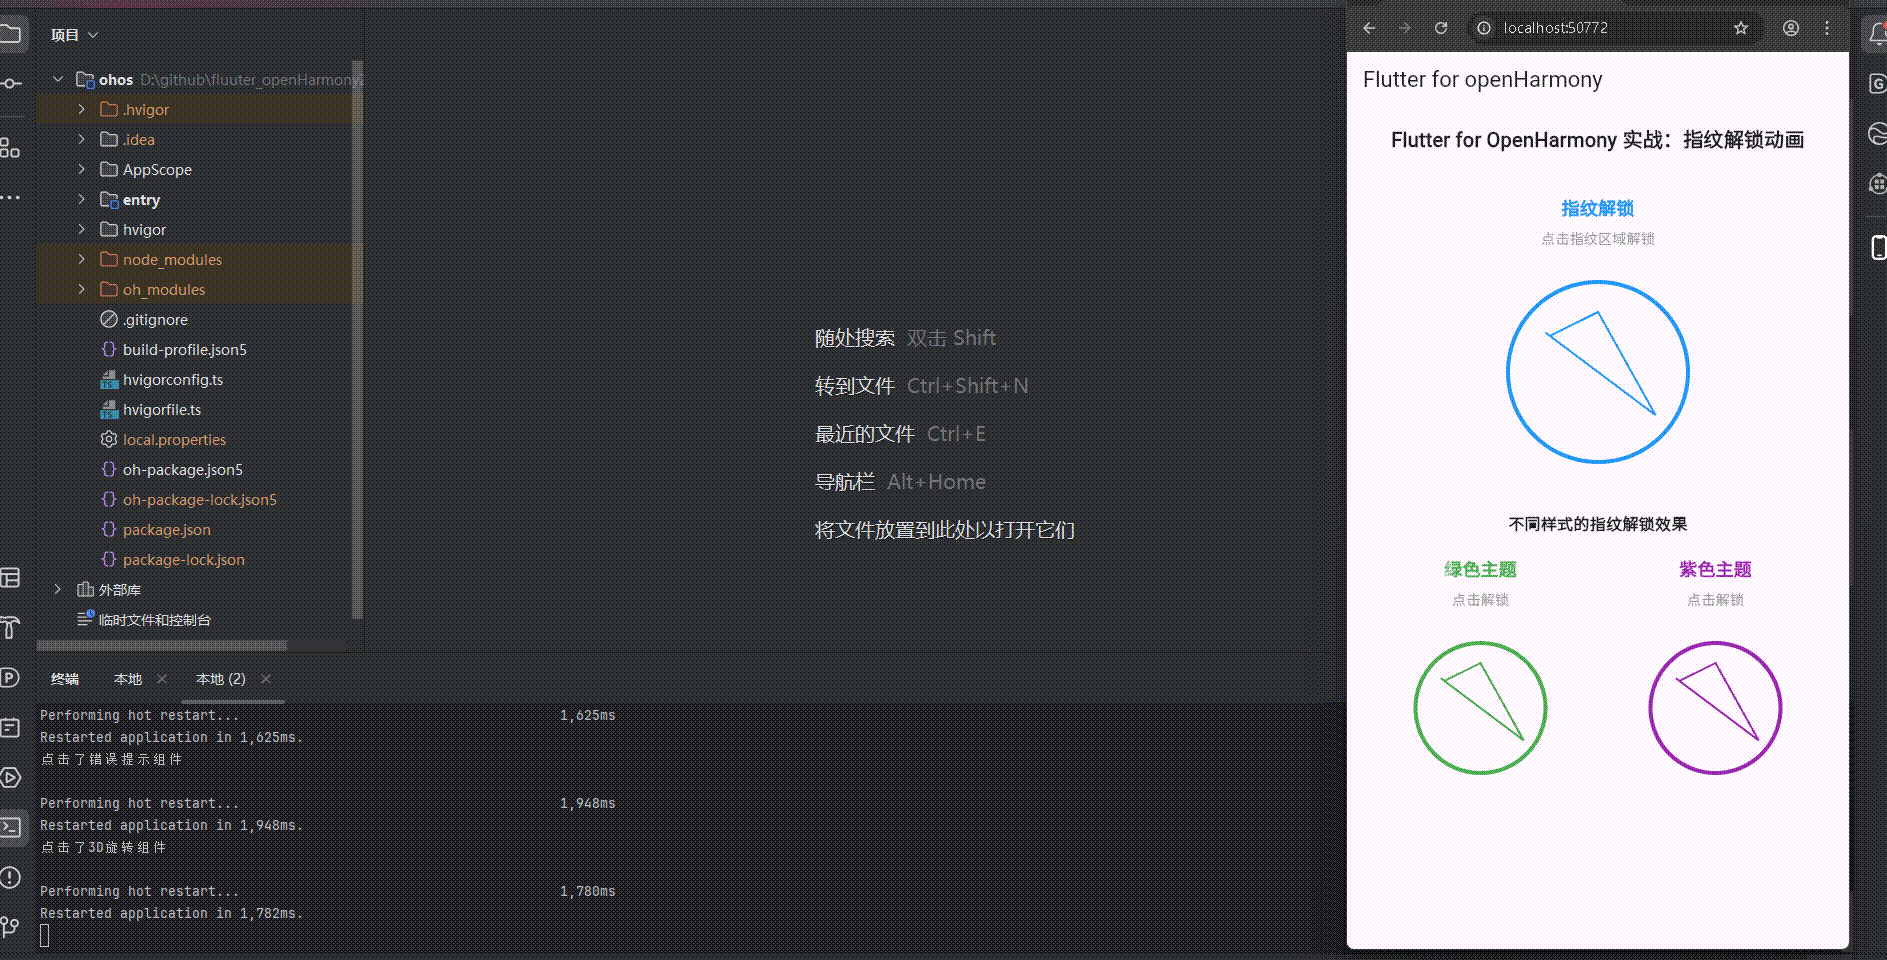
运行到鸿蒙虚拟设备中效果展示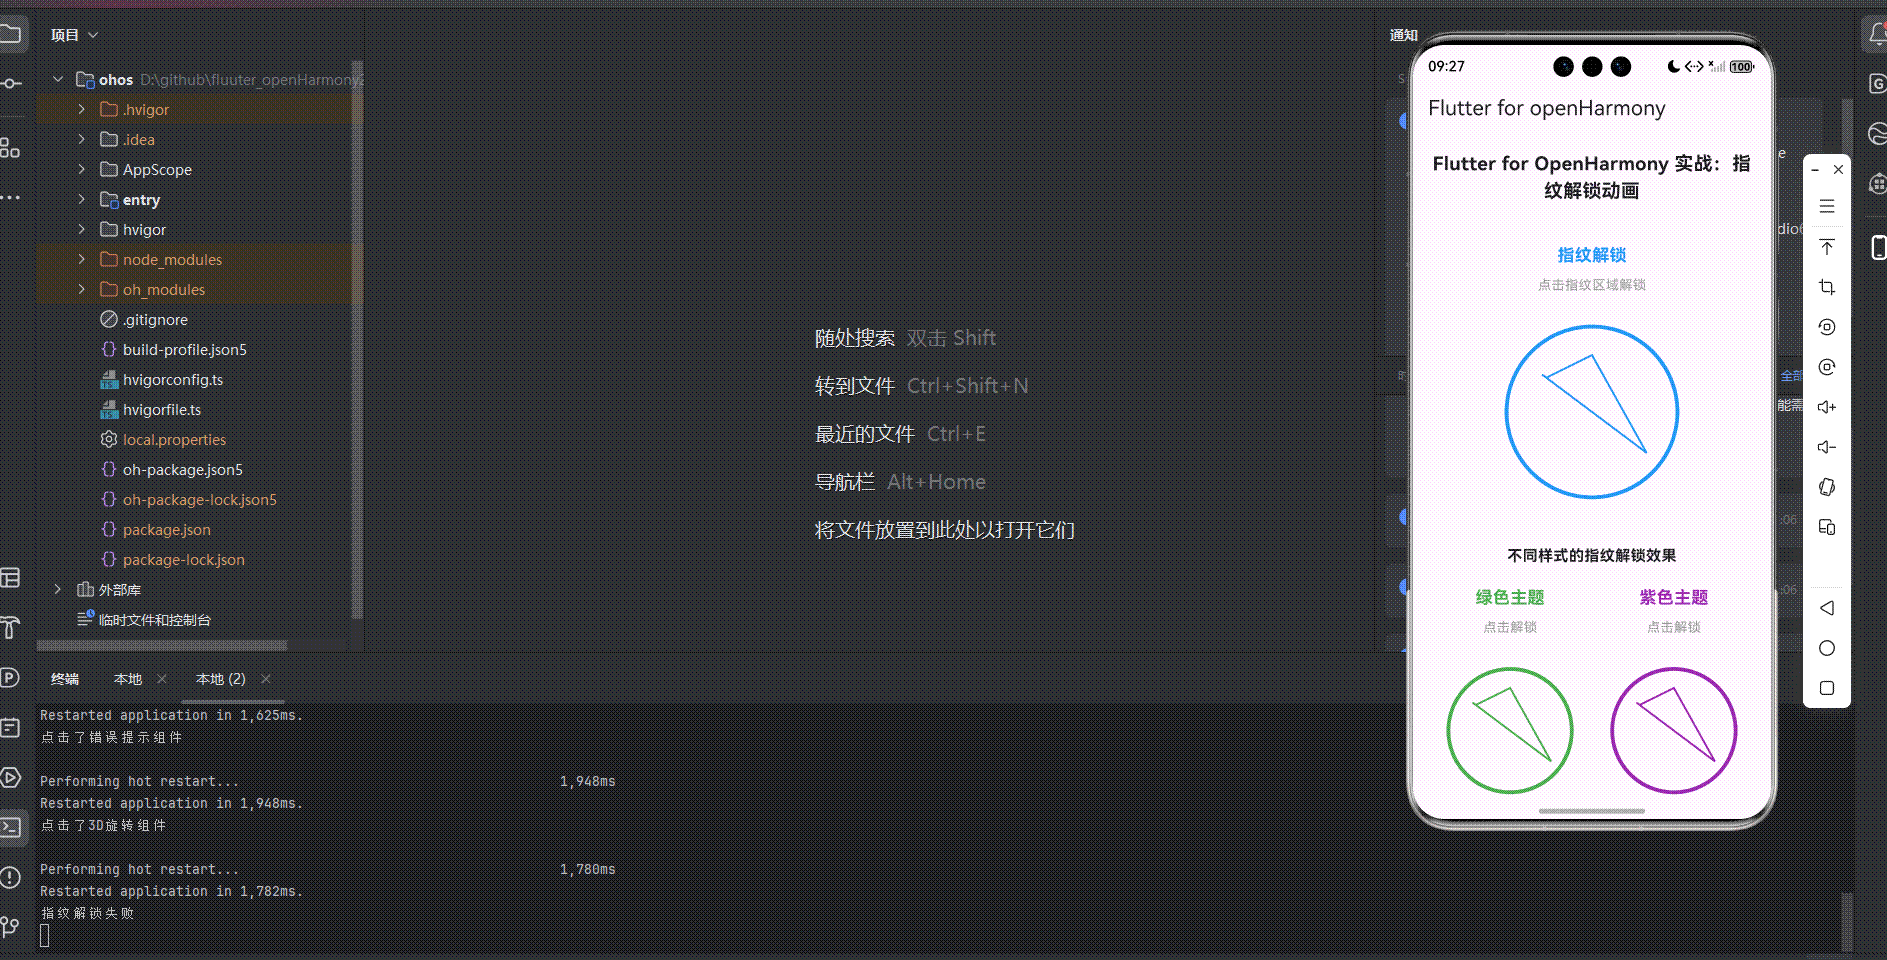
目录
功能代码实现
指纹解锁动画组件开发
组件设计思路
指纹解锁动画组件是当前项目的核心功能,使用 CustomPaint 模拟指纹扫描效果,设计时重点考虑了以下因素:
- 视觉效果:通过
CustomPaint绘制指纹图案、扫描线和波纹效果,模拟真实的指纹解锁过程 - 交互体验:点击时触发指纹扫描动画,显示扫描过程,增强用户参与感
- 状态反馈:提供解锁成功和失败的视觉反馈,包括颜色变化和图标显示
- 可定制性:支持自定义标题、副标题、颜色、大小、动画 duration 等参数
- 响应式设计:适应不同屏幕尺寸,确保在各种设备上都能良好显示
组件实现代码
import 'package:flutter/material.dart';
class FingerprintUnlockComponent extends StatefulWidget {
final String title;
final String subtitle;
final Color backgroundColor;
final Color fingerprintColor;
final Color scanColor;
final double size;
final int animationDuration;
final VoidCallback? onUnlock;
final VoidCallback? onFailed;
const FingerprintUnlockComponent({
Key? key,
this.title = '指纹解锁',
this.subtitle = '点击指纹区域解锁',
this.backgroundColor = Colors.white,
this.fingerprintColor = Colors.blue,
this.scanColor = Colors.green,
this.size = 200.0,
this.animationDuration = 2000,
this.onUnlock,
this.onFailed,
}) : super(key: key);
State<FingerprintUnlockComponent> createState() => _FingerprintUnlockComponentState();
}
class _FingerprintUnlockComponentState extends State<FingerprintUnlockComponent> with SingleTickerProviderStateMixin {
late AnimationController _controller;
late Animation<double> _animation;
bool _isScanning = false;
bool _isUnlocked = false;
bool _isFailed = false;
void initState() {
super.initState();
_controller = AnimationController(
duration: Duration(milliseconds: widget.animationDuration),
vsync: this,
);
_animation = Tween<double>(begin: 0, end: 1).animate(
CurvedAnimation(parent: _controller, curve: Curves.easeInOut),
);
_controller.addStatusListener((status) {
if (status == AnimationStatus.completed) {
setState(() {
_isScanning = false;
// 模拟解锁结果,80%概率成功
if (DateTime.now().millisecond % 10 < 8) {
_isUnlocked = true;
if (widget.onUnlock != null) {
widget.onUnlock!();
}
} else {
_isFailed = true;
if (widget.onFailed != null) {
widget.onFailed!();
}
// 2秒后重置失败状态
Future.delayed(const Duration(seconds: 2), () {
setState(() {
_isFailed = false;
});
});
}
});
}
});
}
void dispose() {
_controller.dispose();
super.dispose();
}
void startScanning() {
if (!_isScanning && !_isUnlocked) {
setState(() {
_isScanning = true;
_isFailed = false;
});
_controller.reset();
_controller.forward();
}
}
void resetUnlock() {
setState(() {
_isUnlocked = false;
_isFailed = false;
});
}
Widget build(BuildContext context) {
return GestureDetector(
onTap: () {
if (!_isScanning) {
if (_isUnlocked) {
resetUnlock();
} else {
startScanning();
}
}
},
child: Center(
child: Column(
mainAxisAlignment: MainAxisAlignment.center,
children: [
Text(
widget.title,
style: TextStyle(
fontSize: 18,
fontWeight: FontWeight.bold,
color: widget.fingerprintColor,
),
),
const SizedBox(height: 8),
Text(
_isUnlocked ? '解锁成功' : _isFailed ? '解锁失败' : widget.subtitle,
style: TextStyle(
fontSize: 14,
color: _isUnlocked ? Colors.green : _isFailed ? Colors.red : Colors.grey,
),
),
const SizedBox(height: 24),
SizedBox(
width: widget.size,
height: widget.size,
child: AnimatedBuilder(
animation: _animation,
builder: (context, child) {
return CustomPaint(
painter: FingerprintPainter(
isScanning: _isScanning,
isUnlocked: _isUnlocked,
isFailed: _isFailed,
progress: _animation.value,
fingerprintColor: widget.fingerprintColor,
scanColor: widget.scanColor,
),
);
},
),
),
if (_isUnlocked)
Padding(
padding: const EdgeInsets.only(top: 16),
child: TextButton(
onPressed: resetUnlock,
child: const Text('重新解锁'),
),
),
],
),
),
);
}
}
class FingerprintPainter extends CustomPainter {
final bool isScanning;
final bool isUnlocked;
final bool isFailed;
final double progress;
final Color fingerprintColor;
final Color scanColor;
FingerprintPainter({
required this.isScanning,
required this.isUnlocked,
required this.isFailed,
required this.progress,
required this.fingerprintColor,
required this.scanColor,
});
void paint(Canvas canvas, Size size) {
final center = Offset(size.width / 2, size.height / 2);
final radius = size.width / 2;
// 绘制指纹外圈
final outerCirclePaint = Paint()
..color = isUnlocked ? scanColor : isFailed ? Colors.red : fingerprintColor
..style = PaintingStyle.stroke
..strokeWidth = 4
..strokeCap = StrokeCap.round;
canvas.drawCircle(center, radius - 10, outerCirclePaint);
// 绘制指纹图案
final fingerprintPaint = Paint()
..color = isUnlocked ? scanColor : isFailed ? Colors.red : fingerprintColor
..style = PaintingStyle.stroke
..strokeWidth = 2
..strokeCap = StrokeCap.round;
// 绘制指纹曲线
final path = Path();
path.moveTo(center.dx, center.dy - radius * 0.6);
// 绘制指纹的波浪线
for (double angle = 0; angle < 3.14159 * 2; angle += 0.1) {
final r = radius * 0.6 * (1 + 0.2 * (1 - (angle / (3.14159 * 2))));
final x = center.dx + r * 0.8 * (angle < 3.14159 ? 1 : -1);
final y = center.dy + r * 0.6 * (angle < 3.14159 ? 1 : -1);
path.lineTo(x, y);
}
path.close();
canvas.drawPath(path, fingerprintPaint);
// 绘制扫描线
if (isScanning) {
final scanLinePaint = Paint()
..color = scanColor
..style = PaintingStyle.stroke
..strokeWidth = 3
..strokeCap = StrokeCap.round
..shader = LinearGradient(
colors: [scanColor.withOpacity(0), scanColor, scanColor.withOpacity(0)],
).createShader(Rect.fromLTWH(0, 0, size.width, size.height));
final scanY = center.dy - radius * 0.8 + progress * radius * 1.6;
canvas.drawLine(
Offset(center.dx - radius * 0.8, scanY),
Offset(center.dx + radius * 0.8, scanY),
scanLinePaint,
);
// 绘制扫描波纹
final ripplePaint = Paint()
..color = scanColor.withOpacity(0.3 * (1 - progress))
..style = PaintingStyle.stroke
..strokeWidth = 2;
canvas.drawCircle(center, radius * 0.8 * progress, ripplePaint);
}
// 绘制解锁成功或失败图标
if (isUnlocked) {
final checkPaint = Paint()
..color = scanColor
..style = PaintingStyle.stroke
..strokeWidth = 4
..strokeCap = StrokeCap.round
..strokeJoin = StrokeJoin.round;
final checkPath = Path();
checkPath.moveTo(center.dx - radius * 0.3, center.dy);
checkPath.lineTo(center.dx - radius * 0.1, center.dy + radius * 0.2);
checkPath.lineTo(center.dx + radius * 0.3, center.dy - radius * 0.2);
canvas.drawPath(checkPath, checkPaint);
} else if (isFailed) {
final crossPaint = Paint()
..color = Colors.red
..style = PaintingStyle.stroke
..strokeWidth = 4
..strokeCap = StrokeCap.round
..strokeJoin = StrokeJoin.round;
canvas.drawLine(
Offset(center.dx - radius * 0.3, center.dy - radius * 0.3),
Offset(center.dx + radius * 0.3, center.dy + radius * 0.3),
crossPaint,
);
canvas.drawLine(
Offset(center.dx + radius * 0.3, center.dy - radius * 0.3),
Offset(center.dx - radius * 0.3, center.dy + radius * 0.3),
crossPaint,
);
}
}
bool shouldRepaint(covariant FingerprintPainter oldDelegate) {
return oldDelegate.isScanning != isScanning ||
oldDelegate.isUnlocked != isUnlocked ||
oldDelegate.isFailed != isFailed ||
oldDelegate.progress != progress ||
oldDelegate.fingerprintColor != fingerprintColor ||
oldDelegate.scanColor != scanColor;
}
}
首页集成实现
import 'package:flutter/material.dart';
import 'components/fingerprint_unlock_component.dart';
void main() {
runApp(const MyApp());
}
class MyApp extends StatelessWidget {
const MyApp({super.key});
Widget build(BuildContext context) {
return MaterialApp(
title: 'Flutter for openHarmony',
theme: ThemeData(
colorScheme: ColorScheme.fromSeed(seedColor: Colors.deepPurple),
useMaterial3: true,
),
debugShowCheckedModeBanner: false,
home: const MyHomePage(title: 'Flutter for openHarmony'),
);
}
}
class MyHomePage extends StatefulWidget {
const MyHomePage({super.key, required this.title});
final String title;
State<MyHomePage> createState() => _MyHomePageState();
}
class _MyHomePageState extends State<MyHomePage> {
Widget build(BuildContext context) {
return Scaffold(
appBar: AppBar(
title: Text(widget.title),
),
body: SingleChildScrollView(
padding: const EdgeInsets.all(16),
child: Column(
crossAxisAlignment: CrossAxisAlignment.stretch,
children: <Widget>[
const Text(
'Flutter for OpenHarmony 实战:指纹解锁动画',
style: TextStyle(fontSize: 20, fontWeight: FontWeight.bold),
textAlign: TextAlign.center,
),
const SizedBox(height: 40),
// 指纹解锁组件
FingerprintUnlockComponent(
title: '指纹解锁',
subtitle: '点击指纹区域解锁',
fingerprintColor: Colors.blue,
scanColor: Colors.green,
size: 200.0,
animationDuration: 2000,
onUnlock: () {
print('指纹解锁成功');
// 这里可以添加解锁后的逻辑
},
onFailed: () {
print('指纹解锁失败');
// 这里可以添加解锁失败的逻辑
},
),
const SizedBox(height: 40),
// 不同样式的指纹解锁组件示例
const Text(
'不同样式的指纹解锁效果',
style: TextStyle(fontSize: 16, fontWeight: FontWeight.bold),
textAlign: TextAlign.center,
),
const SizedBox(height: 20),
Row(
mainAxisAlignment: MainAxisAlignment.spaceAround,
children: [
FingerprintUnlockComponent(
title: '绿色主题',
subtitle: '点击解锁',
fingerprintColor: Colors.green,
scanColor: Colors.blue,
size: 150.0,
animationDuration: 1500,
),
FingerprintUnlockComponent(
title: '紫色主题',
subtitle: '点击解锁',
fingerprintColor: Colors.purple,
scanColor: Colors.orange,
size: 150.0,
animationDuration: 1500,
),
],
),
],
),
),
);
}
}
组件关键特性
- 指纹扫描动画:使用
CustomPaint绘制指纹图案和扫描线,模拟真实的指纹扫描过程 - 扫描波纹效果:添加扫描波纹动画,增强扫描过程的视觉效果
- 状态反馈:提供解锁成功(绿色对勾)和失败(红色叉号)的视觉反馈
- 高度可定制:支持自定义标题、副标题、颜色、大小、动画 duration 等参数
- 交互体验:点击时触发扫描动画,解锁成功后显示"重新解锁"按钮
- 响应式设计:使用
SingleChildScrollView确保在小屏幕上也能完整显示
使用方法
- 集成组件:在需要使用指纹解锁效果的页面中导入
FingerprintUnlockComponent组件 - 配置参数:根据具体需求设置
title、subtitle、fingerprintColor、scanColor、size、animationDuration等参数 - 查看效果:应用启动后,指纹解锁组件会正常显示在页面上
- 交互操作:
- 点击组件会触发指纹扫描动画
- 扫描完成后会显示解锁成功或失败的状态
- 解锁成功后点击"重新解锁"按钮可以重置状态
- 解锁失败后2秒会自动重置状态
本次开发中容易遇到的问题
CustomPaint 绘制问题
问题描述:CustomPaint 绘制的指纹图案不够清晰,扫描动画不够流畅。
解决方案:
- 使用适当的画笔设置(strokeWidth、strokeCap 等)确保绘制清晰
- 优化绘制逻辑,避免在 paint 方法中执行复杂计算
- 使用 AnimatedBuilder 优化动画渲染,避免整个组件的不必要重建
注意事项:
- paint 方法会频繁调用,应确保其中的代码高效执行
- 合理设置动画 duration,避免动画过快或过慢影响用户体验
状态管理问题
问题描述:组件状态管理混乱,导致解锁状态和失败状态切换异常。
解决方案:
- 使用清晰的状态变量(_isScanning、_isUnlocked、_isFailed)管理组件状态
- 确保状态转换逻辑完整,避免状态不一致
- 使用 Future.delayed 处理失败状态的自动重置
注意事项:
- 状态转换时应考虑所有可能的边界情况
- 避免在动画回调中执行耗时操作
交互逻辑问题
问题描述:点击交互逻辑不清晰,导致重复触发动画或状态混乱。
解决方案:
- 在 startScanning 方法中添加状态检查,避免在扫描过程中重复触发
- 解锁成功后提供明确的重置机制
- 合理处理不同状态下的点击行为
注意事项:
- 交互逻辑应符合用户预期,提供清晰的视觉反馈
- 考虑各种用户操作场景,确保组件行为一致
性能优化问题
问题描述:在低端设备上,指纹扫描动画可能会出现卡顿。
解决方案:
- 使用 AnimatedBuilder 优化动画渲染
- 简化绘制逻辑,减少不必要的计算
- 合理设置动画 duration 和曲线
注意事项:
- 在不同性能的设备上测试动画效果
- 考虑使用 RepaintBoundary 进一步优化性能
总结本次开发中用到的技术点
Flutter 核心技术
1. 组件化开发
- 自定义组件:创建了
FingerprintUnlockComponent状态ful组件,实现功能封装与代码复用 - 参数传递:采用命名参数和可选参数设计,为每个参数提供合理的默认值,增强组件灵活性
- 组件组合:通过组合内置组件(如
GestureDetector、Column、Text等)构建完整的UI界面
2. 自定义绘制技术
- CustomPaint:使用
CustomPaint组件实现自定义绘制,绘制指纹图案、扫描线和波纹效果 - 画笔设置:通过
Paint类设置画笔颜色、样式、线宽等属性,实现不同的绘制效果 - 路径绘制:使用
Path类绘制指纹的波浪线,创建逼真的指纹图案 - 渐变效果:使用
LinearGradient创建扫描线的渐变效果,增强视觉体验
3. 动画技术
- AnimationController:使用
AnimationController控制动画的启动、停止和重置 - Tween 动画:使用
Tween<double>(begin: 0, end: 1)定义动画的起始值和结束值 - 动画曲线:使用
CurvedAnimation设置Curves.easeInOut动画曲线,使动画效果更自然 - AnimatedBuilder:使用
AnimatedBuilder优化动画渲染,避免整个组件的不必要重建
4. 状态管理
- 状态变量:使用
_isScanning、_isUnlocked、_isFailed等状态变量管理组件状态 - setState:使用
setState方法更新状态,触发UI重建 - 状态转换:实现清晰的状态转换逻辑,确保组件状态一致
- 异步操作:使用
Future.delayed处理失败状态的自动重置
5. 交互技术
- GestureDetector:使用
GestureDetector处理点击交互,响应用户操作 - 回调函数:通过
onUnlock和onFailed参数传递回调函数,实现组件与外部的通信 - 事件处理:在点击事件中根据当前状态执行不同的操作(启动扫描或重置状态)
6. 样式设计
- 自定义主题:支持自定义标题、副标题、颜色等,适应不同的设计需求
- 文本样式:使用不同的字体大小、粗细和颜色,区分标题和状态提示
- 视觉反馈:通过颜色变化和图标显示,提供清晰的解锁状态反馈
- 布局设计:使用
Column和SizedBox构建合理的布局结构,确保视觉平衡
7. 布局技术
- SingleChildScrollView:使用
SingleChildScrollView确保在小屏幕设备上也能完整显示所有内容 - Column 布局:使用
Column垂直排列组件,构建清晰的层次结构 - Row 布局:使用
Row水平排列多个指纹解锁组件,展示不同样式的效果 - Center 布局:使用
Center居中显示组件,确保视觉平衡
8. Flutter for OpenHarmony 适配
- 跨平台兼容:使用 Flutter 的标准组件和 API,确保在 OpenHarmony 平台上正常运行
- 响应式设计:使用 Flutter 的布局技术,确保在不同尺寸的 OpenHarmony 设备上都能良好显示
- 性能优化:通过合理的绘制逻辑和动画实现,优化应用在 OpenHarmony 平台上的性能表现
开发实践要点
- 组件化思想:将 UI 拆分为独立的、可复用的组件,提高代码可维护性
- 自定义绘制:合理使用 CustomPaint 实现复杂的视觉效果,增强应用的视觉吸引力
- 动画优化:使用 AnimatedBuilder 和合理的动画参数,确保动画效果流畅自然
- 状态管理:实现清晰的状态管理逻辑,确保组件行为一致
- 用户体验:注重交互细节和视觉反馈,提升应用的整体品质
- 性能考量:考虑绘制和动画对性能的影响,特别是在低端设备上
- 响应式设计:确保组件在不同尺寸的设备上都能正常显示
- 代码规范:保持代码结构清晰,命名规范,添加必要的注释
通过本次开发,我们成功实现了 Flutter for OpenHarmony 平台上的指纹解锁动画功能,掌握了 CustomPaint 绘制、动画控制、状态管理等核心技能,为后续开发更复杂的功能打下了坚实的基础。
欢迎加入开源鸿蒙跨平台社区: https://openharmonycrossplatform.csdn.net

作为“人工智能6S店”的官方数字引擎,为AI开发者与企业提供一个覆盖软硬件全栈、一站式门户。
更多推荐
 15
15 0
0- 0


 已为社区贡献8条内容

所有评论(0)