
Flutter for OpenHarmony 实战:扫雷游戏完整开发指南
扫雷(Minesweeper)是经典的单人益智游戏,考验玩家的逻辑推理和运气。本文将详细介绍如何使用Flutter for OpenHarmony框架开发一款功能完整的扫雷游戏。文章涵盖了地雷生成算法、洪水填充算法、游戏状态管理、难度设计等核心技术点。通过本文学习,读者将掌握Flutter在鸿蒙平台上开发网格类游戏的完整流程,了解递归算法在游戏开发中的应用。目标:找出所有非地雷格子规则点击格子揭开
·
欢迎加入开源鸿蒙跨平台社区:开源鸿蒙跨平台开发者社区
Flutter for OpenHarmony 实战:扫雷游戏完整开发指南
摘要
扫雷(Minesweeper)是经典的单人益智游戏,考验玩家的逻辑推理和运气。本文将详细介绍如何使用Flutter for OpenHarmony框架开发一款功能完整的扫雷游戏。文章涵盖了地雷生成算法、洪水填充算法、游戏状态管理、难度设计等核心技术点。通过本文学习,读者将掌握Flutter在鸿蒙平台上开发网格类游戏的完整流程,了解递归算法在游戏开发中的应用。
一、项目背景与功能概述
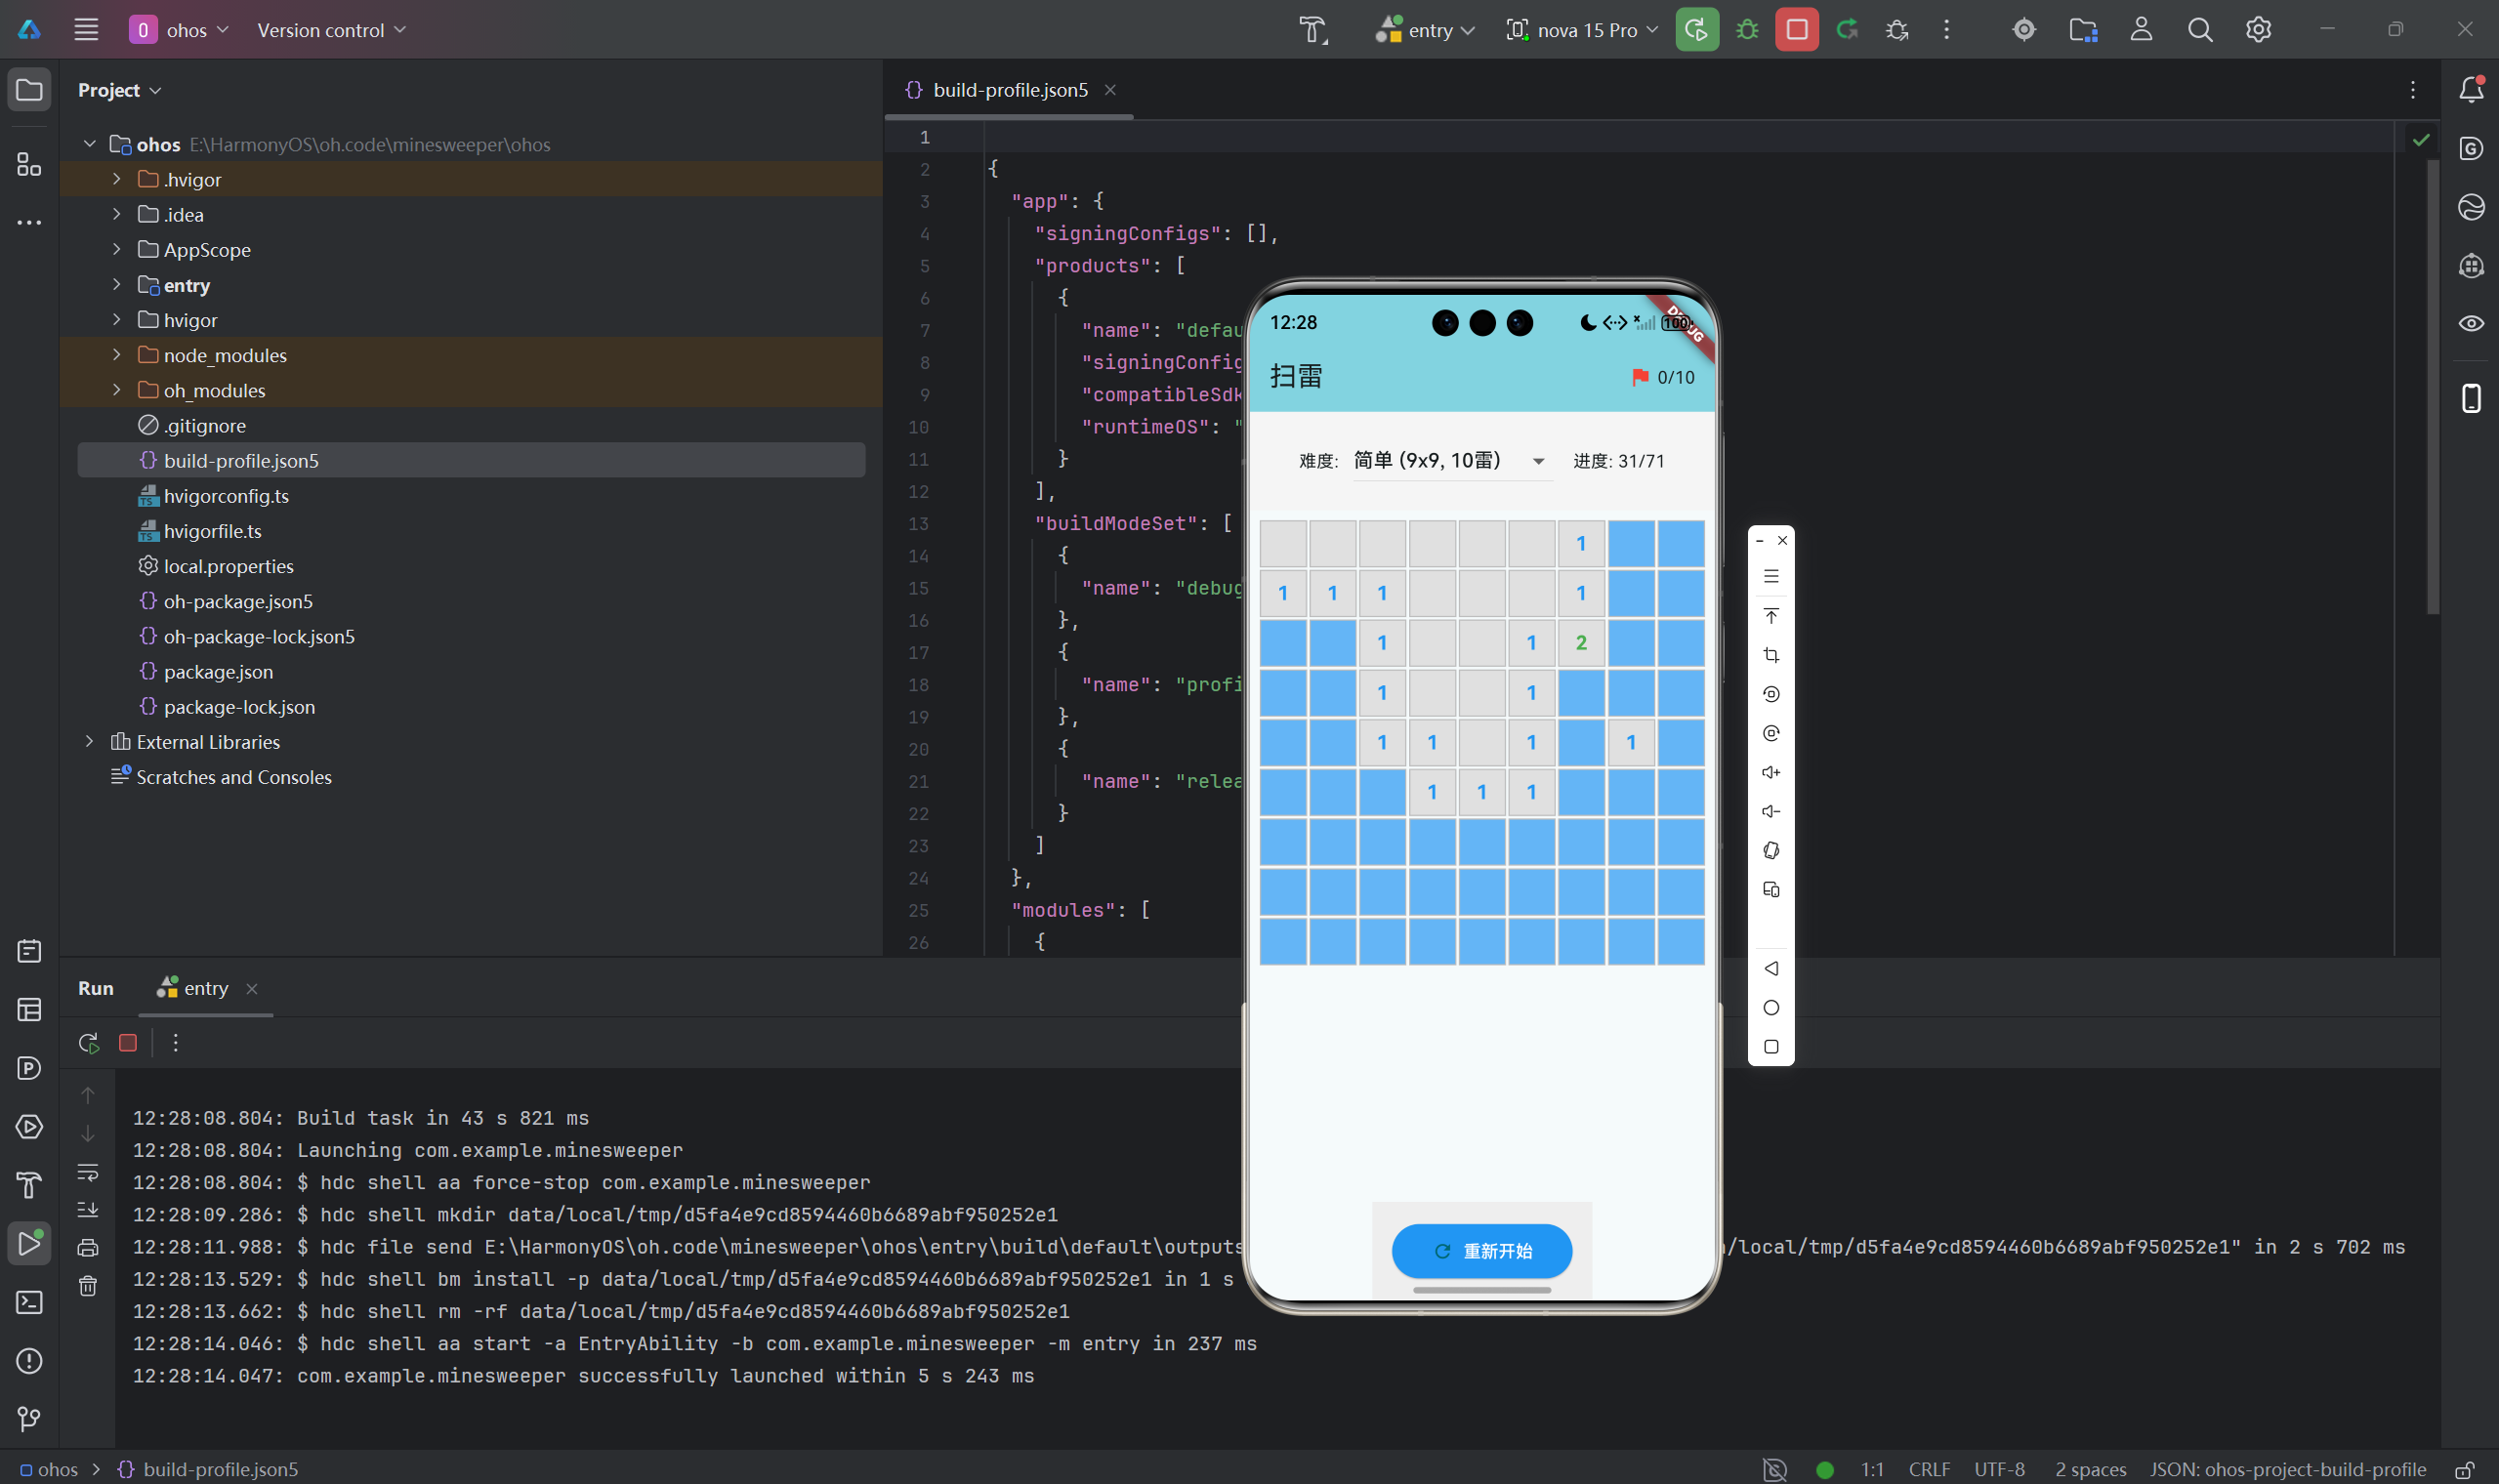
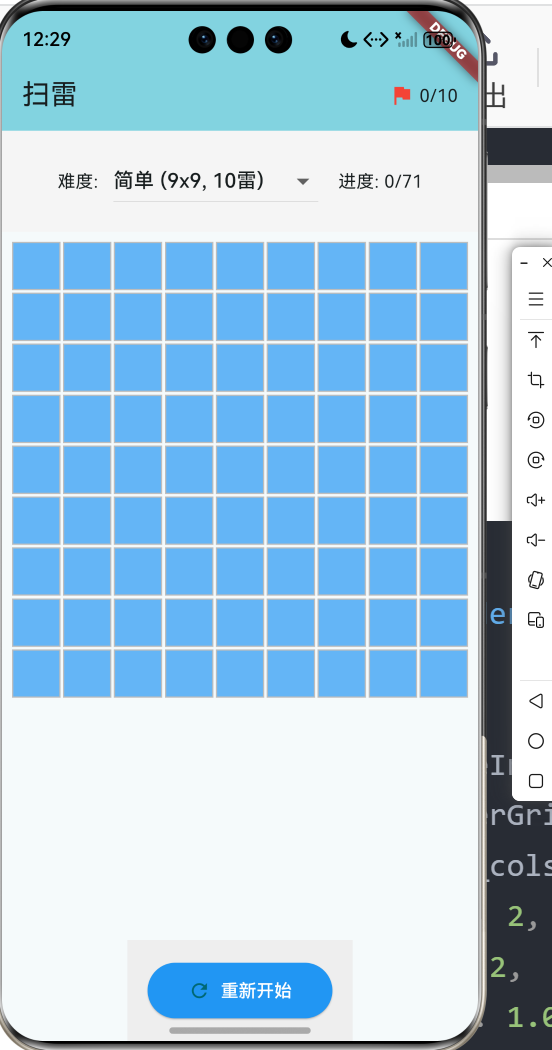
1.1 扫雷游戏介绍
扫雷是由微软在1990年代推广的经典游戏:
- 目标:找出所有非地雷格子
- 规则:
- 点击格子揭开
- 数字表示周围8格的地雷数
- 长按标记地雷
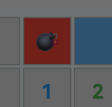
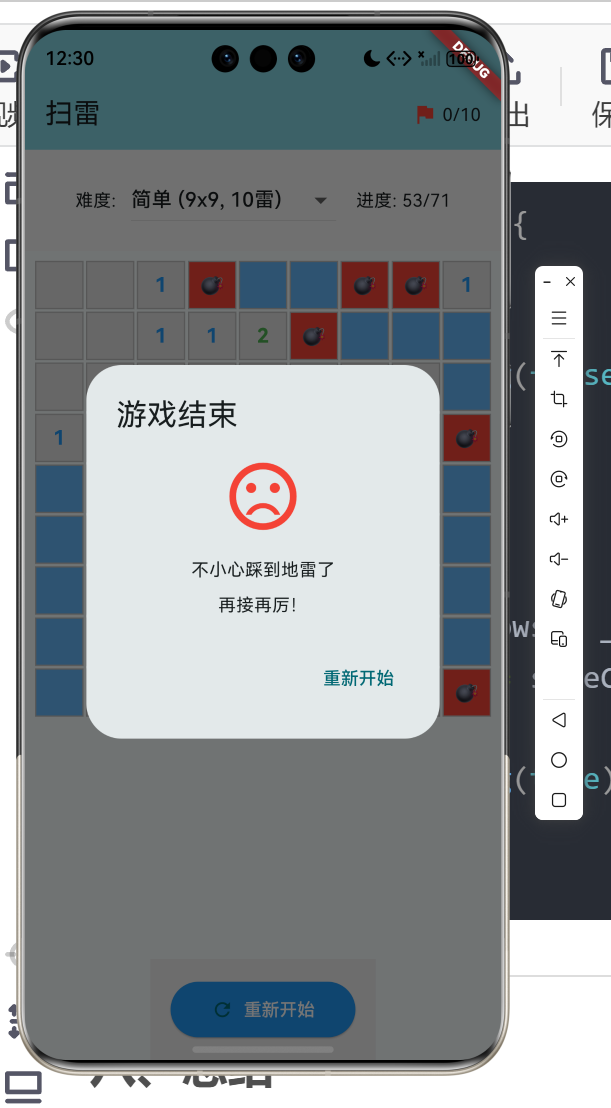
- 点到地雷则失败
1.2 应用功能规划
| 功能模块 | 具体功能 |
|---|---|
| 难度选择 | 简单(9x9)、中等(16x16)、困难(16x30) |
| 地雷生成 | 随机分布地雷 |
| 数字显示 | 显示相邻地雷数量 |
| 洪水填充 | 自动揭开空白区域 |
| 标记功能 | 长按标记/取消标记 |
| 胜负判断 | 踩雷失败、排完胜利 |
| 进度显示 | 剩余安全格子数 |
1.3 难度设置
| 难度 | 网格大小 | 地雷数 | 地雷密度 |
|---|---|---|---|
| 简单 | 9×9 | 10 | 12.3% |
| 中等 | 16×16 | 40 | 15.6% |
| 困难 | 16×30 | 99 | 20.6% |
二、数据模型设计
2.1 单元格状态
enum CellState {
  hidden,    // 未揭开
  revealed,  // 已揭开
  flagged,   // 已标记
}
2.2 单元格类
class Cell {
  final int x;                 // x坐标
  final int y;                 // y坐标
  final bool isMine;          // 是否是地雷
  final int adjacentMines;    // 相邻地雷数
  CellState state;            // 格子状态

  Cell({
    required this.x,
    required this.y,
    required this.isMine,
    required this.adjacentMines,
    this.state = CellState.hidden,
  });

  // 复制格子
  Cell copyWith({CellState? state}) {
    return Cell(
      x: x,
      y: y,
      isMine: isMine,
      adjacentMines: adjacentMines,
      state: state ?? this.state,
    );
  }
}
2.3 游戏配置
enum Difficulty {
  easy,    // 9x9, 10雷
  medium,  // 16x16, 40雷
  hard,    // 16x30, 99雷
}

class GameConfig {
  final int rows;
  final int cols;
  final int totalMines;

  GameConfig({required this.rows, required this.cols, required this.totalMines});

  factory GameConfig.fromDifficulty(Difficulty difficulty) {
    switch (difficulty) {
      case Difficulty.easy:
        return GameConfig(rows: 9, cols: 9, totalMines: 10);
      case Difficulty.medium:
        return GameConfig(rows: 16, cols: 16, totalMines: 40);
      case Difficulty.hard:
        return GameConfig(rows: 16, cols: 30, totalMines: 99);
    }
  }

  int get totalCells => rows * cols;
  int get safeCells => totalCells - totalMines;
  double get mineDensity => totalMines / totalCells;
}
三、地雷生成算法
3.1 随机放置算法
void _placeMines() {
  int placed = 0;
  while (placed < _totalMines) {
    final x = _random.nextInt(_cols);
    final y = _random.nextInt(_rows);

    if (!_grid[y][x].isMine) {
      _grid[y][x] = Cell(
        x: x,
        y: y,
        isMine: true,
        adjacentMines: _grid[y][x].adjacentMines,
      );
      placed++;
    }
  }
}
3.2 避免首次踩雷
改进算法,确保第一次点击不会踩雷:
Point? _firstClick;

void _revealCell(int x, int y) {
  // 如果是第一次点击,先放置地雷
  if (_firstClick == null) {
    _firstClick = Point(x, y);
    _placeMinesAvoiding(x, y);
    _calculateAdjacentMines();
  }

  // 正常揭开逻辑...
}

void _placeMinesAvoiding(int safeX, int safeY) {
  int placed = 0;
  while (placed < _totalMines) {
    final x = _random.nextInt(_cols);
    final y = _random.nextInt(_rows);

    // 跳过首次点击位置及其周围8格
    if ((x - safeX).abs() <= 1 && (y - safeY).abs() <= 1) {
      continue;
    }

    if (!_grid[y][x].isMine) {
      _grid[y][x] = Cell(
        x: x,
        y: y,
        isMine: true,
        adjacentMines: _grid[y][x].adjacentMines,
      );
      placed++;
    }
  }
}
3.3 保证可解性
更高级的地雷生成算法,确保有解:
void _placeMinesGuaranteedSolvable() {
  // 1. 先放置地雷
  _placeMines();

  // 2. 计算每个格子的"安全度"
  final safeZones = _findSafeZones();

  // 3. 如果没有足够的起始安全区,重新生成
  if (safeZones.length < 3) {
    _initGame();
    return;
  }
}

List<Point> _findSafeZones() {
  final safe = <Point>[];

  for (int y = 0; y < _rows; y++) {
    for (int x = 0; x < _cols; x++) {
      if (!_grid[y][x].isMine && _grid[y][x].adjacentMines == 0) {
        safe.add(Point(x, y));
      }
    }
  }

  return safe;
}
四、相邻地雷计算
4.1 8方向检查
void _calculateAdjacentMines() {
  for (int y = 0; y < _rows; y++) {
    for (int x = 0; x < _cols; x++) {
      if (_grid[y][x].isMine) continue;

      int count = 0;

      // 检查8个方向
      for (int dy = -1; dy <= 1; dy++) {
        for (int dx = -1; dx <= 1; dx++) {
          if (dx == 0 && dy == 0) continue;

          final nx = x + dx;
          final ny = y + dy;

          if (nx >= 0 && nx < _cols && ny >= 0 && ny < _rows) {
            if (_grid[ny][nx].isMine) {
              count++;
            }
          }
        }
      }

      _grid[y][x] = Cell(
        x: x,
        y: y,
        isMine: false,
        adjacentMines: count,
        state: _grid[y][x].state,
      );
    }
  }
}
4.2 方向数组优化
// 8个方向的偏移量
static const List<List<int>> _directions = [
  [-1, -1], [-1, 0], [-1, 1],
  [0, -1],           [0, 1],
  [1, -1],  [1, 0],  [1, 1],
];

int _countAdjacentMines(int x, int y) {
  int count = 0;

  for (final dir in _directions) {
    final nx = x + dir[0];
    final ny = y + dir[1];

    if (nx >= 0 && nx < _cols && ny >= 0 && ny < _rows) {
      if (_grid[ny][nx].isMine) {
        count++;
      }
    }
  }

  return count;
}
五、洪水填充算法
5.1 递归实现
void _revealCell(int x, int y) {
  // 边界检查
  if (x < 0 || x >= _cols || y < 0 || y >= _rows) return;

  final cell = _grid[y][x];

  // 只处理未揭开的格子
  if (cell.state != CellState.hidden) return;

  // 踩到地雷
  if (cell.isMine) {
    _grid[y][x] = cell.copyWith(state: CellState.revealed);
    _gameOver = true;
    _revealAllMines();
    return;
  }

  // 揭开当前格子
  _grid[y][x] = cell.copyWith(state: CellState.revealed);
  _revealedCount++;

  // 如果是空白格子,递归揭开周围
  if (cell.adjacentMines == 0) {
    for (int dy = -1; dy <= 1; dy++) {
      for (int dx = -1; dx <= 1; dx++) {
        if (dx == 0 && dy == 0) continue;
        _revealCell(x + dx, y + dy);
      }
    }
  }
}
5.2 迭代实现(避免栈溢出)
void _revealCellIterative(int startX, int startY) {
  final queue = <Point>[];
  final visited = <Point>{};

  queue.add(Point(startX, startY));

  while (queue.isNotEmpty) {
    final point = queue.removeAt(0);

    if (visited.contains(point)) continue;
    visited.add(point);

    final x = point.x;
    final y = point.y;

    // 边界检查
    if (x < 0 || x >= _cols || y < 0 || y >= _rows) continue;

    final cell = _grid[y][x];

    // 只处理未揭开的格子
    if (cell.state != CellState.hidden) continue;

    // 踩到地雷
    if (cell.isMine) {
      _grid[y][x] = cell.copyWith(state: CellState.revealed);
      _gameOver = true;
      _revealAllMines();
      return;
    }

    // 揭开当前格子
    _grid[y][x] = cell.copyWith(state: CellState.revealed);
    _revealedCount++;

    // 如果是空白格子,将周围格子加入队列
    if (cell.adjacentMines == 0) {
      for (int dy = -1; dy <= 1; dy++) {
        for (int dx = -1; dx <= 1; dx++) {
          if (dx == 0 && dy == 0) continue;
          final neighbor = Point(x + dx, y + dy);
          if (!visited.contains(neighbor)) {
            queue.add(neighbor);
          }
        }
      }
    }
  }
}
5.3 洪水填充可视化
// 延迟显示揭开动画
Future<void> _revealCellAnimated(int x, int y) async {
  final toReveal = <Point>[];
  final visited = <Point>{};

  _collectCellsToReveal(x, y, toReveal, visited);

  // 按距离分层揭开
  final layers = <List<Point>>[];
  while (toReveal.isNotEmpty) {
    layers.add([...toReveal]);
    toReveal.clear();
  }

  for (final layer in layers) {
    for (final point in layer) {
      if (!_grid[point.y][point.x].isMine) {
        _grid[point.y][point.x] = _grid[point.y][point.x].copyWith(
          state: CellState.revealed,
        );
        _revealedCount++;
      }
    }
    setState(() {});
    await Future.delayed(const Duration(milliseconds: 50));
  }
}
六、UI界面实现
6.1 网格构建

Widget _buildGrid() {
  return GridView.builder(
    shrinkWrap: true,
    primary: true,
    padding: const EdgeInsets.all(8),
    gridDelegate: SliverGridDelegateWithFixedCrossAxisCount(
      crossAxisCount: _cols,
      crossAxisSpacing: 2,
      mainAxisSpacing: 2,
      childAspectRatio: 1.0,
    ),
    itemCount: _rows * _cols,
    itemBuilder: (context, index) {
      final x = index % _cols;
      final y = index ~/ _cols;
      return _buildCell(x, y);
    },
  );
}
6.2 单元格UI
Widget _buildCell(int x, int y) {
  final cell = _grid[y][x];

  Color backgroundColor;
  Color textColor;
  String text;

  switch (cell.state) {
    case CellState.hidden:
      backgroundColor = Colors.blue.shade300;
      textColor = Colors.transparent;
      text = '';
      break;
    case CellState.flagged:
      backgroundColor = Colors.blue.shade300;
      textColor = Colors.red;
      text = '🚩';
      break;
    case CellState.revealed:
      if (cell.isMine) {
        backgroundColor = Colors.red;
        textColor = Colors.white;
        text = '💣';
      } else if (cell.adjacentMines == 0) {
        backgroundColor = Colors.grey.shade300;
        textColor = Colors.transparent;
        text = '';
      } else {
        backgroundColor = Colors.grey.shade300;
        textColor = _getNumberColor(cell.adjacentMines);
        text = '${cell.adjacentMines}';
      }
      break;
  }

  return GestureDetector(
    onTap: () => _onCellTap(x, y),
    onLongPress: () => _onCellLongPress(x, y),
    child: Container(
      decoration: BoxDecoration(
        color: backgroundColor,
        border: Border.all(color: Colors.grey.shade400),
      ),
      child: Center(
        child: Text(
          text,
          style: TextStyle(
            color: textColor,
            fontSize: 16,
            fontWeight: FontWeight.bold,
          ),
        ),
      ),
    ),
  );
}
6.3 数字颜色映射
Color _getNumberColor(int number) {
  final colors = [
    Colors.blue,    // 1
    Colors.green,   // 2
    Colors.red,     // 3
    Colors.purple,  // 4
    Colors.brown,   // 5
    Colors.cyan,    // 6
    Colors.black,   // 7
    Colors.grey,    // 8
  ];
  return colors[(number - 1) % colors.length];
}
七、游戏逻辑实现
7.1 点击处理
void _onCellTap(int x, int y) {
  if (_gameOver || _gameWon) return;
  if (_grid[y][x].state != CellState.hidden) return;

  _revealCell(x, y);
  setState(() {});

  _checkGameState();
}
7.2 长按标记
void _onCellLongPress(int x, int y) {
  if (_gameOver || _gameWon) return;
  if (_grid[y][x].state != CellState.hidden) return;

  setState(() {
    final cell = _grid[y][x];

    if (cell.state == CellState.hidden) {
      // 添加标记
      _grid[y][x] = cell.copyWith(state: CellState.flagged);
      _flagCount++;
    } else if (cell.state == CellState.flagged) {
      // 取消标记
      _grid[y][x] = cell.copyWith(state: CellState.hidden);
      _flagCount--;
    }
  });
}
7.3 胜负判断
void _checkGameState() {
  // 失败判断
  if (_gameOver) {
    _showGameOverDialog(false);
    return;
  }

  // 胜利判断
  final safeCells = _rows * _cols - _totalMines;
  if (_revealedCount == safeCells) {
    _gameWon = true;
    _showGameOverDialog(true);
  }
}
八、总结
本文详细介绍了使用Flutter for OpenHarmony开发扫雷游戏的完整过程,涵盖了以下核心技术点:
- 数据模型:单元格状态、游戏配置
- 地雷生成:随机算法、避免首次踩雷
- 相邻计算:8方向检查、数字显示
- 洪水填充:递归实现、迭代优化
- UI实现:网格构建、单元格渲染
- 交互设计:点击揭开、长按标记
- 胜负判断:游戏状态检测
这个项目展示了Flutter在网格类游戏开发中的完整流程。
欢迎加入开源鸿蒙跨平台社区: 开源鸿蒙跨平台开发者社区

作为“人工智能6S店”的官方数字引擎,为AI开发者与企业提供一个覆盖软硬件全栈、一站式门户。
更多推荐
 8
8 0
0- 0


 已为社区贡献16条内容

所有评论(0)