
ReactNative for Harmony 项目鸿蒙化三方库集成实战:react-native-svg
react-native-svg 是一个强大的 SVG 渲染库,允许在 React Native 应用中创建和管理 SVG 图形。它支持路径、形状、渐变、文本、动画等多种 SVG 元素,完全兼容 Android、iOS 和 HarmonyOS 三端。WARNING] 本项目为 react-native-svg 的 ArkTS 版本,现已停止维护。如需最新版本,请使用。库名称版本信息最新版本请查看R
📋 前言
react-native-svg 是一个强大的 SVG 渲染库,允许在 React Native 应用中创建和管理 SVG 图形。它支持路径、形状、渐变、文本、动画等多种 SVG 元素,完全兼容 Android、iOS 和 HarmonyOS 三端。
[!WARNING] 本项目为 react-native-svg 的 ArkTS 版本,现已停止维护。如需最新版本,请使用 react-native-svg-capi。
🎯 库简介
基本信息
-
库名称: @react-native-oh-tpl/react-native-svg
-
版本信息:
- 最新版本请查看 Releases
-
官方仓库: https://github.com/react-native-oh-library/react-native-svg
-
主要功能:
- 支持所有 SVG 元素(路径、形状、文本、渐变等)
- 支持动画和交互
- 支持自定义字体
- 兼容 Android、iOS 和 HarmonyOS
-
维护状态: ⚠️ 已停止维护,建议使用 react-native-svg-capi
为什么需要这个库?
- SVG 支持: 在 React Native 中渲染 SVG 图形和动画
- 高性能: 使用原生渲染,性能优异
- 功能丰富: 支持几乎所有 SVG 特性
- 跨平台: 在三端提供一致的渲染效果
📦 安装步骤
不懂得看另一篇文章 :react-native-picker适配(带图片)
1. 使用 npm 安装
在项目根目录执行以下命令:
npm install @react-native-oh-tpl/react-native-svg@13.14.0-0.2.5
2. 验证安装
安装完成后,检查 package.json 文件,应该能看到新增的依赖:
{
  "dependencies": {
    "@react-native-oh-tpl/react-native-svg": "^13.14.0-0.2.5",
    // ... 其他依赖
  }
}
🔧 HarmonyOS 平台配置 ⭐
由于 HarmonyOS 暂不支持 AutoLink,需要手动配置原生端代码。本文采用方法二:直接链接源码的方式。
1. 在工程根目录的 oh-package.json5 添加 overrides 字段
首先需要使用 DevEco Studio 打开项目里的 HarmonyOS 工程 harmony
打开 harmony/oh-package.json5,添加以下配置:
{
  ...
  "overrides": {
    "@rnoh/react-native-openharmony": "0.72.90"
  }
}
2. 引入原生端代码
目前有两种方法:
方法一:通过 har 包引入
[!TIP] har 包位于三方库安装路径的
harmony文件夹下。
打开 entry/oh-package.json5,添加以下依赖:
"dependencies": {
    "@react-native-oh-tpl/react-native-svg": "file:../../node_modules/@react-native-oh-tpl/react-native-svg/harmony/svg.har"
}
点击右上角的 sync 按钮
或者在终端执行:
cd entry
ohpm install
方法二:直接链接源码
目前 DevEco Studio 不支持通过源码引入外部 module,我们推荐使用直接链接源码的方式,将源码通过操作改成 harmony 工程的内部模块。
步骤 1: 把 <RN工程>/node_modules/@react-native-oh-tpl/react-native-svg/harmony 目录下的源码 svg 复制到 harmony(鸿蒙壳工程)工程根目录下。
步骤 2: 在 harmony 工程根目录的 build-profile.template.json5(若存在)和 build-profile.json5 添加以下模块:
modules: [
  ...
  {
    name: '<xxx>',
    srcPath: './<xxx>',
  },
  {
    name: 'svg',
    srcPath: './svg',
  }
]
步骤 3: 打开 svg/oh-package.json5,修改 react-native-openharmony 和项目的版本一致。
步骤 4: 打开 entry/oh-package.json5,添加以下依赖:
"dependencies": {
  "@rnoh/react-native-openharmony": "0.72.90",
  "@react-native-oh-tpl/react-native-svg": "file:../svg"
}
步骤 5: 点击 DevEco Studio 右上角的 sync 按钮
3. 配置 CMakeLists 和引入 SVGPackage
打开 entry/src/main/cpp/CMakeLists.txt,添加:
project(rnapp)
cmake_minimum_required(VERSION 3.4.1)
set(CMAKE_SKIP_BUILD_RPATH TRUE)
set(RNOH_APP_DIR "${CMAKE_CURRENT_SOURCE_DIR}")
set(NODE_MODULES "${CMAKE_CURRENT_SOURCE_DIR}/../../../../../node_modules")
+ set(OH_MODULES "${CMAKE_CURRENT_SOURCE_DIR}/../../../oh_modules")
set(RNOH_CPP_DIR "${CMAKE_CURRENT_SOURCE_DIR}/../../../../../../react-native-harmony/harmony/cpp")
set(LOG_VERBOSITY_LEVEL 1)
set(CMAKE_ASM_FLAGS "-Wno-error=unused-command-line-argument -Qunused-arguments")
set(CMAKE_CXX_FLAGS "-fstack-protector-strong -Wl,-z,relro,-z,now,-z,noexecstack -s -fPIE -pie")
set(WITH_HITRACE_SYSTRACE 1) # for other CMakeLists.txt files to use
add_compile_definitions(WITH_HITRACE_SYSTRACE)

add_subdirectory("${RNOH_CPP_DIR}" ./rn)

# RNOH_BEGIN: manual_package_linking_1
add_subdirectory("../../../../sample_package/src/main/cpp" ./sample-package)
+ add_subdirectory("${OH_MODULES}/@react-native-oh-tpl/react-native-svg/src/main/cpp" ./svg)
# RNOH_END: manual_package_linking_1

file(GLOB GENERATED_CPP_FILES "./generated/*.cpp")

add_library(rnoh_app SHARED
    ${GENERATED_CPP_FILES}
    "./PackageProvider.cpp"
    "${RNOH_CPP_DIR}/RNOHAppNapiBridge.cpp"
)
target_link_libraries(rnoh_app PUBLIC rnoh)

# RNOH_BEGIN: manual_package_linking_2
target_link_libraries(rnoh_app PUBLIC rnoh_sample_package)
+ target_link_libraries(rnoh_app PUBLIC rnoh_svg)
# RNOH_END: manual_package_linking_2
打开 entry/src/main/cpp/PackageProvider.cpp,添加:
#include "RNOH/PackageProvider.h"
#include "generated/RNOHGeneratedPackage.h"
#include "SamplePackage.h"
+ #include "SVGPackage.h"

using namespace rnoh;

std::vector<std::shared_ptr<Package>> PackageProvider::getPackages(Package::Context ctx) {
    return {
      std::make_shared<RNOHGeneratedPackage>(ctx),
      std::make_shared<SamplePackage>(ctx),
+     std::make_shared<SVGPackage>(ctx),
    };
}
4.在 ArkTs 侧引入 SVG 组件
找到 function buildCustomComponent() ,一般位于 entry/src/main/ets/pages/index.ets 或 entry/src/main/ets/rn/LoadBundle.ets,添加:
...
import { createRNPackages } from '../RNPackagesFactory'
+ import { SVG_VIEW_TYPE_NAME, SVGView } from "@react-native-oh-tpl/svg"

@Builder
function buildCustomComponent(ctx: ComponentBuilderContext) {
  if (ctx.componentName === SAMPLE_VIEW_TYPE) {
    SampleView({
      ctx: ctx.rnComponentContext,
      tag: ctx.tag,
      buildCustomComponent: buildCustomComponent
    })
  }
+ else if (ctx.componentName === SVG_VIEW_TYPE_NAME) {
+   SVGView({
+     ctx: ctx.rnComponentContext,
+     tag: ctx.tag
+   })
+ }
 ...
}
...
本库使用了混合方案,需要添加组件名。
在 entry/src/main/ets/pages/index.ets 或 entry/src/main/ets/rn/LoadBundle.ets 找到常量 arkTsComponentNames 在其数组里添加组件名
const arkTsComponentNames: Array<string> = [
  ...
+ SVG_VIEW_TYPE_NAME
  ];
5. 运行
点击右上角的 sync 按钮
或者在终端执行:
cd entry
ohpm install
然后编译、运行即可。
💻 代码集成
[!WARNING] 使用时 import 的库名不变。
下面是一个完整的示例,展示了 react-native-svg 的各种使用场景:
import React from 'react';
import {
View,
Text,
StyleSheet,
ScrollView,
StatusBar,
SafeAreaView,
} from 'react-native';
import { Svg, Rect, Circle, Path } from 'react-native-svg';
function SvgDemo() {
return (
<SafeAreaView style={styles.container}>
<StatusBar barStyle="light-content" />
<ScrollView>
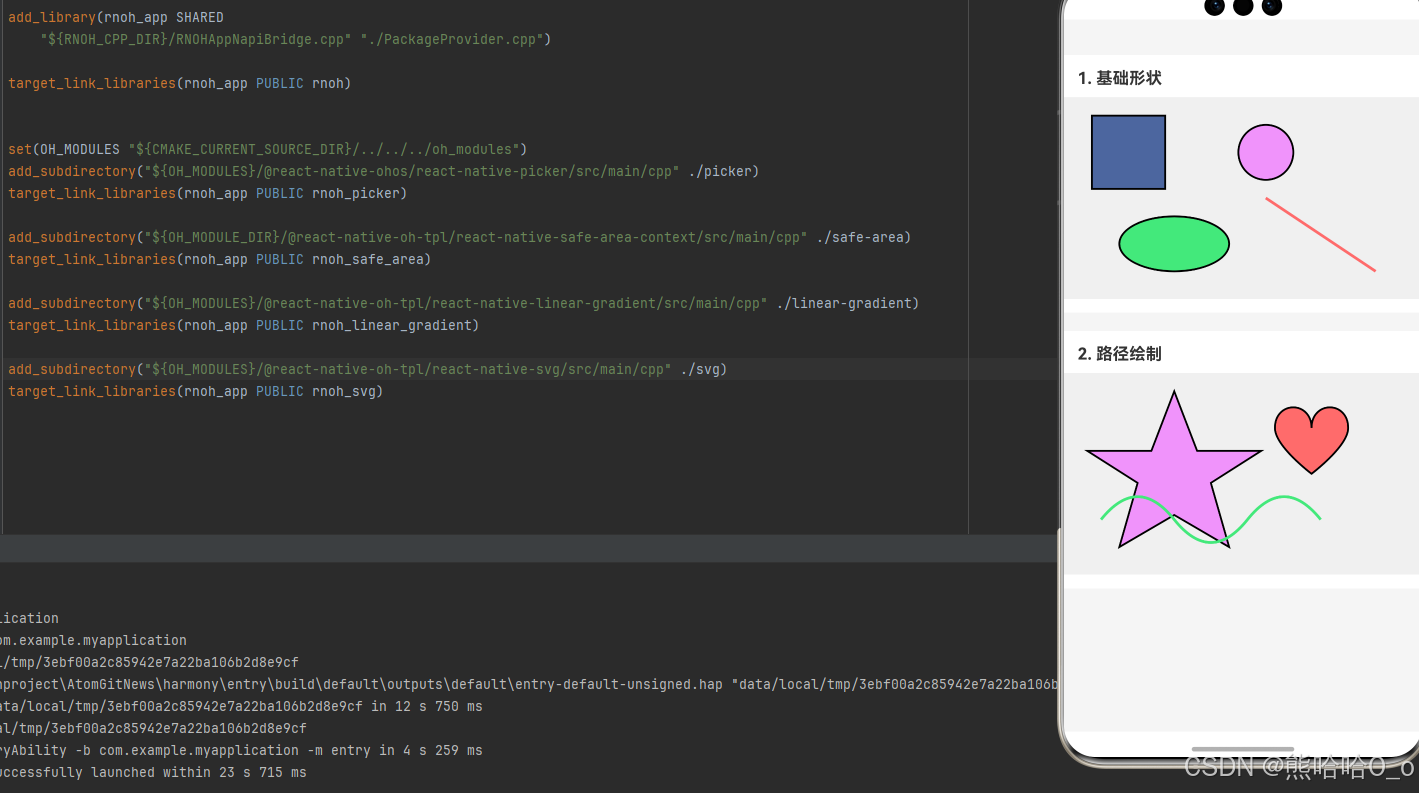
{/* 示例 1: 基础形状 */}
<View style={styles.section}>
<Text style={styles.sectionTitle}>1. 基础形状</Text>
<View style={styles.svgContainer}>
<Svg height="200" width="350">
<Rect
x="10"
y="10"
width="80"
height="80"
fill="#4c669f"
stroke="black"
strokeWidth="2"
/>
<Circle
cx="200"
cy="50"
r="30"
fill="#f093fb"
stroke="black"
strokeWidth="2"
/>
<Path
d="M40 150 A60 30 0 1 0 160 150 A60 30 0 1 0 40 150"
fill="#43e97b"
stroke="black"
strokeWidth="2"
/>
<Path
d="M200 100 L320 180"
stroke="#ff6b6b"
strokeWidth="3"
fill="none"
/>
</Svg>
</View>
</View>
{/* 示例 2: 路径绘制 */}
<View style={styles.section}>
<Text style={styles.sectionTitle}>2. 路径绘制</Text>
<View style={styles.svgContainer}>
<Svg height="200" width="350">
{/* 星形 */}
<Path
d="M100 10 L125 75 L195 75 L140 110 L160 180 L100 145 L40 180 L60 110 L5 75 L75 75 Z"
fill="#f093fb"
stroke="black"
strokeWidth="2"
/>
{/* 心形 */}
<Path
d="M250 50 C250 20 210 20 210 50 C210 70 250 100 250 100 C250 100 290 70 290 50 C290 20 250 20 250 50 Z"
fill="#ff6b6b"
stroke="black"
strokeWidth="2"
/>
{/* 波浪线 */}
<Path
d="M20 150 Q60 100 100 150 T180 150 T260 150"
fill="none"
stroke="#43e97b"
strokeWidth="3"
/>
</Svg>
</View>
</View>
</ScrollView>
</SafeAreaView>
);
}
const styles = StyleSheet.create({
container: {
flex: 1,
backgroundColor: '#f5f5f5',
},
section: {
marginBottom: 20,
backgroundColor: '#ffffff',
paddingVertical: 15,
},
sectionTitle: {
fontSize: 18,
fontWeight: 'bold',
marginBottom: 10,
marginLeft: 15,
color: '#333333',
},
svgContainer: {
backgroundColor: '#f0f0f0',
justifyContent: 'center',
alignItems: 'center',
paddingVertical: 10,
},
});
export default SvgDemo;
6. 执行 npm run harmony 命令
执行 npm run harmony 命令,构建适用于鸿蒙的 bundle 文件,并拷贝到鸿蒙工程 rawfile 目录下。
🎨 实际应用场景
react-native-svg 可以应用于以下实际场景:
- 图标渲染: 创建可缩放的矢量图标,支持多种尺寸而不失真
- 数据可视化: 绘制图表、图形、仪表盘等数据展示
- 装饰性图形: 为应用添加美观的装饰性图形元素
- 复杂图形: 绘制自定义的复杂图形和图案
⚠️ 注意事项与最佳实践
1. 性能优化
- 避免使用过于复杂的路径
- 对于静态图形,考虑使用图片代替
- 在 ScrollView 中避免大量复杂的 SVG
2. 响应式设计
// ✅ 使用百分比或相对单位
<Svg width="100%" height="200" />

// ❌ 避免固定尺寸
<Svg width="350" height="200" />
3. 调试技巧
// 添加边框便于调试
<Path
  d="..."
  stroke="black"
  strokeWidth="1"
  fill="none"
/>
📝 总结
通过集成 react-native-svg,我们为项目添加了强大的 SVG 渲染能力。该库支持所有 SVG 元素、渐变、动画等功能,可以用于图标、图表、复杂图形等各种场景。
关键要点回顾
- ✅ 安装依赖:
npm install @react-native-oh-tpl/react-native-svg - ✅ 配置平台: 通过 har 包或直接链接源码,配置 CMakeLists.txt、PackageProvider.cpp 和 RNPackagesFactory.ts
- ✅ 集成代码: 使用
react-native-svg导入组件 - ✅ 支持功能: 所有 SVG 元素、路径、形状等
- ✅ 测试验证: 确保三端表现一致
- ⚠️ 重要: 本库已停止维护,建议使用 react-native-svg-capi
实际效果
- Android: 原生渲染的 SVG 图形
- iOS: 高质量的渲染效果
- HarmonyOS: 一致的渲染表现
版本迁移提示
由于 react-native-svg(ArkTS 版本)已停止维护,建议新项目使用 react-native-svg-capi。
欢迎加入开源鸿蒙跨平台社区:https://openharmonycrossplatform.csdn.net

作为“人工智能6S店”的官方数字引擎,为AI开发者与企业提供一个覆盖软硬件全栈、一站式门户。
更多推荐
 13
13 0
0- 0


 已为社区贡献30条内容

所有评论(0)