
Flutter框架跨平台鸿蒙开发——历史年表APP的开发流程
本文详细介绍了基于Flutter框架开发跨平台鸿蒙历史年表APP的完整流程,包括项目架构设计、核心功能实现、代码展示等内容。通过Flutter框架的跨平台特性,我们可以实现"一次编写,处处运行",提高开发效率,降低开发成本。历史年表APP的开发过程中,我们采用了MVC架构模式,实现了数据模型、数据源、视图层的分离,提高了代码的可维护性和扩展性。同时,我们还实现了响应式设计、智能筛选、时间排序等核心
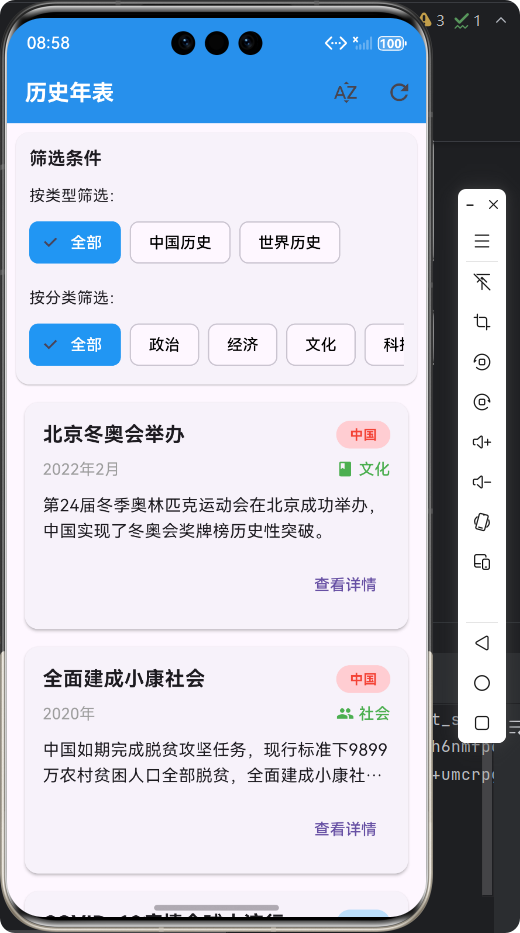
🚀运行效果展示
Flutter框架跨平台鸿蒙开发——历史年表APP的开发流程
📝 前言
随着移动互联网的快速发展,跨平台开发框架已成为移动应用开发的重要趋势。Flutter作为Google推出的开源UI软件开发工具包,凭借其"一次编写,处处运行"的特性,在跨平台开发领域占据了重要地位。本文将详细介绍基于Flutter框架开发跨平台鸿蒙历史年表APP的完整流程,包括项目架构设计、核心功能实现、代码展示等内容,为开发者提供参考。
📱
应用介绍
历史年表APP是一款用于查看中外历史大事件的移动应用,用户可以通过该应用浏览、筛选和搜索历史事件,了解不同时期的历史发展脉络。应用具有以下特点:
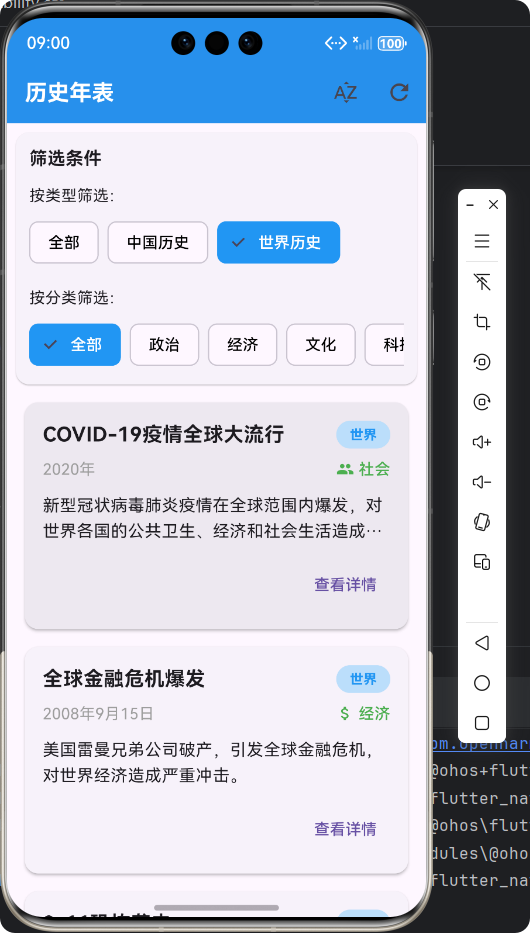
- 🎯 响应式设计:适配不同屏幕尺寸的设备
- 🌍 中外历史:涵盖中国历史和世界历史事件
- 🔍 智能筛选:支持按类型、分类、年份筛选
- ⏰ 时间排序:支持按年份从早到晚或从晚到早排序
- 📋 详细信息:提供历史事件的详细描述
🔄 开发流程
1. 项目初始化
首先,我们需要创建一个Flutter项目,并配置鸿蒙开发环境。Flutter项目初始化完成后,我们需要根据应用需求设计项目结构。
2. 项目架构设计
采用MVC(Model-View-Controller)架构模式,将应用分为数据模型、视图和控制器三个部分,提高代码的可维护性和扩展性。
lib/
├── models/                 # 数据模型层
│   └── historical_event_model.dart
├── data/                   # 数据源层
│   └── historical_event_data_source.dart
├── screens/                # 视图层
│   └── historical_timeline_screen.dart
└── main.dart               # 应用入口
🚀 核心功能实现及代码展示
1. 数据模型设计
首先,我们需要设计历史事件的数据模型,包括事件的基本信息、类型、分类等。
/// 历史事件模型
/// 用于存储历史事件的详细信息
class HistoricalEvent {
  /// 事件ID
  final String id;

  /// 事件年份
  final int year;

  /// 事件月份(可选)
  final int? month;

  /// 事件日期(可选)
  final int? day;

  /// 事件标题
  final String title;

  /// 事件描述
  final String description;

  /// 事件类型(中国历史/世界历史)
  final EventType type;

  /// 事件分类
  final EventCategory category;

  /// 构造函数
  HistoricalEvent({
    required this.id,
    required this.year,
    this.month,
    this.day,
    required this.title,
    required this.description,
    required this.type,
    required this.category,
  });

  /// 获取格式化的日期字符串
  String get formattedDate {
    if (month != null && day != null) {
      return '$year年$month月$day日';
    } else if (month != null) {
      return '$year年$month月';
    } else {
      return '$year年';
    }
  }
}

/// 事件类型枚举
enum EventType {
  /// 中国历史
  chinese,

  /// 世界历史
  world,
}

/// 事件分类枚举
enum EventCategory {
  /// 政治
  politics,

  /// 经济
  economy,

  /// 文化
  culture,

  /// 科技
  technology,

  /// 军事
  military,

  /// 社会
  society,

  /// 其他
  other,
}
2. 数据源实现
接下来,我们需要实现历史事件的数据源,提供历史事件的示例数据。
/// 历史事件数据源
/// 提供历史事件的示例数据
class HistoricalEventDataSource {
  /// 获取所有历史事件
  static List<HistoricalEvent> getAllEvents() {
    return [...getChineseEvents(), ...getWorldEvents()];
  }

  /// 获取中国历史事件
  static List<HistoricalEvent> getChineseEvents() {
    return [
      HistoricalEvent(
        id: 'ch-001',
        year: 1949,
        month: 10,
        day: 1,
        title: '中华人民共和国成立',
        description: '毛泽东主席在天安门城楼宣布中华人民共和国中央人民政府成立,标志着中国人民从此站起来了。',
        type: EventType.chinese,
        category: EventCategory.politics,
      ),
      // 更多中国历史事件...
    ];
  }

  /// 获取世界历史事件
  static List<HistoricalEvent> getWorldEvents() {
    return [
      HistoricalEvent(
        id: 'w-001',
        year: 1945,
        month: 9,
        day: 2,
        title: '第二次世界大战结束',
        description: '日本正式签署投降书,标志着第二次世界大战全面结束,世界反法西斯战争取得胜利。',
        type: EventType.world,
        category: EventCategory.military,
      ),
      // 更多世界历史事件...
    ];
  }

  /// 根据年份范围过滤事件
  static List<HistoricalEvent> filterEventsByYearRange(
      List<HistoricalEvent> events, int startYear, int endYear) {
    return events.where((event) => event.year >= startYear && event.year <= endYear).toList();
  }

  /// 根据事件类型过滤事件
  static List<HistoricalEvent> filterEventsByType(
      List<HistoricalEvent> events, EventType type) {
    return events.where((event) => event.type == type).toList();
  }

  /// 根据事件分类过滤事件
  static List<HistoricalEvent> filterEventsByCategory(
      List<HistoricalEvent> events, EventCategory category) {
    return events.where((event) => event.category == category).toList();
  }

  /// 按年份排序事件(从早到晚)
  static List<HistoricalEvent> sortEventsByYearAsc(List<HistoricalEvent> events) {
    return List.from(events)..sort((a, b) => a.year.compareTo(b.year));
  }

  /// 按年份排序事件(从晚到早)
  static List<HistoricalEvent> sortEventsByYearDesc(List<HistoricalEvent> events) {
    return List.from(events)..sort((a, b) => b.year.compareTo(a.year));
  }
}
3. 主页面实现
历史年表APP的主页面主要包括筛选栏和历史事件列表两部分。筛选栏用于按类型、分类筛选事件,历史事件列表用于展示筛选后的事件。
/// 历史年表主页面
/// 用于展示和筛选历史事件
class HistoricalTimelineScreen extends StatefulWidget {
/// 构造函数
const HistoricalTimelineScreen({super.key});
State<HistoricalTimelineScreen> createState() => _HistoricalTimelineScreenState();
}
class _HistoricalTimelineScreenState extends State<HistoricalTimelineScreen> {
/// 所有历史事件
late List<HistoricalEvent> allEvents;
/// 筛选后的历史事件
late List<HistoricalEvent> filteredEvents;
/// 选中的事件类型(null表示全部)
EventType? selectedEventType;
/// 选中的事件分类(null表示全部)
EventCategory? selectedCategory;
/// 排序方式(true表示从早到晚,false表示从晚到早)
bool isAscending = false;
void initState() {
super.initState();
// 初始化数据
allEvents = HistoricalEventDataSource.getAllEvents();
filteredEvents = HistoricalEventDataSource.sortEventsByYearDesc(allEvents);
}
/// 筛选事件
void _filterEvents() {
List<HistoricalEvent> tempEvents = List.from(allEvents);
// 按事件类型筛选
if (selectedEventType != null) {
tempEvents = HistoricalEventDataSource.filterEventsByType(tempEvents, selectedEventType!);
}
// 按事件分类筛选
if (selectedCategory != null) {
tempEvents = HistoricalEventDataSource.filterEventsByCategory(tempEvents, selectedCategory!);
}
// 排序
if (isAscending) {
tempEvents = HistoricalEventDataSource.sortEventsByYearAsc(tempEvents);
} else {
tempEvents = HistoricalEventDataSource.sortEventsByYearDesc(tempEvents);
}
setState(() {
filteredEvents = tempEvents;
});
}
Widget build(BuildContext context) {
return Scaffold(
appBar: AppBar(
title: const Text('历史年表'),
actions: [
IconButton(
onPressed: _toggleSortOrder,
icon: Icon(
isAscending ? Icons.sort_by_alpha : Icons.sort_by_alpha_outlined,
),
tooltip: isAscending ? '从晚到早排序' : '从早到晚排序',
),
IconButton(
onPressed: _resetFilters,
icon: const Icon(Icons.refresh),
tooltip: '重置筛选',
),
],
),
body: Column(
children: [
// 筛选栏
_buildFilterBar(),
// 历史事件列表
Expanded(
child: filteredEvents.isEmpty
? const Center(
child: Text('暂无历史事件数据'),
)
: ListView.builder(
itemCount: filteredEvents.length,
itemBuilder: (context, index) {
final event = filteredEvents[index];
return _buildEventCard(event);
},
),
),
],
),
);
}
// 其他方法实现...
}
4. 事件卡片设计
历史事件卡片采用卡片式设计,展示事件的标题、日期、类型、分类等信息,点击卡片可以查看事件详情。
/// 构建事件卡片
Widget _buildEventCard(HistoricalEvent event) {
  return Card(
    margin: const EdgeInsets.symmetric(horizontal: 16.0, vertical: 8.0),
    elevation: 2,
    shape: RoundedRectangleBorder(
      borderRadius: BorderRadius.circular(12.0),
    ),
    child: InkWell(
      onTap: () => _showEventDetail(event),
      borderRadius: BorderRadius.circular(12.0),
      child: Padding(
        padding: const EdgeInsets.all(16.0),
        child: Column(
          crossAxisAlignment: CrossAxisAlignment.start,
          children: [
            // 事件标题和日期
            Row(
              mainAxisAlignment: MainAxisAlignment.spaceBetween,
              children: [
                Expanded(
                  child: Text(
                    event.title,
                    style: const TextStyle(
                      fontWeight: FontWeight.bold,
                      fontSize: 18,
                    ),
                    overflow: TextOverflow.ellipsis,
                    maxLines: 1,
                  ),
                ),
                const SizedBox(width: 12),
                Container(
                  padding: const EdgeInsets.symmetric(horizontal: 12.0, vertical: 4.0),
                  decoration: BoxDecoration(
                    color: event.type == EventType.chinese ? Colors.red[100] : Colors.blue[100],
                    borderRadius: BorderRadius.circular(16.0),
                  ),
                  child: Text(
                    event.type == EventType.chinese ? '中国' : '世界',
                    style: TextStyle(
                      fontSize: 12,
                      fontWeight: FontWeight.bold,
                      color: event.type == EventType.chinese ? Colors.red : Colors.blue,
                    ),
                  ),
                ),
              ],
            ),
            const SizedBox(height: 8),

            // 事件日期和分类
            Row(
              mainAxisAlignment: MainAxisAlignment.spaceBetween,
              children: [
                Text(
                  event.formattedDate,
                  style: const TextStyle(
                    color: Colors.grey,
                    fontSize: 14,
                  ),
                ),
                Row(
                  children: [
                    Icon(
                      EventCategoryUtil.getCategoryIcon(event.category),
                      size: 16,
                      color: Colors.green,
                    ),
                    const SizedBox(width: 4),
                    Text(
                      EventCategoryUtil.getCategoryName(event.category),
                      style: const TextStyle(
                        color: Colors.green,
                        fontSize: 14,
                        fontWeight: FontWeight.w500,
                      ),
                    ),
                  ],
                ),
              ],
            ),
            const SizedBox(height: 12),

            // 事件描述
            Text(
              event.description,
              style: const TextStyle(
                fontSize: 15,
                height: 1.5,
              ),
              overflow: TextOverflow.ellipsis,
              maxLines: 2,
            ),
            const SizedBox(height: 12),

            // 查看详情按钮
            Align(
              alignment: Alignment.centerRight,
              child: TextButton(
                onPressed: () => _showEventDetail(event),
                child: const Text('查看详情'),
              ),
            ),
          ],
        ),
      ),
    ),
  );
}
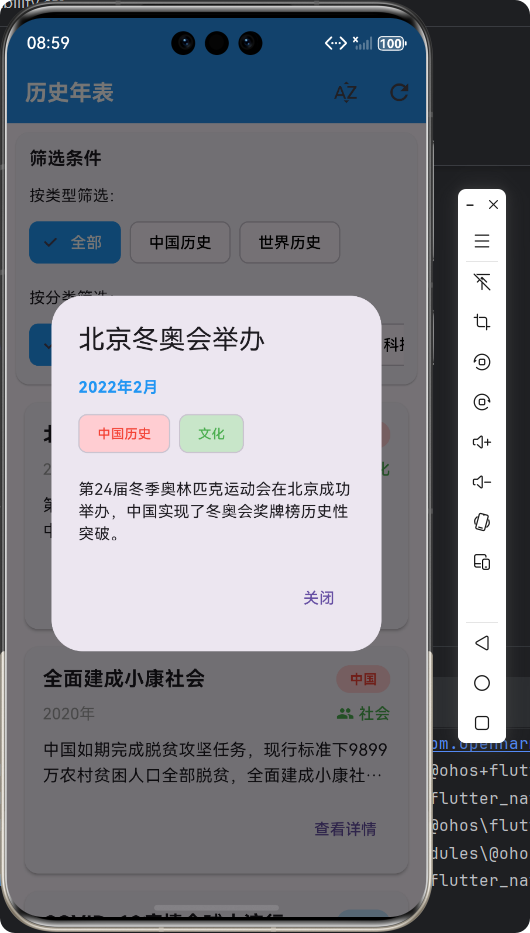
5. 事件详情展示
点击事件卡片后,会弹出事件详情对话框,展示事件的完整信息。
/// 显示事件详情
void _showEventDetail(HistoricalEvent event) {
  showDialog(
    context: context,
    builder: (context) => AlertDialog(
      title: Text(event.title),
      content: SingleChildScrollView(
        child: Column(
          crossAxisAlignment: CrossAxisAlignment.start,
          mainAxisSize: MainAxisSize.min,
          children: [
            Text(
              event.formattedDate,
              style: const TextStyle(
                fontWeight: FontWeight.bold,
                color: Colors.blue,
              ),
            ),
            const SizedBox(height: 8),
            Row(
              children: [
                Chip(
                  label: Text(
                    event.type == EventType.chinese ? '中国历史' : '世界历史',
                    style: const TextStyle(fontSize: 12),
                  ),
                  backgroundColor: event.type == EventType.chinese ? Colors.red[100] : Colors.blue[100],
                  labelStyle: TextStyle(
                    color: event.type == EventType.chinese ? Colors.red : Colors.blue,
                  ),
                ),
                const SizedBox(width: 8),
                Chip(
                  label: Text(
                    EventCategoryUtil.getCategoryName(event.category),
                    style: const TextStyle(fontSize: 12),
                  ),
                  backgroundColor: Colors.green[100],
                  labelStyle: const TextStyle(color: Colors.green),
                ),
              ],
            ),
            const SizedBox(height: 16),
            Text(event.description),
          ],
        ),
      ),
      actions: [
        TextButton(
          onPressed: () => Navigator.pop(context),
          child: const Text('关闭'),
        ),
      ],
    ),
  );
}
🎯 核心功能实现流程
1. 数据初始化流程
2. 事件筛选流程
🔧 技术要点
- 响应式设计:使用Flutter的LayoutBuilder、MediaQuery等组件实现响应式布局,适配不同屏幕尺寸
- 状态管理:使用StatefulWidget管理页面状态,实现筛选条件的动态更新
- 数据过滤:实现多条件筛选功能,支持按类型、分类、年份筛选
- UI组件复用:封装事件卡片、筛选标签等组件,提高代码复用率
- 跨平台适配:针对鸿蒙平台进行特定配置,确保应用在鸿蒙设备上正常运行
📊 测试与调试
在开发过程中,我们使用Flutter的调试工具进行测试和调试,包括:
- 热重载:快速查看代码更改效果
- DevTools:分析应用性能、调试UI布局
- 模拟器测试:在鸿蒙模拟器上测试应用功能
🎉 总结
本文详细介绍了基于Flutter框架开发跨平台鸿蒙历史年表APP的完整流程,包括项目架构设计、核心功能实现、代码展示等内容。通过Flutter框架的跨平台特性,我们可以实现"一次编写,处处运行",提高开发效率,降低开发成本。
历史年表APP的开发过程中,我们采用了MVC架构模式,实现了数据模型、数据源、视图层的分离,提高了代码的可维护性和扩展性。同时,我们还实现了响应式设计、智能筛选、时间排序等核心功能,为用户提供了良好的使用体验。
随着Flutter框架的不断发展和完善,跨平台开发将变得更加高效和便捷。希望本文能够为开发者提供参考,帮助大家更好地掌握Flutter跨平台开发技术,开发出更多优秀的跨平台应用。
📚 参考资料
欢迎加入开源鸿蒙跨平台社区:https://openharmonycrossplatform.csdn.net

作为“人工智能6S店”的官方数字引擎,为AI开发者与企业提供一个覆盖软硬件全栈、一站式门户。
更多推荐
 21
21 0
0- 0


 已为社区贡献8条内容

所有评论(0)