
鸿蒙学习实战之路-ArkTS 循环渲染_Repeat 使用指南
Repeat 是 ArkTS 中的"智能上菜系统"!ForEach:每次客人点菜都要重新炒一遍(重新创建组件):客人点菜时再炒,但炒完就倒掉(销毁组件)Repeat:客人点菜时先看看有没有现成的,没现成的再炒,炒完的菜不倒掉,留着给下个客人用(节点复用)特性ForEachRepeat性能基础中等最佳内存管理无自动释放智能复用大数据支持差好极好实现复杂度简单中等复杂适用场景小数据量中等数据量大数据量
鸿蒙学习实战之路-ArkTS 循环渲染_Repeat 使用指南
ArkTS 循环渲染_Repeat 使用指南
害,上篇我们聊了 LazyForEach 数据懒加载,有朋友私信问我:“西兰花啊,我有个列表要显示几千条数据,懒加载是有了,但每次滚动还是有卡顿,咋整呢?”
别慌!今天我们就来聊聊鸿蒙的"性能神器"——Repeat 组件!这可是比 ForEach 和 LazyForEach 更高级的存在,节点复用、智能缓存,让你的应用流畅得像德芙巧克力~
什么是 Repeat 组件?
Repeat 是 ArkTS 中的"智能上菜系统"!想象一下:
- ForEach:每次客人点菜都要重新炒一遍(重新创建组件)
- LazyForEach:客人点菜时再炒,但炒完就倒掉(销毁组件)
- Repeat:客人点菜时先看看有没有现成的,没现成的再炒,炒完的菜不倒掉,留着给下个客人用(节点复用)

使用限制(必读!)
🥦 西兰花警告:
Repeat 不是万能的!它有以下限制,用错了就是给自己挖坑:
1. 容器组件限制
只支持 5 种滚动容器组件:
- List:列表(最常用)
- ListItemGroup:分组列表
- Grid:网格布局
- Swiper:轮播组件
- WaterFlow:瀑布流
2. 组件结构限制
- 循环渲染只允许创建一个子组件
- 与 List 配合使用时,子组件必须为 ListItem
- 不支持 V1 装饰器,会导致渲染异常
3. 性能限制
- 当前不支持动画效果
- 滚动容器内只能包含一个 Repeat
- 不建议同时包含 ListItem、ForEach、LazyForEach
// ✅ 正确的使用方式
@Entry
@ComponentV2
struct CorrectExample {
  @Local dataArr: Array<string> = [];

  aboutToAppear(): void {
    for (let i = 0; i < 50; i++) {
      this.dataArr.push(`data_${i}`);
    }
  }

  build() {
    Column() {
      List() {
        Repeat<string>(this.dataArr)
          .each((ri: RepeatItem<string>) => {
            ListItem() {
              Text('each_' + ri.item).fontSize(30)
            }
          })
          .virtualScroll({ totalCount: this.dataArr.length })
      }
      .cachedCount(2)
      .height('70%')
      .border({ width: 1 })
    }
  }
}
核心能力详解
1. 基础循环渲染
最简单的情况:只需要循环渲染一种子组件。
@Entry
@ComponentV2
struct 基础示例 {
  @Local 菜品列表: Array<string> = ['红烧肉', '麻婆豆腐', '宫保鸡丁', '糖醋里脊', '鱼香肉丝'];

  build() {
    Column() {
      Text('今日菜品推荐').fontSize(24).fontWeight(FontWeight.Bold)

      List() {
        Repeat<string>(this.菜品列表)
          .each((ri: RepeatItem<string>) => {
            ListItem() {
              Row() {
                Text(ri.item).fontSize(18).fontColor(Color.Black)
                Text('推荐').fontSize(14).fontColor(Color.Red).margin({ left: 10 })
              }
              .width('100%')
              .padding(15)
              .backgroundColor('#F5F5F5')
              .borderRadius(8)
            }
          })
          .virtualScroll({ totalCount: this.菜品列表.length })
      }
      .cachedCount(2)
      .divider({ strokeWidth: 1, color: '#E0E0E0' })
      .padding(20)
    }
    .padding(20)
    .height('100%')
    .backgroundColor(0xF1F3F5)
  }
}
2. 多模板渲染(高级玩法)
同一个数据源,根据不同条件渲染不同样式的组件。就像一家餐厅,根据客人喜好提供不同套餐!
@Entry
@ComponentV2
struct 多模板示例 {
  @Local 菜品列表: Array<string> = [];

  aboutToAppear(): void {
    for (let i = 0; i < 50; i++) {
      this.菜品列表.push(`菜品_${i}`);
    }
  }

  build() {
    Column() {
      Text('智能餐厅推荐系统').fontSize(24).fontWeight(FontWeight.Bold)

      List() {
        Repeat<string>(this.菜品列表)
          .each((ri: RepeatItem<string>) => {
            // 默认模板
            ListItem() {
              Text('普通_' + ri.item).fontSize(30).fontColor(Color.Gray)
            }
          })
          .key((item: string, index: number): string => JSON.stringify(item))
          .virtualScroll({ totalCount: this.菜品列表.length })
          .templateId((item: string, index: number): string => {
            // 根据索引返回不同的模板类型
            return index <= 4 ? 'A' : (index <= 10 ? 'B' : '');
          })
          .template('A', (ri: RepeatItem<string>) => {
            // A模板:招牌菜
            ListItem() {
              Text('招牌_' + ri.item).fontSize(30).fontColor(Color.Green)
                .backgroundColor('#E8F5E8')
                .borderRadius(8)
                .padding(10)
            }
          }, { cachedCount: 3 })
          .template('B', (ri: RepeatItem<string>) => {
            // B模板:特色菜
            ListItem() {
              Text('特色_' + ri.item).fontSize(30).fontColor(Color.Blue)
                .backgroundColor('#E8F0FF')
                .borderRadius(8)
                .padding(10)
            }
          }, { cachedCount: 4 })
      }
      .cachedCount(2)
      .height('70%')
      .border({ width: 1 })
      .padding(20)
    }
    .padding(20)
    .height('100%')
    .backgroundColor(0xF1F3F5)
  }
}
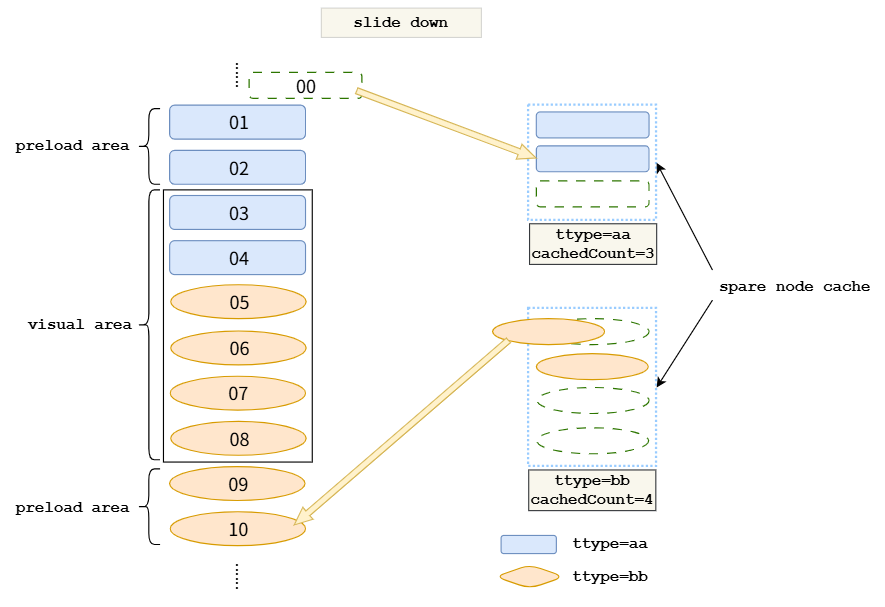
节点复用机制
Repeat 最牛的地方就是节点复用!让我用餐厅的比喻来解释:
1. 四种节点操作
- 节点创建:新客人点菜,厨房现炒(首次渲染)
- 节点更新:客人想换口味,只改调料不改菜(属性更新)
- 节点复用:新客人点了同样的菜,直接端上之前的菜(从缓存池复用)
- 节点销毁:客人走了,菜倒了(离开可视区域)
2. 缓存池机制

- L1 缓存:有效加载区域(当前屏幕可见+预加载区域)
- L2 缓存:每个模板的空闲节点缓存池
3. 滑动场景实战
当用户向右滑动时:
@Entry
@ComponentV2
struct 滑动复用示例 {
  @Local 数据列表: Array<string> = [];

  aboutToAppear(): void {
    for (let i = 0; i < 1000; i++) {
      this.数据列表.push(`数据项_${i}`);
    }
  }

  build() {
    Column() {
      Text('长列表滑动演示(1000条数据)').fontSize(20).fontWeight(FontWeight.Bold)

      List() {
        Repeat<string>(this.数据列表)
          .each((ri: RepeatItem<string>) => {
            ListItem() {
              Row() {
                Text(`索引: ${ri.index}`).fontSize(16).fontColor(Color.Blue)
                Text(ri.item).fontSize(16).margin({ left: 20 })
              }
              .width('100%')
              .padding(15)
              .backgroundColor(ri.index % 2 === 0 ? '#FFFFFF' : '#F8F9FA')
            }
          })
          .key((item: string, index: number): string => item)
          .virtualScroll({ totalCount: this.数据列表.length })
      }
      .cachedCount(3) // 预加载区域大小
      .divider({ strokeWidth: 1, color: '#E0E0E0' })
      .padding(20)
      .layoutWeight(1)
    }
    .padding(20)
    .height('100%')
    .backgroundColor(0xF1F3F5)
  }
}
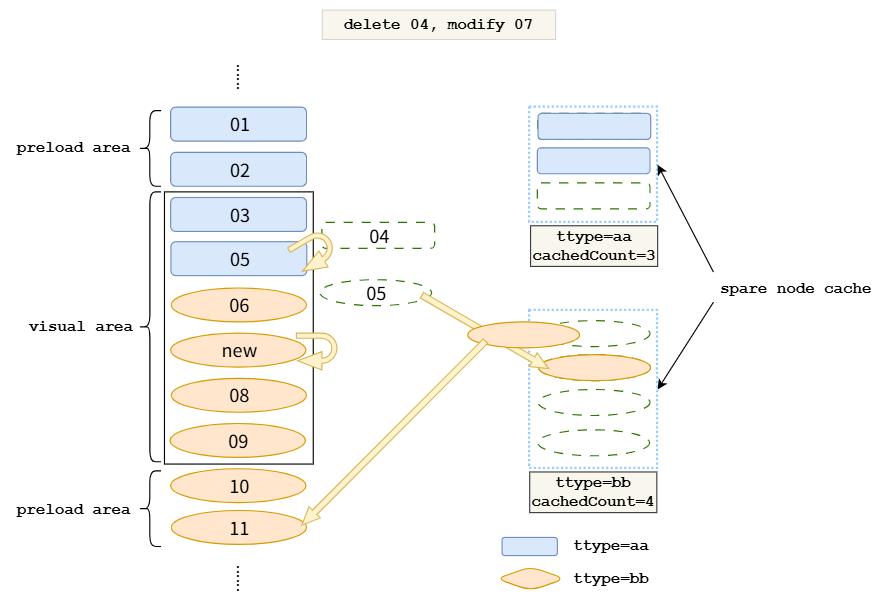
4. 数据更新场景
当数组发生变化时的处理:
@Entry
@ComponentV2
struct 数据更新示例 {
  @Local 购物车列表: Array<商品> = [];
  @Local 修改次数: number = 0;

  constructor() {
    super();
    this.购物车列表 = [
      new 商品('001', '红烧肉', 28.8),
      new 商品('002', '麻婆豆腐', 18.8),
      new 商品('003', '宫保鸡丁', 32.8),
      new 商品('004', '糖醋里脊', 26.8),
      new 商品('005', '鱼香肉丝', 22.8),
    ];
  }

  删除商品(index: number) {
    this.购物车列表.splice(index, 1);
  }

  修改价格(index: number) {
    this.购物车列表[index].价格 = Math.random() * 50;
  }

  build() {
    Column({ space: 15 }) {
      Text('购物车管理').fontSize(24).fontWeight(FontWeight.Bold)

      Row({ space: 10 }) {
        Button('删除第2个商品').onClick(() => this.删除商品(1))
        Button('随机改价').onClick(() => {
          const randomIndex = Math.floor(Math.random() * this.购物车列表.length);
          this.修改价格(randomIndex);
          this.修改次数++;
        })
      }

      Text(`修改次数: ${this.修改次数}`).fontSize(16).fontColor(Color.Gray)

      List() {
        Repeat<商品>(this.购物车列表)
          .each((ri: RepeatItem<商品>) => {
            ListItem() {
              Row() {
                Column() {
                  Text(ri.item.名称).fontSize(18).fontWeight(FontWeight.Bold)
                  Text(`ID: ${ri.item.ID}`).fontSize(14).fontColor(Color.Gray)
                }
                .alignItems(HorizontalAlign.Start)
                .layoutWeight(1)

                Column() {
                  Text(`¥${ri.item.价格.toFixed(1)}`).fontSize(18).fontColor(Color.Red)
                  Text(`索引: ${ri.index}`).fontSize(12).fontColor(Color.Gray)
                }
                .alignItems(HorizontalAlign.End)
              }
              .width('100%')
              .padding(15)
              .backgroundColor('#FFFFFF')
              .borderRadius(8)
              .shadow({
                radius: 4,
                color: '#00000020',
                offsetX: 0,
                offsetY: 2
              })
            }
          })
          .key((item: 商品): string => item.ID)
          .virtualScroll({ totalCount: this.购物车列表.length })
      }
      .layoutWeight(1)
      .cachedCount(2)
      .divider({ strokeWidth: 1, color: '#E0E0E0' })
      .padding(20)
    }
    .padding(20)
    .height('100%')
    .backgroundColor(0xF1F3F5)
  }
}

@ObservedV2
class 商品 {
  @Trace ID: string;
  @Trace 名称: string;
  @Trace 价格: number;

  constructor(ID: string, 名称: string, 价格: number) {
    this.ID = ID;
    this.名称 = 名称;
    this.价格 = 价格;
  }
}
键值生成规则
键值是 Repeat 识别数据的关键!就像每个商品的条形码,必须唯一且稳定。
// ✅ 正确的键值生成
Repeat<string>(this.数据列表).key((item: string, index: number): string => {
  // 推荐:使用唯一标识符
  return item; // 如果item本身就是唯一标识
  // 或者
  return `${item}_${index}`; // 组合使用
});

// ❌ 错误的键值生成
Repeat<string>(this.数据列表).key((item: string, index: number): string => {
  return index.toString(); // 危险!索引变化会导致key变化
});

// ✅ 推荐:对象数组 + 唯一ID
@ObservedV2
class 商品 {
  @Trace ID: string;
  @Trace 名称: string;
  @Trace 价格: number;

  constructor(ID: string, 名称: string, 价格: number) {
    this.ID = ID; // 唯一标识符
    this.名称 = 名称;
    this.价格 = 价格;
  }
}

Repeat<商品>(this.商品列表).key((item: 商品): string => item.ID); // 使用唯一ID作为键值
🥦 西兰花小贴士:
键值生成的黄金法则:
- 唯一性:每个数据项的键值必须唯一
- 一致性:相同数据输入必须产生相同键值
- 稳定性:数据项不变,键值就不能变
数据精准懒加载
当数据量超大(几千条甚至上万条)时,我们可以实现真正的"按需加载"!
@Entry
@ComponentV2
struct 精准懒加载示例 {
  @Local 虚拟数组: Array<string> = [];
  scroller: Scroller = new Scroller();

  // 模拟从服务器获取数据
  private async 获取数据(起始索引: number, 数量: number): Promise<Array<string>> {
    const 模拟延迟 = 300; // 模拟网络延迟
    await new Promise(resolve => setTimeout(resolve, 模拟延迟));

    const 结果: Array<string> = [];
    for (let i = 0; i < 数量; i++) {
      结果.push(`虚拟数据_${起始索引 + i}`);
    }
    return 结果;
  }

  build() {
    Column({ space: 10 }) {
      Text('海量数据演示(虚拟10000条)').fontSize(20).fontWeight(FontWeight.Bold)

      List({ scroller: this.scroller, space: 5, initialIndex: 100 }) {
        Repeat<string>(this.虚拟数组)
          .each((ri: RepeatItem<string>) => {
            ListItem() {
              Row() {
                Text(`虚拟数据_${ri.index}`).fontSize(16)
                Text(`[延迟加载]`).fontSize(12).fontColor(Color.Blue).margin({ left: 10 })
              }
              .width('100%')
              .padding(15)
              .backgroundColor('#F8F9FA')
              .borderRadius(8)
            }
          })
          .key((item: string, index: number): string => `虚拟_${index}`)
          .virtualScroll({
            totalCount: 10000, // 总数据量
            onTotalCount: (): number => 10000,
            onLazyLoading: async (开始索引: number, 结束索引: number) => {
              // 按需加载数据
              const 数据 = await this.获取数据(开始索引, 结束索引 - 开始索引 + 1);
              // 插入到对应位置
              this.虚拟数组.splice(开始索引, 0, ...数据);
            }
          })
      }
      .cachedCount(5)
      .divider({ strokeWidth: 1, color: '#E0E0E0' })
      .layoutWeight(1)
      .padding(20)
    }
    .padding(20)
    .height('100%')
    .backgroundColor(0xF1F3F5)
  }
}
拖拽排序功能
Repeat 还支持拖拽排序,让你的列表可以像微信通讯录一样拖拽调整顺序!
@Entry
@ComponentV2
struct 拖拽排序示例 {
  @Local 任务列表: Array<任务> = [];

  constructor() {
    super();
    this.任务列表 = [
      new 任务('001', '完成项目文档'),
      new 任务('002', '代码审查'),
      new 任务('003', '用户测试'),
      new 任务('004', '部署上线'),
      new 任务('005', '性能优化'),
    ];
  }

  build() {
    Column({ space: 15 }) {
      Text('任务列表(拖拽排序)').fontSize(24).fontWeight(FontWeight.Bold)

      Text('长按拖拽调整顺序').fontSize(14).fontColor(Color.Gray)

      List() {
        Repeat<任务>(this.任务列表)
          .each((ri: RepeatItem<任务>) => {
            ListItem() {
              Row() {
                Text(ri.item.图标).fontSize(24).margin({ right: 15 })

                Column() {
                  Text(ri.item.名称).fontSize(18).fontWeight(FontWeight.Bold)
                  Text(`优先级: ${ri.item.优先级}`).fontSize(14).fontColor(Color.Gray)
                }
                .alignItems(HorizontalAlign.Start)
                .layoutWeight(1)

                Text('≡').fontSize(20).fontColor(Color.Gray) // 拖拽图标
              }
              .width('100%')
              .padding(15)
              .backgroundColor('#FFFFFF')
              .borderRadius(8)
              .shadow({
                radius: 4,
                color: '#00000020',
                offsetX: 0,
                offsetY: 2
              })
            }
          })
          .key((item: 任务): string => item.ID)
          .virtualScroll({ totalCount: this.任务列表.length })
          .onMove((开始索引: number, 结束索引: number) => {
            // 拖拽排序逻辑
            const 移动元素 = this.任务列表.splice(开始索引, 1)[0];
            this.任务列表.splice(结束索引, 0, 移动元素);
          })
      }
      .cachedCount(3)
      .divider({ strokeWidth: 1, color: '#E0E0E0' })
      .padding(20)
    }
    .padding(20)
    .height('100%')
    .backgroundColor(0xF1F3F5)
  }
}

@ObservedV2
class 任务 {
  @Trace ID: string;
  @Trace 名称: string;
  @Trace 优先级: number;
  @Trace 图标: string;

  constructor(ID: string, 名称: string) {
    this.ID = ID;
    this.名称 = 名称;
    this.优先级 = Math.floor(Math.random() * 5) + 1;
    this.图标 = ['🔴', '🟠', '🟡', '🟢', '🔵'][this.优先级 - 1];
  }
}
性能优化实战
1. 最佳实践
@Entry
@ComponentV2
struct 性能优化示例 {
  @Local 商品列表: Array<商品> = [];

  aboutToAppear(): void {
    // 模拟大量数据
    for (let i = 0; i < 5000; i++) {
      this.商品列表.push(new 商品(`商品_${i}`, `商品描述_${i}`, Math.random() * 100));
    }
  }

  build() {
    Column() {
      Text(`商品列表(${this.商品列表.length}条数据)`).fontSize(20).fontWeight(FontWeight.Bold)

      List() {
        Repeat<商品>(this.商品列表)
          .each((ri: RepeatItem<商品>) => {
            ListItem() {
              Row() {
                // 优化:避免复杂的计算放在这里
                Column() {
                  Text(ri.item.名称).fontSize(16).fontWeight(FontWeight.Bold)
                  Text(ri.item.描述).fontSize(12).fontColor(Color.Gray)
                }
                .alignItems(HorizontalAlign.Start)
                .layoutWeight(1)

                Text(`¥${ri.item.价格.toFixed(1)}`).fontSize(16).fontColor(Color.Red)
              }
              .width('100%')
              .padding(12)
              .backgroundColor('#FFFFFF')
            }
          })
          .key((item: 商品): string => item.ID) // 唯一且稳定的键值
          .virtualScroll({
            totalCount: this.商品列表.length,
            // 可选:自定义缓存策略
            reusable: true, // 启用节点复用(默认true)
          })
      }
      .cachedCount(4) // 适中的预加载数量
      .divider({ strokeWidth: 1, color: '#E0E0E0' })
      .layoutWeight(1)
    }
    .padding(15)
    .height('100%')
    .backgroundColor(0xF1F3F5)
  }
}

@ObservedV2
class 商品 {
  @Trace ID: string;
  @Trace 名称: string;
  @Trace 描述: string;
  @Trace 价格: number;

  constructor(ID: string, 名称: string, 价格: number) {
    this.ID = ID;
    this.名称 = 名称;
    this.描述 = 描述;
    this.价格 = 价格;
  }
}
2. 缓存策略调优
🥦 西兰花小贴士:
缓存设置的艺术:
- cachedCount: 容器预加载数量,一般设为可见项目的 1-2 倍
- 模板缓存: 不同模板可以设置不同的缓存数量
- 平衡点: 缓存太少会卡顿,太多会耗内存
常见问题与解决方案
问题 1:渲染结果不符合预期
症状:数组变化后,界面显示的数据和期望不符
原因:键值生成不当,导致数据错乱
解决:
// ❌ 错误:使用索引作为键值
.key((item: string, index: number): string => index.toString())

// ✅ 正确:使用唯一标识符
.key((item: string, index: number): string => item)
问题 2:滑动时出现闪烁
症状:快速滑动时,组件内容闪烁
原因:键值不稳定或缓存设置不合理
解决:
Repeat<商品>(this.商品列表)
  .key((item: 商品): string => item.ID) // 稳定的键值
  .virtualScroll({
    totalCount: this.商品列表.length,
    cachedCount: 4, // 增加缓存
  });
问题 3:内存占用过高
症状:长时间使用后,应用内存持续增长
原因:缓存池设置过大,没有及时清理
解决:
Repeat<商品>(this.商品列表)
  .each((ri: RepeatItem<商品>) => {
    ListItem() {
      // 简化组件结构
      Text(ri.item.名称).fontSize(16)
    }
  })
  .virtualScroll({ totalCount: this.商品列表.length })
问题 4:拖拽排序失效
症状:拖拽时数据没有正确移动
原因:onMove 事件处理不当
解决:
Repeat<任务>(this.任务列表).onMove((开始索引: number, 结束索引: number) => {
  if (开始索引 === 结束索引) return; // 防止无效移动

  const 移动元素 = this.任务列表.splice(开始索引, 1)[0];
  this.任务列表.splice(结束索引, 0, 移动元素);
});
电商实战案例
让我给你一个完整的电商商品列表实现,包含搜索、筛选、排序等功能:
@Entry
@ComponentV2
struct 电商商品列表 {
  @Local 商品列表: Array<商品> = [];
  @Local 搜索关键词: string = '';
  @Local 价格筛选: number = 0;
  @Local 排序方式: string = '默认';

  constructor() {
    super();
    // 初始化商品数据
    const 商品名称列表 = [
      'iPhone 15 Pro', '华为Mate60', '小米14', 'OPPO Find X7', 'vivo X100',
      'MacBook Air', 'ThinkPad X1', '戴尔XPS', '华为MateBook', '小米笔记本',
      'AirPods Pro', '华为FreeBuds', '小米耳机', '索尼WH-1000XM5', 'Bose QC45'
    ];

    for (let i = 0; i < 200; i++) {
      const 随机名称 = 商品名称列表[Math.floor(Math.random() * 商品名称列表.length)];
      const 随机价格 = Math.random() * 10000 + 100;
      const 随机评分 = Math.random() * 2 + 3;

      this.商品列表.push(new 商品(
        `商品_${i}`,
        随机名称,
        `高品质${随机名称},限时优惠`,
        随机价格,
        Math.floor(随机评分 * 10) / 10,
        Math.floor(Math.random() * 1000) + 50,
        Math.random() > 0.5 ? '现货' : '预售'
      ));
    }
  }

  get 过滤后商品列表(): Array<商品> {
    return this.商品列表.filter(商品 => {
      const 匹配搜索 = this.搜索关键词 === '' ||
        商品.名称.includes(this.搜索关键词) ||
        商品.描述.includes(this.搜索关键词);

      const 匹配价格 = this.价格筛选 === 0 || 商品.价格 <= this.价格筛选;

      return 匹配搜索 && 匹配价格;
    }).sort((a, b) => {
      switch (this.排序方式) {
        case '价格低到高':
          return a.价格 - b.价格;
        case '价格高到低':
          return b.价格 - a.价格;
        case '评分高到低':
          return b.评分 - a.评分;
        default:
          return 0;
      }
    });
  }

  build() {
    Column() {
      // 搜索和筛选区域
      this.搜索筛选区域()

      // 商品列表
      Text(`共找到 ${this.过滤后商品列表.length} 件商品`).fontSize(14).fontColor(Color.Gray)

      List() {
        Repeat<商品>(this.过滤后商品列表)
          .each((ri: RepeatItem<商品>) => {
            ListItem() {
              this.商品卡片(ri.item)
            }
          })
          .key((item: 商品): string => item.ID)
          .virtualScroll({ totalCount: this.过滤后商品列表.length })
      }
      .layoutWeight(1)
      .cachedCount(5)
      .divider({ strokeWidth: 1, color: '#E0E0E0' })
      .padding(15)
    }
    .padding(20)
    .height('100%')
    .backgroundColor(0xF1F3F5)
  }

  @Builder
  搜索筛选区域() {
    Column({ space: 10 }) {
      // 搜索框
      Row() {
        Text('🔍').fontSize(20)
        TextInput({ placeholder: '搜索商品...', text: this.搜索关键词 })
          .layoutWeight(1)
          .onChange((value: string) => {
            this.搜索关键词 = value;
          })
      }
      .padding(10)
      .backgroundColor('#FFFFFF')
      .borderRadius(8)

      // 筛选和排序
      Row({ space: 10 }) {
        Button(`价格筛选: ${this.价格筛选 === 0 ? '不限' : '≤' + this.价格筛选}`)
          .fontSize(12)
          .onClick(() => {
            // 简单的价格筛选
            const 价格选项 = [0, 500, 1000, 2000, 5000];
            const 当前索引 = 价格选项.indexOf(this.价格筛选);
            const 下个索引 = (当前索引 + 1) % 价格选项.length;
            this.价格筛选 = 价格选项[下个索引];
          })

        Button(`排序: ${this.排序方式}`)
          .fontSize(12)
          .onClick(() => {
            const 排序选项 = ['默认', '价格低到高', '价格高到低', '评分高到低'];
            const 当前索引 = 排序选项.indexOf(this.排序方式);
            const 下个索引 = (当前索引 + 1) % 排序选项.length;
            this.排序方式 = 排序选项[下个索引];
          })
      }
    }
    .margin({ bottom: 15 })
  }

  @Builder
  商品卡片(商品: 商品) {
    Row({ space: 15 }) {
      // 商品图片区域
      Column() {
        Text('📱').fontSize(40).textAlign(TextAlign.Center)
          .width(80).height(80).backgroundColor('#F0F0F0').borderRadius(8)
      }
      .width(80).height(80)

      // 商品信息区域
      Column({ space: 5 }) {
        Text(商品.名称).fontSize(16).fontWeight(FontWeight.Bold)
          .maxLines(1).textOverflow({ overflow: TextOverflow.Ellipsis })

        Text(商品.描述).fontSize(12).fontColor(Color.Gray)
          .maxLines(2).textOverflow({ overflow: TextOverflow.Ellipsis })

        Row() {
          Text(`⭐${商品.评分}`).fontSize(12).fontColor('#FF9500')
          Text(`${商品.销量}+人付款`).fontSize(12).fontColor(Color.Gray).margin({ left: 10 })
        }

        Row() {
          Text(`¥${商品.价格.toFixed(0)}`).fontSize(18).fontColor(Color.Red).fontWeight(FontWeight.Bold)
          Text(商品.库存状态).fontSize(12).fontColor(
            商品.库存状态 === '现货' ? Color.Green : Color.Orange
          ).margin({ left: 10 })
        }
      }
      .alignItems(HorizontalAlign.Start)
      .layoutWeight(1)

      // 操作按钮区域
      Column() {
        Button('加入购物车').fontSize(12).backgroundColor('#FF6B35')
      }
      .width(80)
    }
    .width('100%')
    .padding(15)
    .backgroundColor('#FFFFFF')
    .borderRadius(12)
    .shadow({
      radius: 4,
      color: '#00000020',
      offsetX: 0,
      offsetY: 2
    })
  }
}

@ObservedV2
class 商品 {
  @Trace ID: string;
  @Trace 名称: string;
  @Trace 描述: string;
  @Trace 价格: number;
  @Trace 评分: number;
  @Trace 销量: number;
  @Trace 库存状态: string;

  constructor(ID: string, 名称: string, 描述: string, 价格: number, 评分: number, 销量: number, 库存状态: string) {
    this.ID = ID;
    this.名称 = 名称;
    this.描述 = 描述;
    this.价格 = 价格;
    this.评分 = 评分;
    this.销量 = 销量;
    this.库存状态 = 库存状态;
  }
}
对比总结
| 特性 | ForEach | LazyForEach | Repeat |
|---|---|---|---|
| 性能 | 基础 | 中等 | 最佳 |
| 内存管理 | 无 | 自动释放 | 智能复用 |
| 大数据支持 | 差 | 好 | 极好 |
| 实现复杂度 | 简单 | 中等 | 复杂 |
| 适用场景 | 小数据量 | 中等数据量 | 大数据量+高性能 |
推荐资源
📚 官方文档:
总结
Repeat 组件是鸿蒙开发中的"性能利器"!它通过智能的节点复用机制,让大数据量列表的渲染性能提升到新的高度。虽然学习曲线稍陡,但一旦掌握,绝对让你的应用飞起来!
记住几个要点:
- 键值生成要稳定:唯一且一致
- 缓存策略要合理:平衡性能和内存
- 模板使用要得当:不同场景用不同模板
- 大数据场景优先:性能优势最明显
我是盐焗西兰花,
不教理论,只给你能跑的代码和避坑指南。
下期见!🥦

作为“人工智能6S店”的官方数字引擎,为AI开发者与企业提供一个覆盖软硬件全栈、一站式门户。
更多推荐

 14
14 0
0- 0


 已为社区贡献49条内容

所有评论(0)