
【Flutter&HarmonyOS】Flutter开发鸿蒙GitCode小工具实战(gitcode口袋工具箱)
本文介绍了一个基于Flutter开发的轻量级GitCode辅助工具,适用于鸿蒙系统。主要内容包括:1. 项目准备:环境配置、GitCode API密钥申请方法;2. 模块化开发:采用分层架构设计,包含常量定义、主题配置、服务层、数据模型和页面组件;3. 核心功能实现:毛玻璃效果主题、API请求封装、登录认证、仓库浏览和个人中心等模块;4. 运行测试:添加依赖配置并通过DevEco Studio进行
一、引言:项目背景与完善目标
- 项目定位:轻量型 GitCode 辅助工具(鸿蒙端),基于 Flutter 跨端开发
- 阅读收益:掌握 Flutter 开发鸿蒙应用的模块化思路 + 实战细节
- 项目目标:做个能查 GitCode 仓库的鸿蒙手机小工具(就是打开 App 能搜代码仓库、存常用仓库)
二、第一步:准备工具
1.前期准备:
-
环境:JDK 17 + DevEco Studio 4.0 + Flutter 3.10
-
工具:PowerShell终端、VS Code(写Flutter代码)、DevEco Studio(管理鸿蒙工程)
2.拿“钥匙
去 GitCode 官网注册账号,申请一个 “API 密钥”(后续搜仓库要用)
-
GitCode 的定位
- GitCode 是一个面向开发者的代码托管平台,类似 GitHub、Gitee,主要提供代码仓库管理、协作开发等服务。
-
API 密钥的作用
- 申请的 API 密钥主要用于后续通过程序(而非手动操作)访问 GitCode 的服务(如搜索仓库、操作代码仓库),是接口调用的身份验证凭证。
-
操作的大致流程
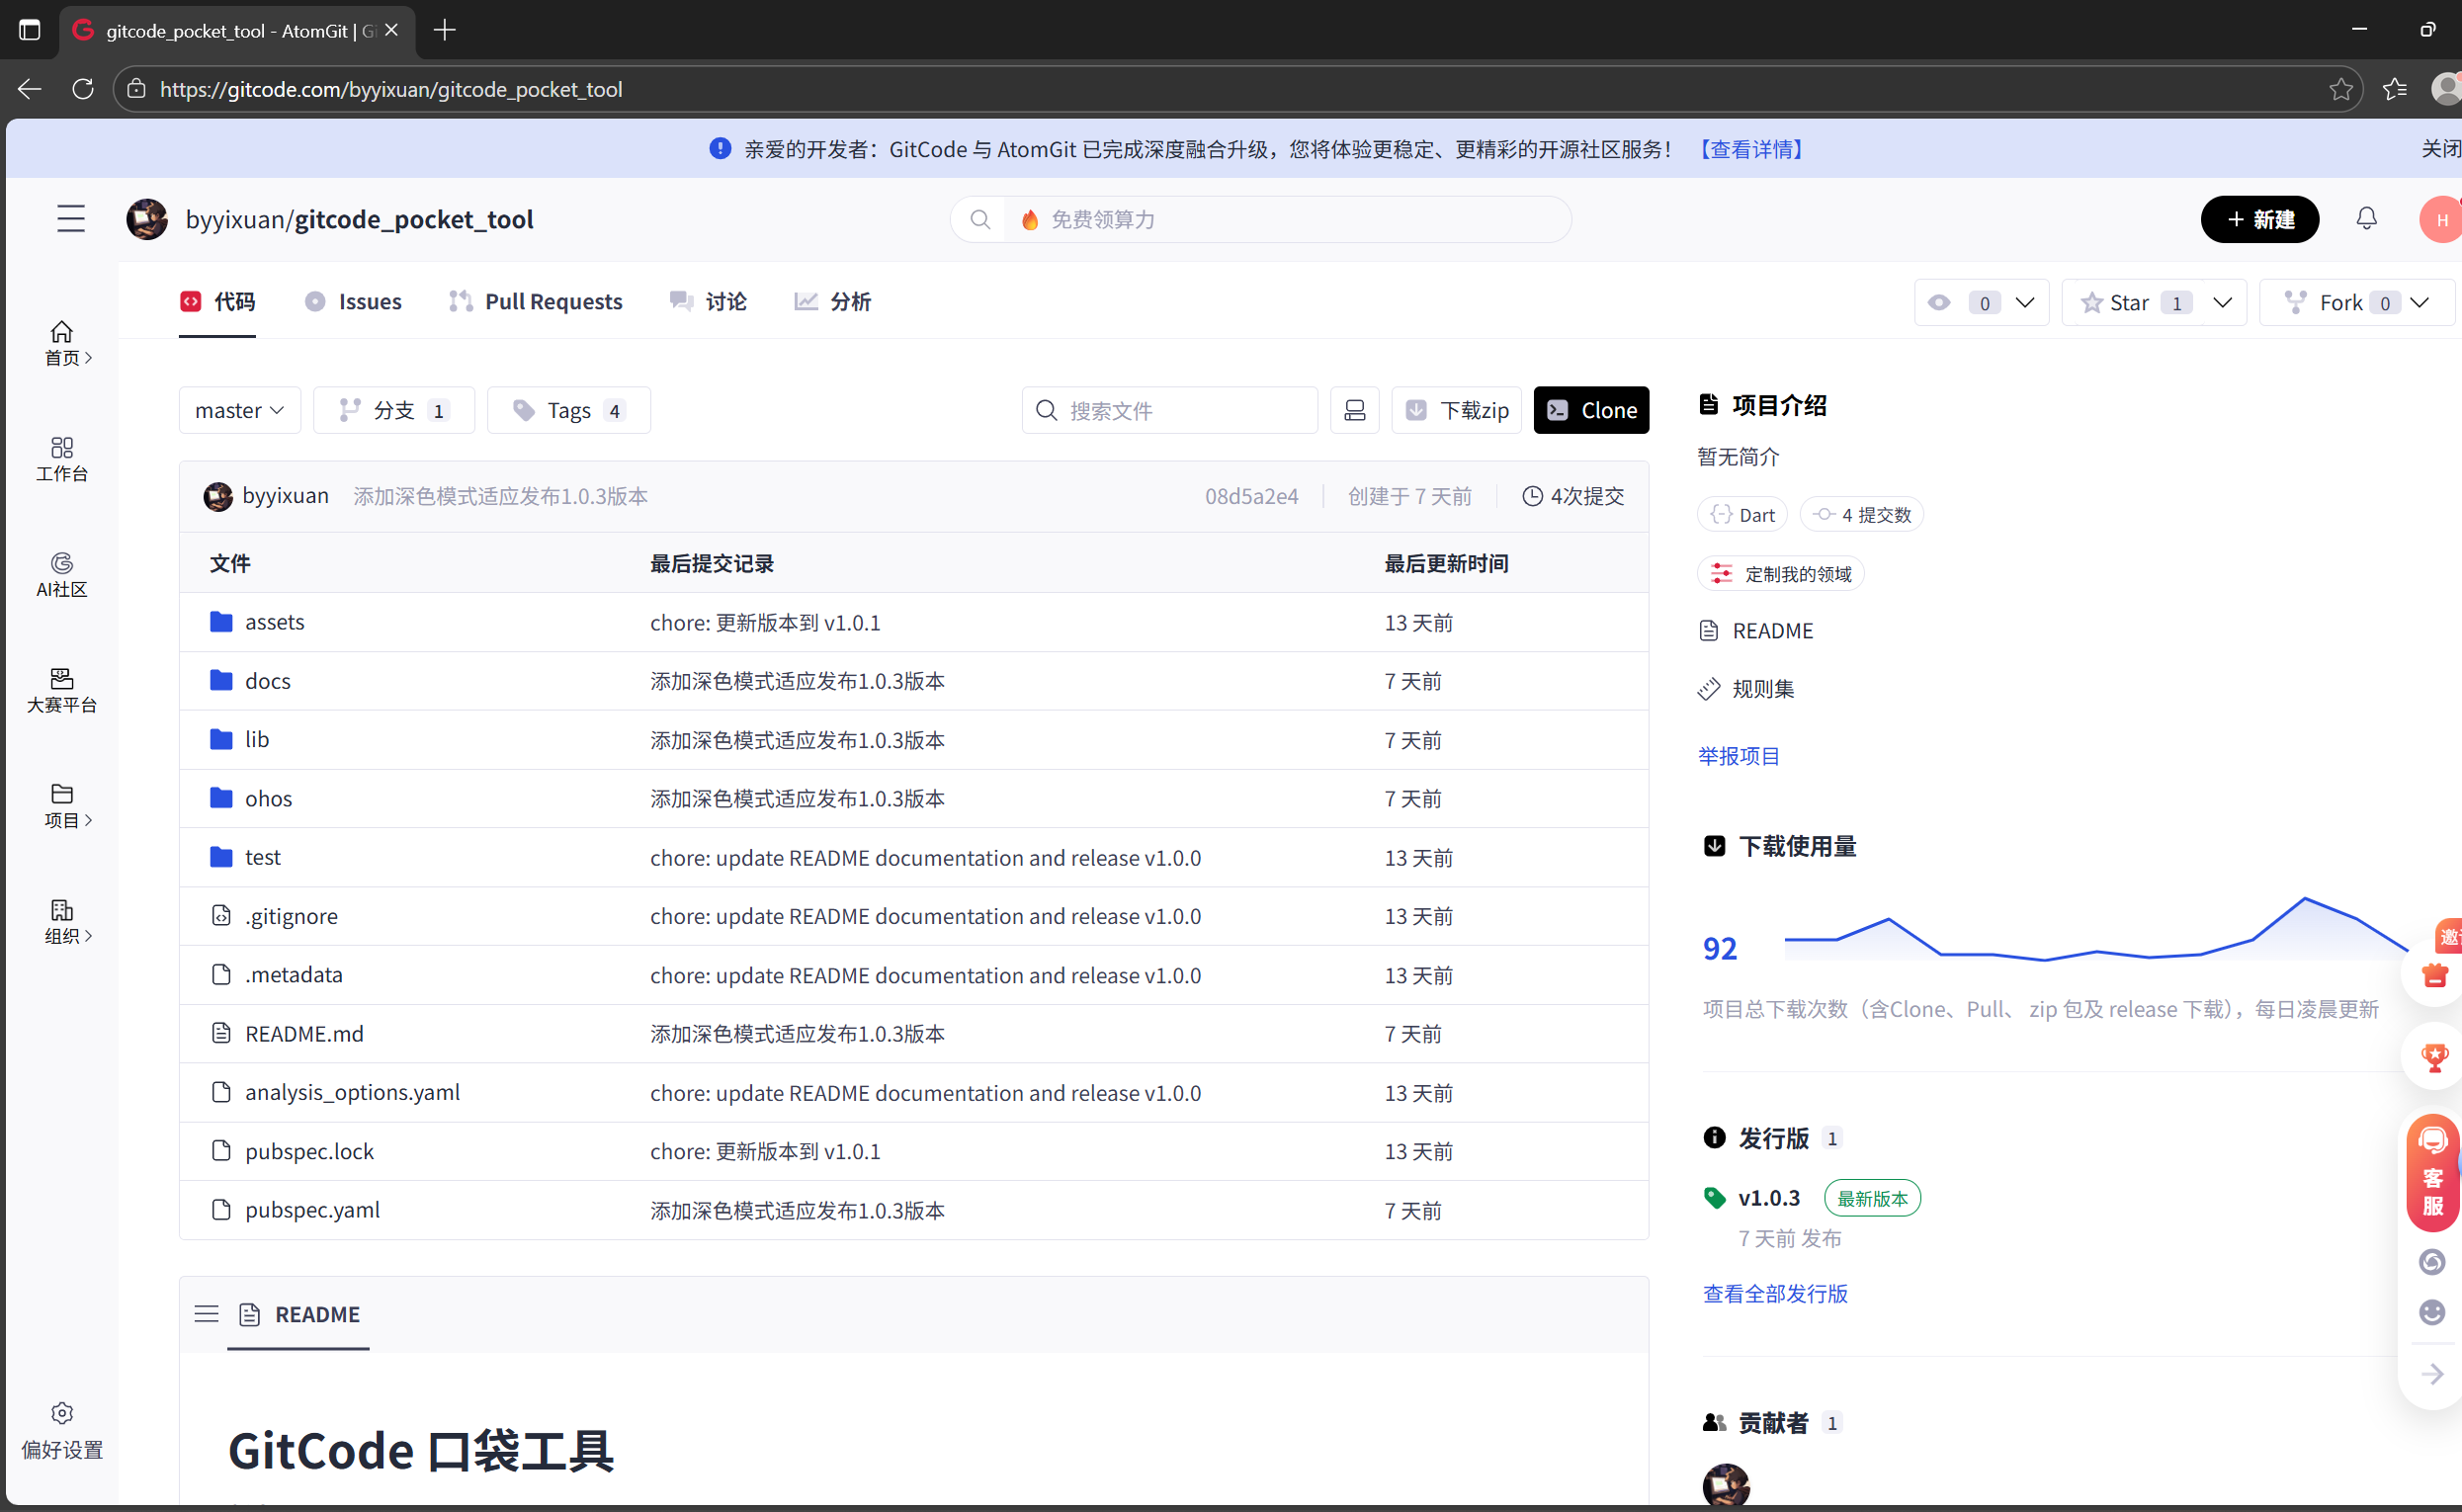
- 首先复制以下网址到浏览器搜索,自动跳转如图:(地址:https://gitcode.com/byyixuan/gitcode_pocket_tool)
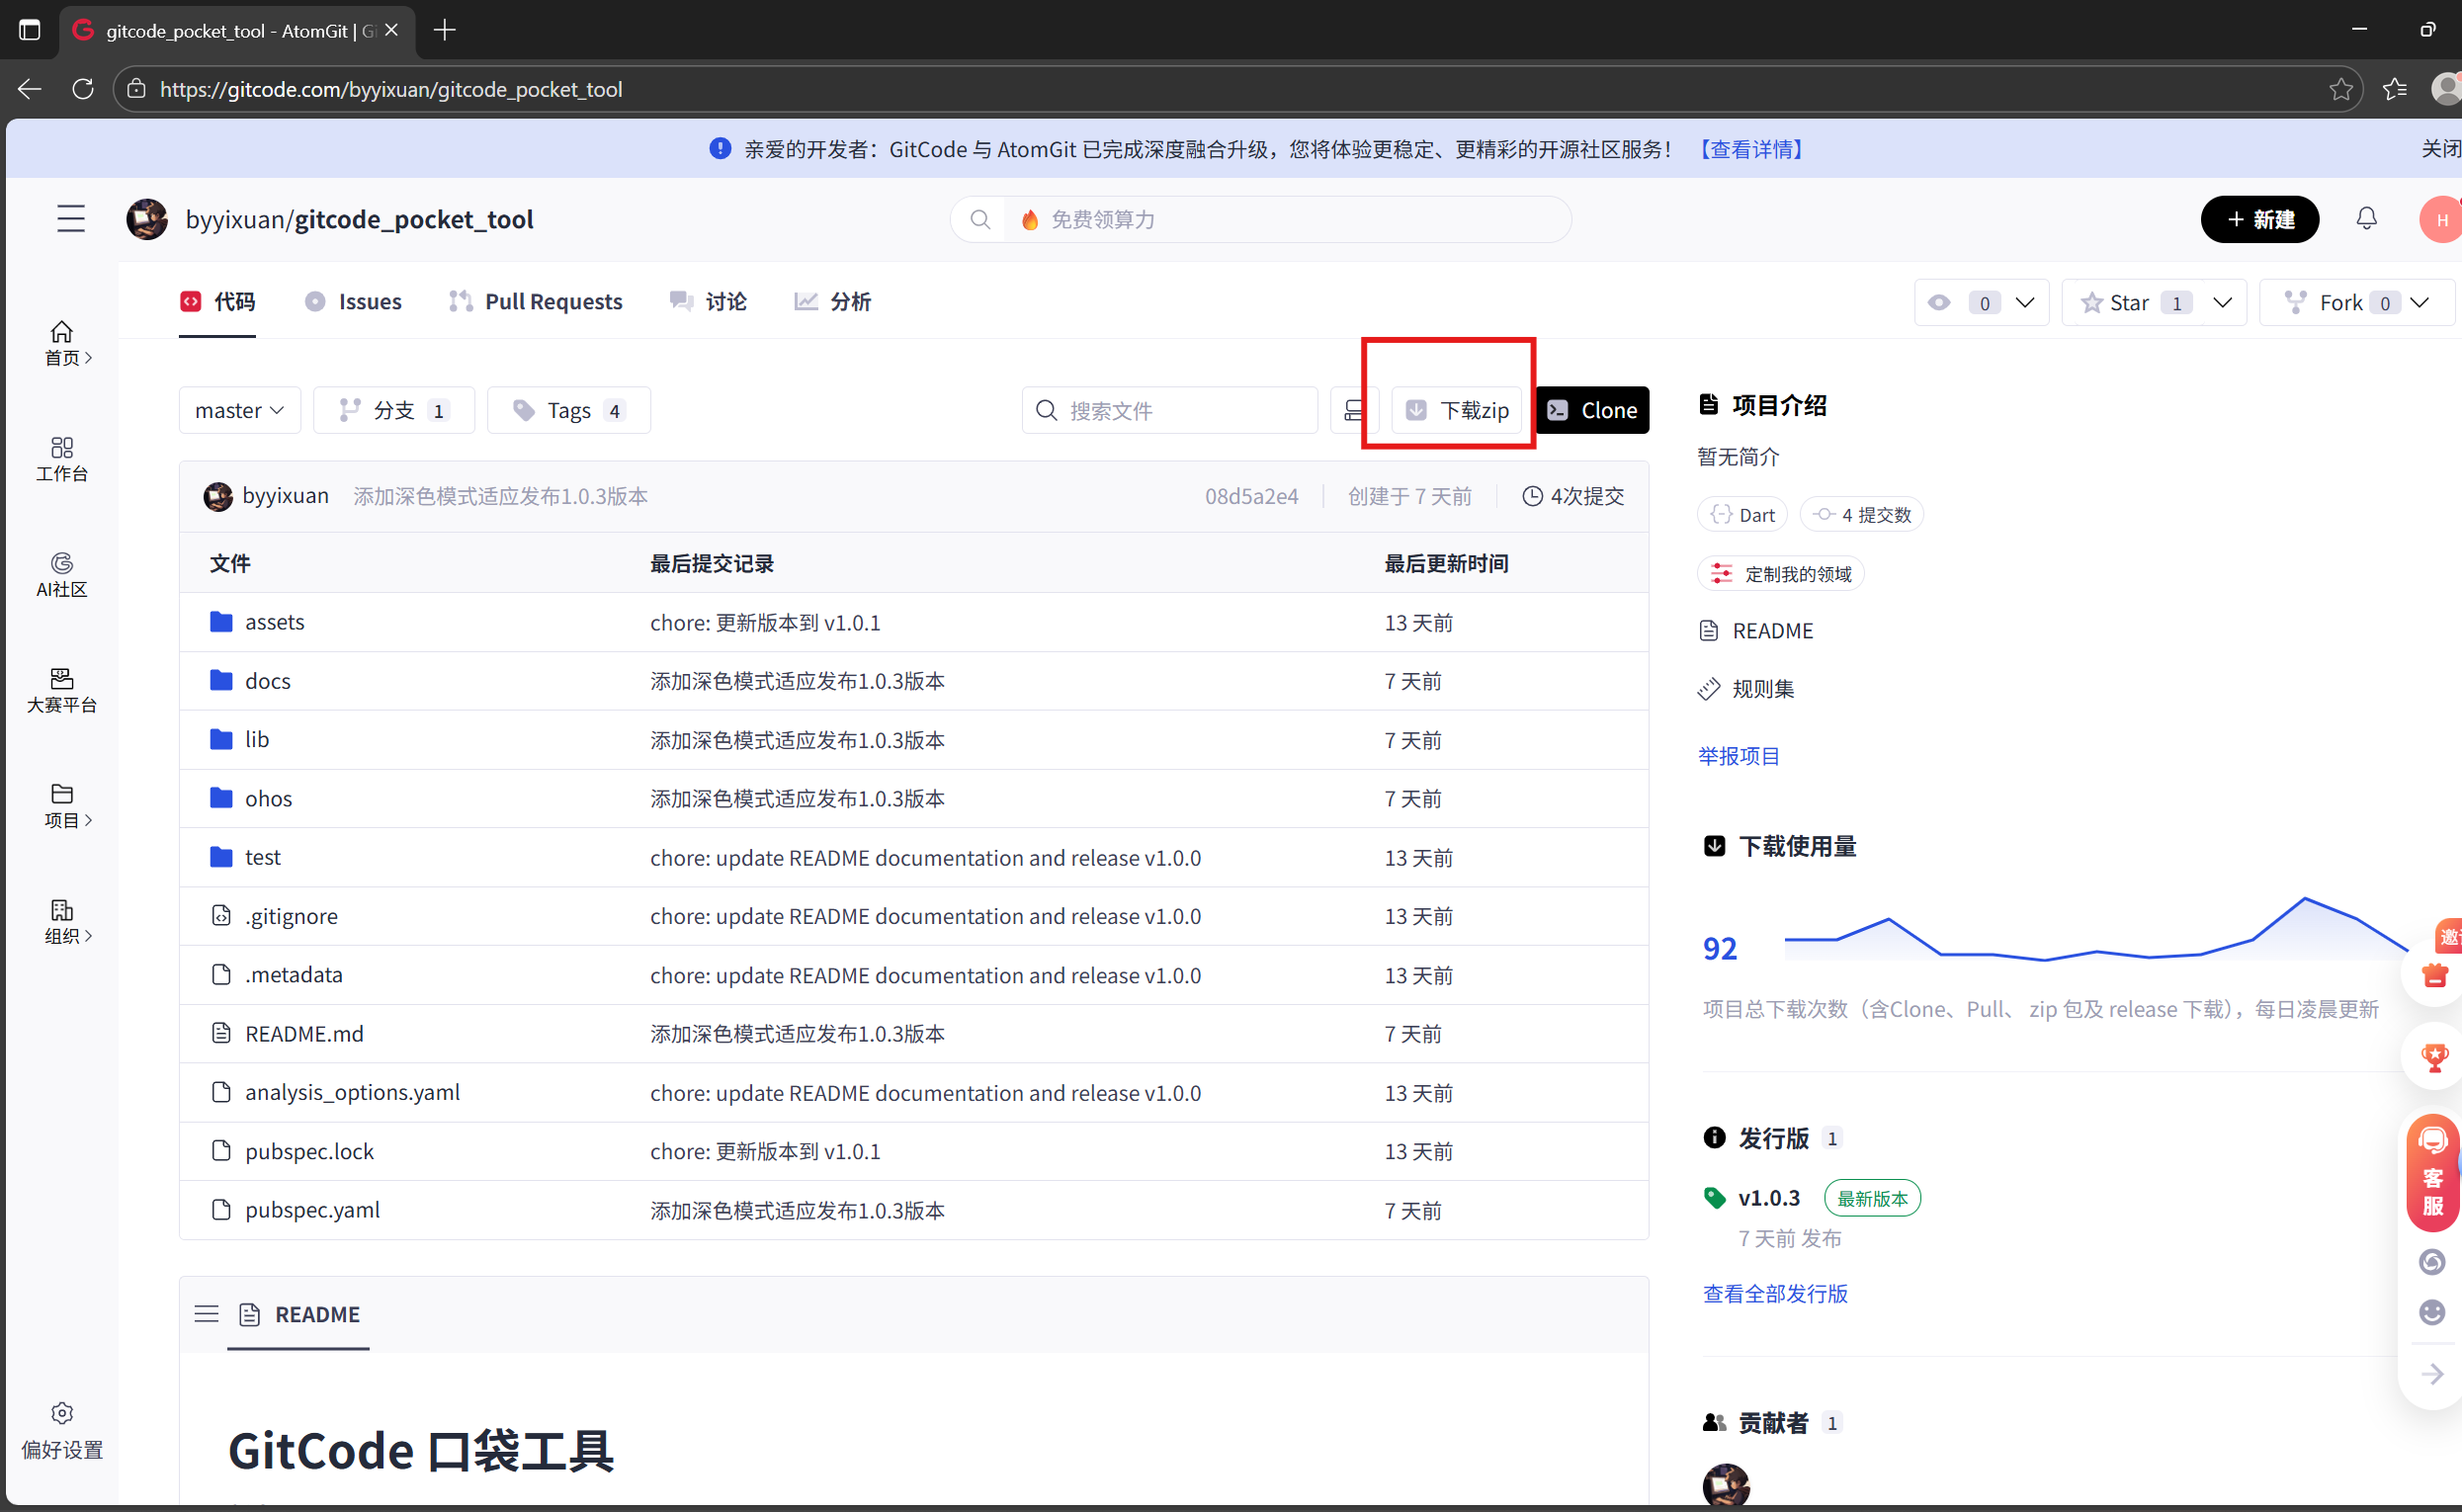
- 我们在下面的地址中下载好压缩包,点击下载ZIP即可
 https://gitcode.com/byyixuan/gitcode_pocket_tool
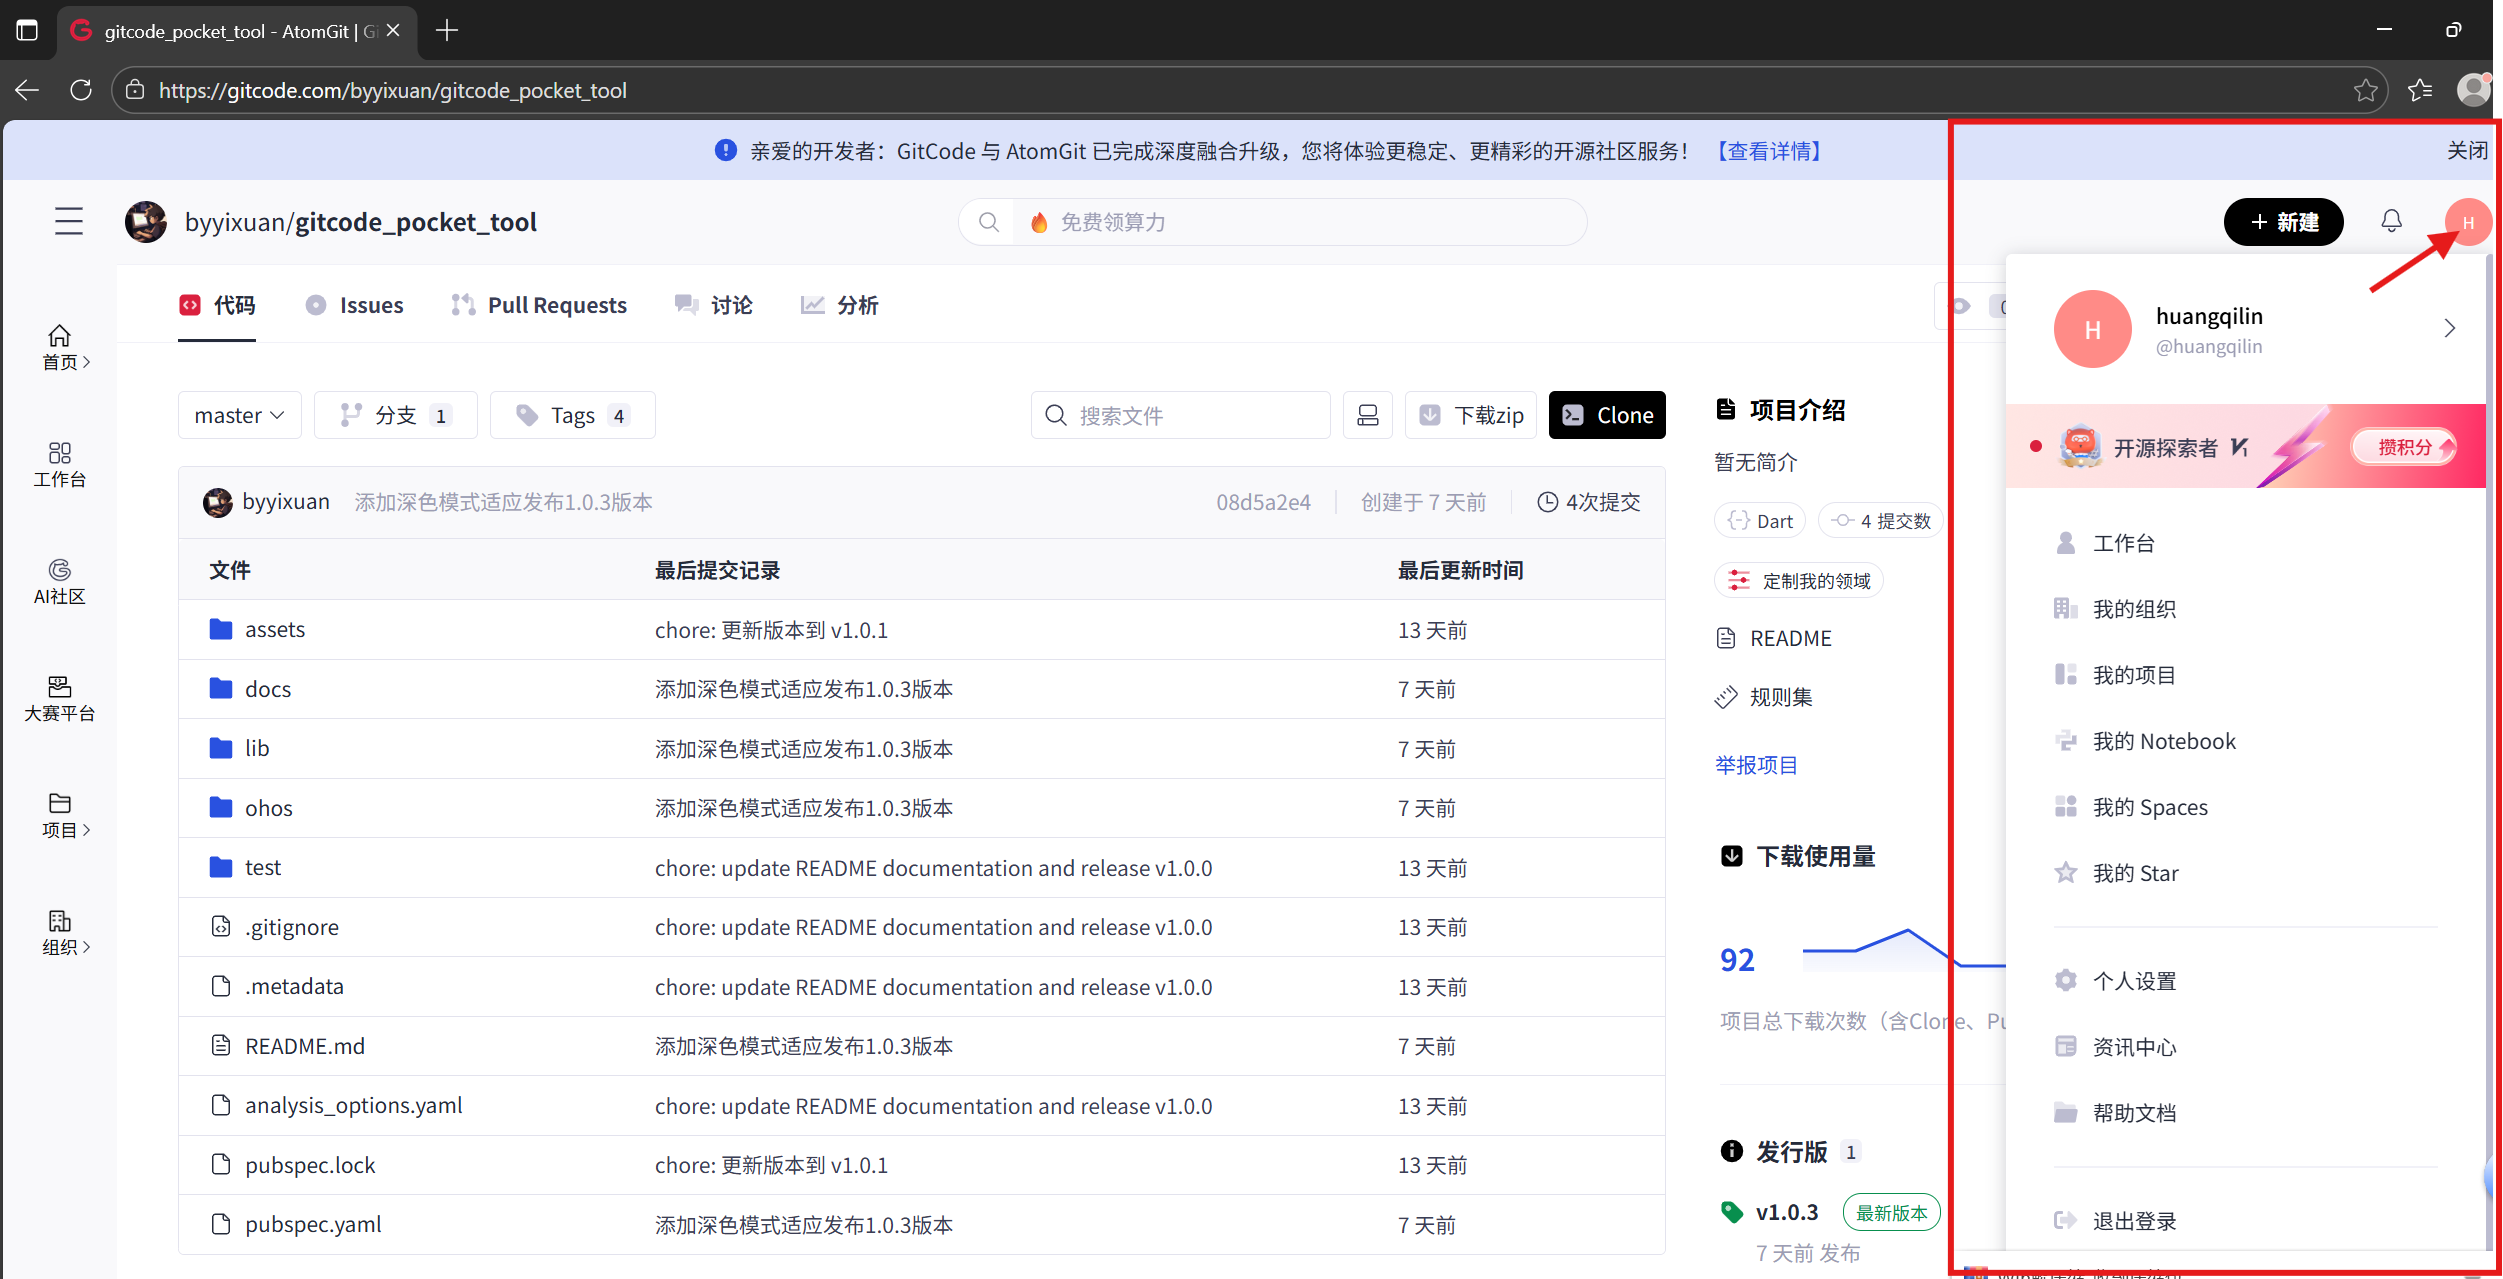
 - 完成账号注册(通常需提供邮箱、设置密码等);
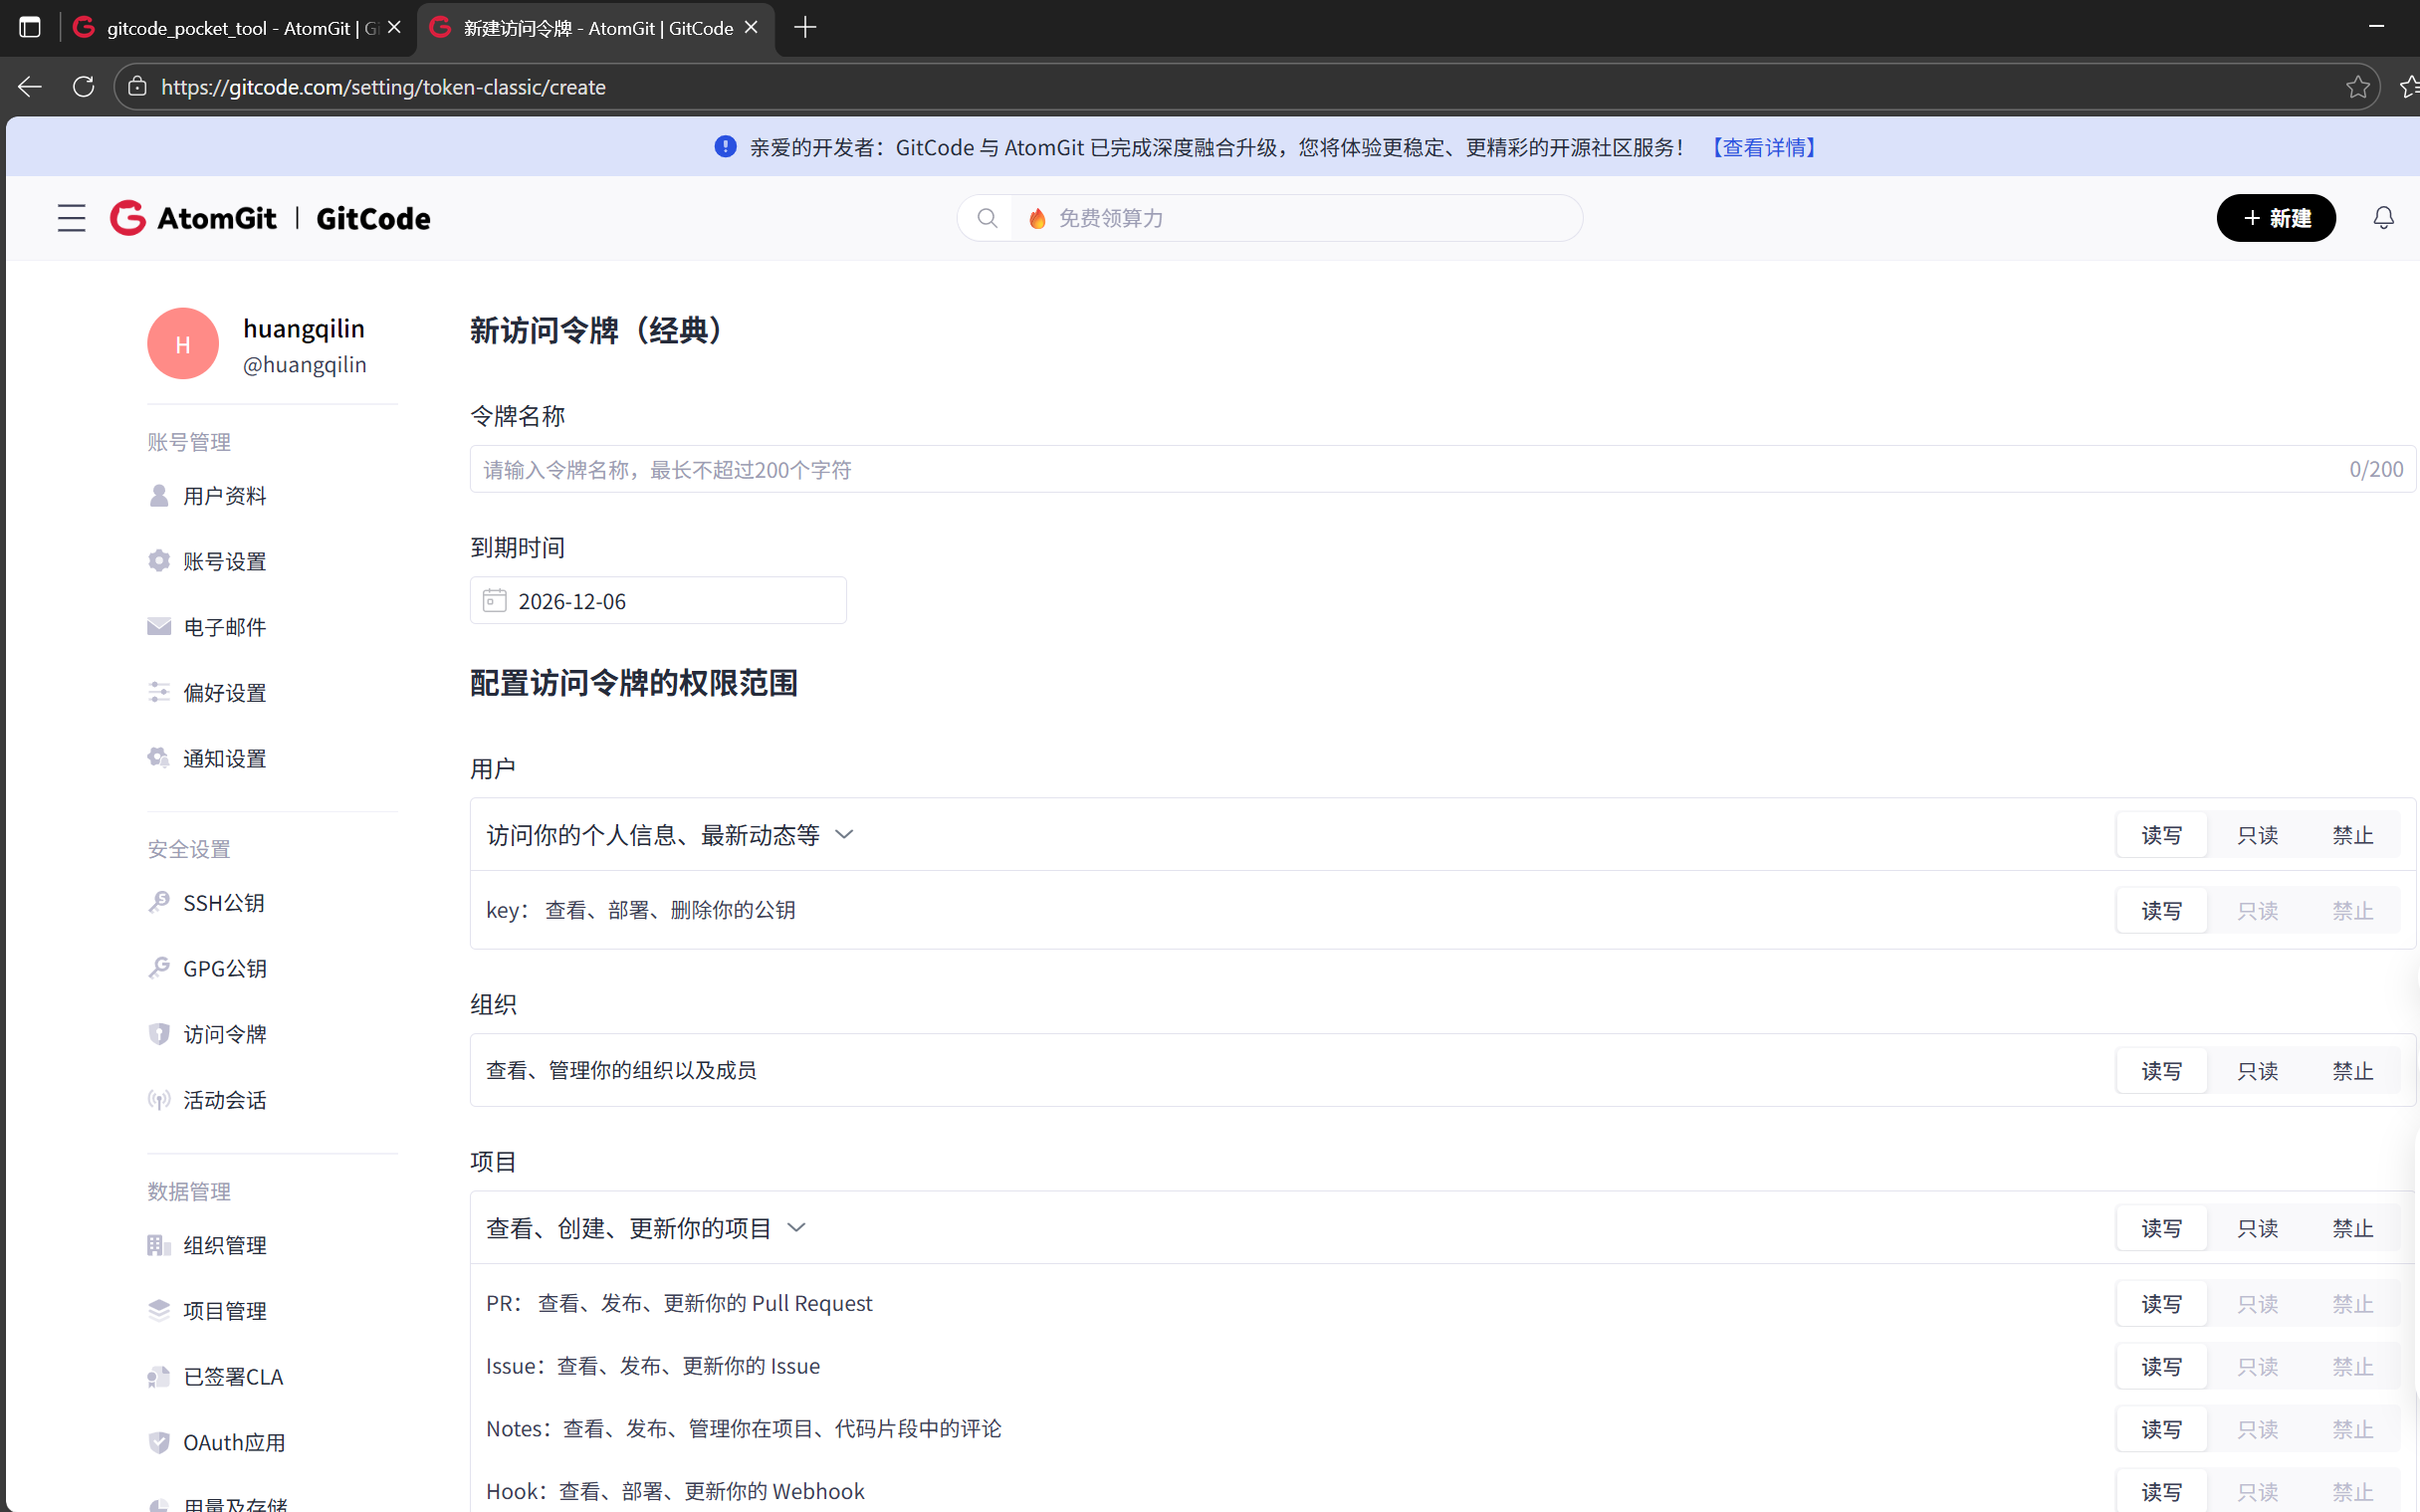
- 配置访问令牌(访问地址:https://gitcode.com/setting/token-classic/create)同样复制该网址到浏览器打开,跳转页面如图:
-
然后点击右上角的新建访问令牌按键
配置好名称后(如小博令牌名称是:Huang_Qi26),其他参数和设置都可以选择默认的,然后划到下面点击新建访问令牌
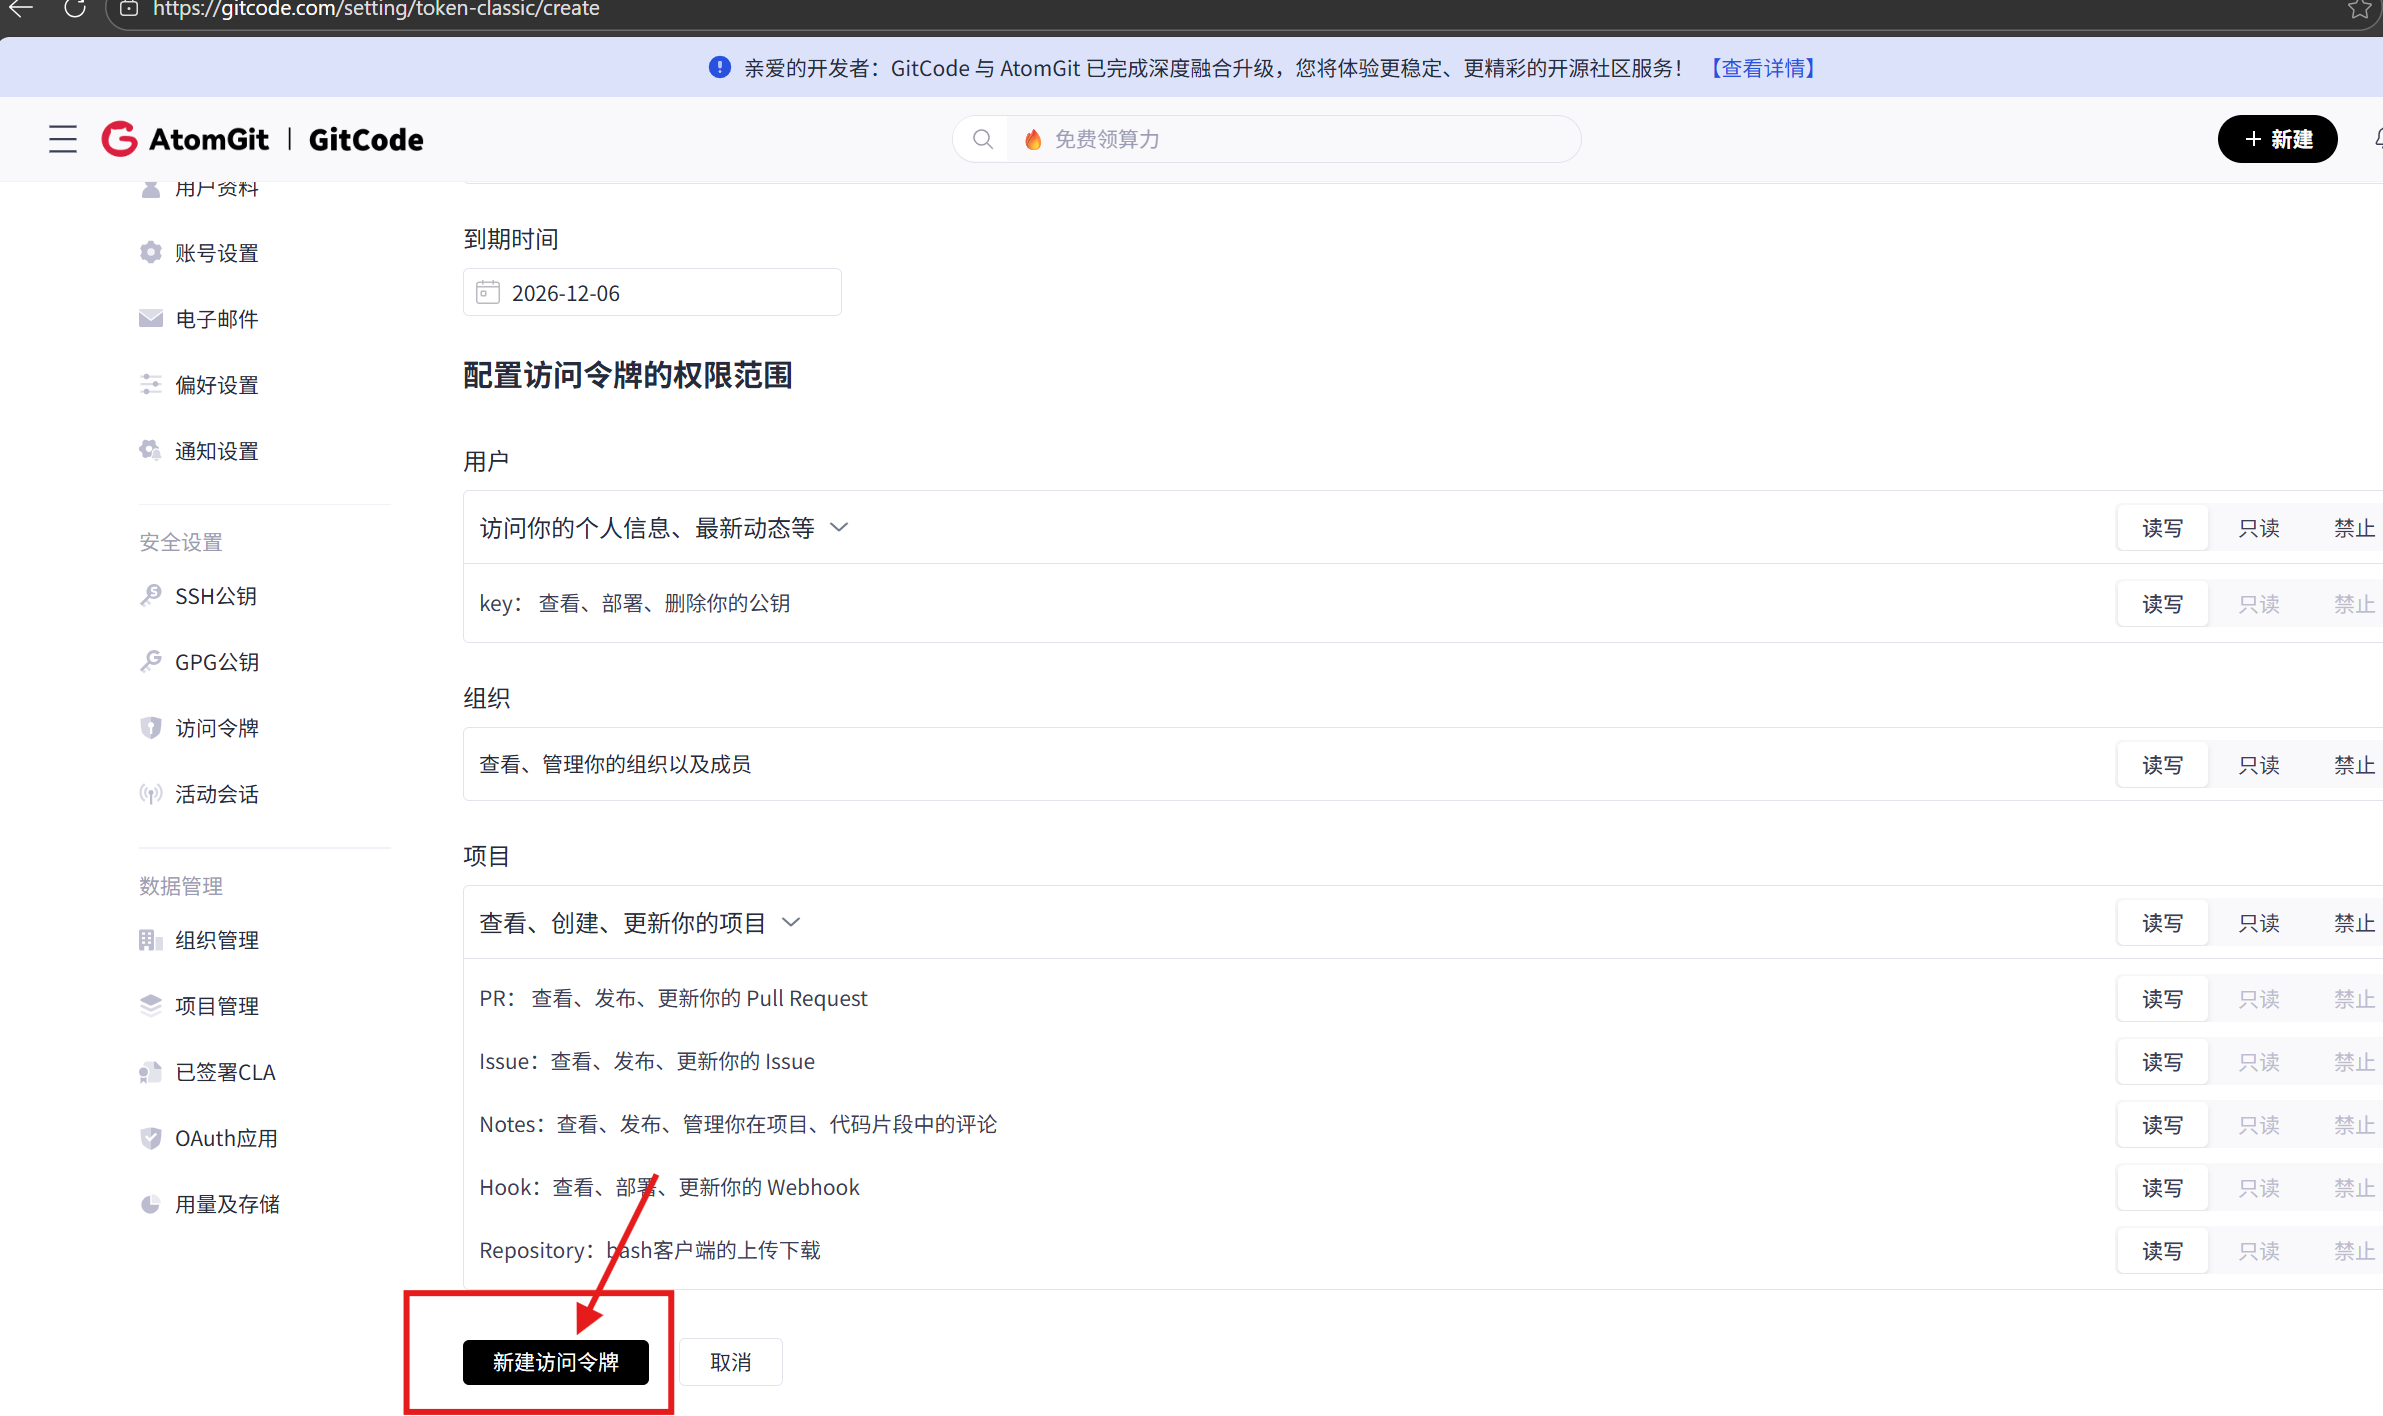
注意注意:一定要记住你的个人访问令牌且要保密(这样“钥匙”就成功拿到了)
- 首先复制以下网址到浏览器搜索,自动跳转如图:(地址:https://gitcode.com/byyixuan/gitcode_pocket_tool)
三、项目结构规划(文件夹 + 简单功能)
首先,我们将代码拆分为模块化结构,便于维护和扩展:
1.文件夹(不用记,跟着建就行),直接在文件管理器找到你的前期鸿蒙项目的文件(如小博的:D:\HarmonyOS\oh_code\demo_gitcode\lib),在你的项目lib文件夹下分别建constants, themes, services, models, screens文件夹如下图
lib/
├── main.dart                 # 应用入口
├── constants/                # 常量定义
│   └── app_constants.dart    # API地址、主题色等
├── themes/                   # 主题配置
│   └── app_theme.dart        # 毛玻璃二次元主题
├── services/                 # 服务层
│   └── gitcode_service.dart  # GitCode API请求
├── models/                   # 数据模型(可选,当前使用Map)
├── screens/                  # 页面组件
│   ├── login_screen.dart     # 登录页
│   ├── main_screen.dart      # 主页面(底部导航)
│   ├── home_screen.dart      # 首页动态
│   ├── repo_screen.dart      # 仓库页
│   └── profile_screen.dart   # 个人中心
└── widgets/                  # 自定义组件
    ├── glass_card.dart       # 毛玻璃卡片组件
    └── activity_card.dart    # 动态卡片组件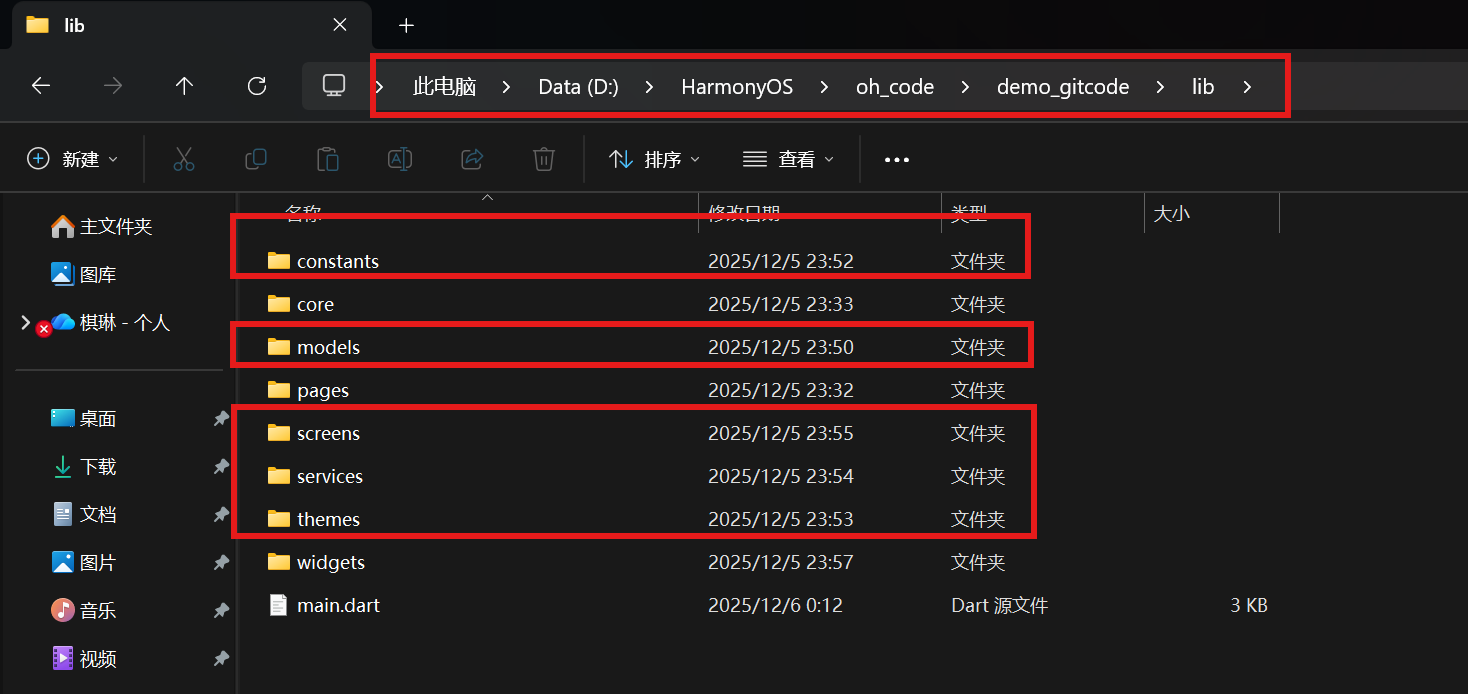
此时刚创建的各文件夹都是空的
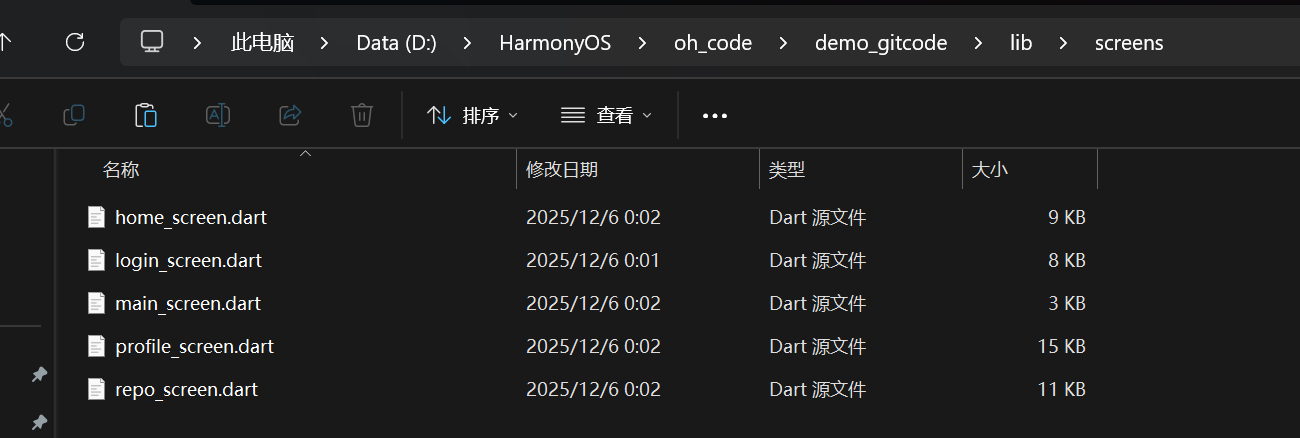
2.然后是创建各文件夹下的Dart源文件(这里就实例一个文件夹screens的创建,其他文件的创建
同理)
在screens文件夹上方的框内直接输入cmd回车打开此目录的终端


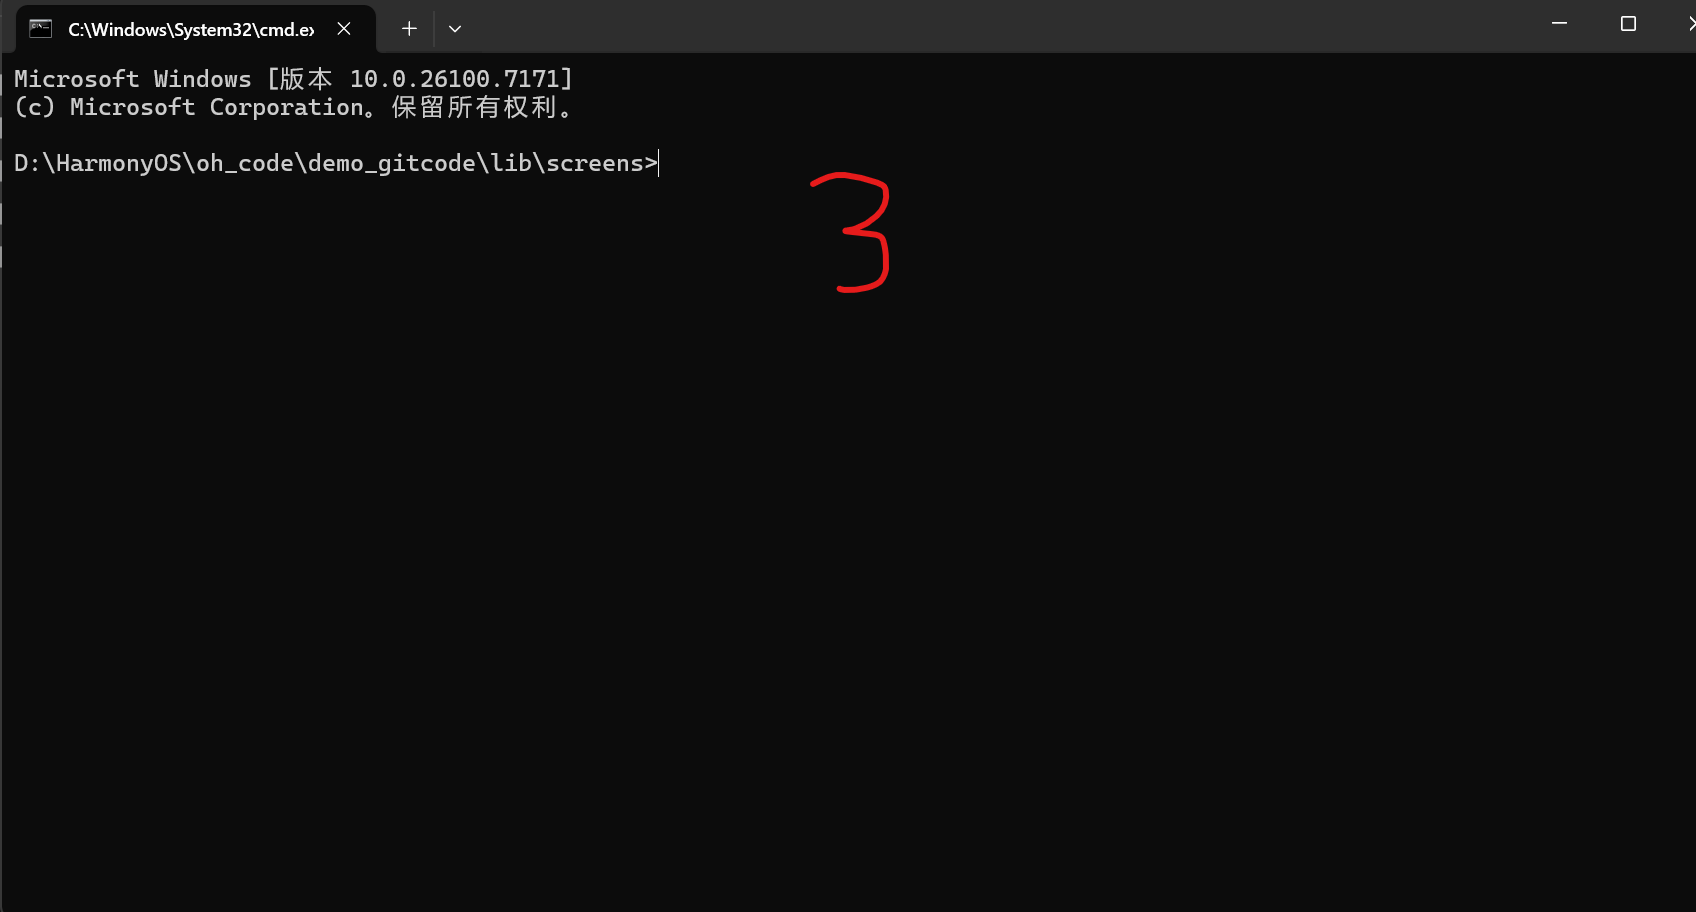
然后用命令“type nul >”在此目录下创建Dart源文件,如下图创建了5个需分别输入5次命令
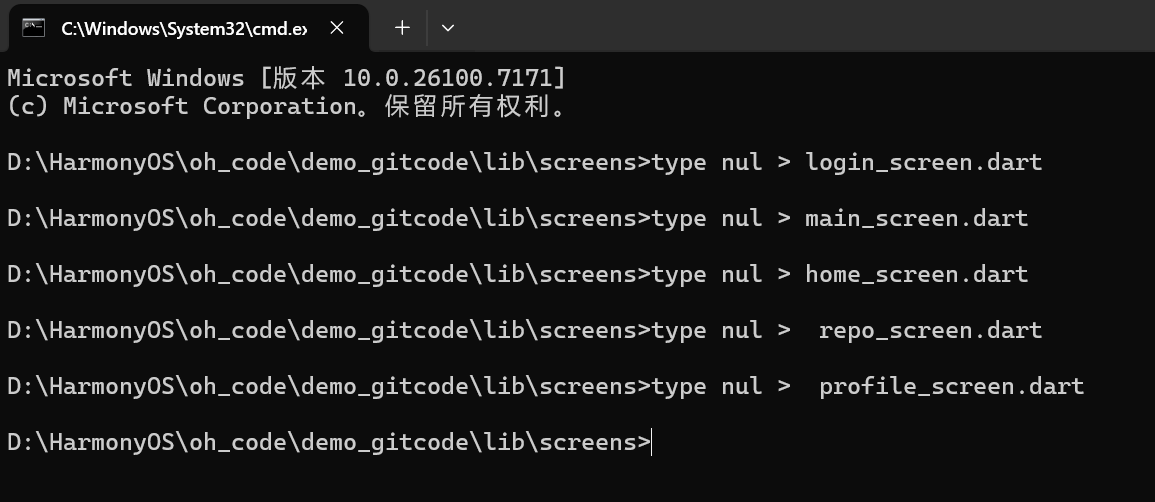
此时再打开screens文件下就有五个Dart源文件了,就已经为后续做好准备了(其他同理)
四.逐步实现各模块
1. 常量定义(constants/app_constants.dart)
作用:集中管理 API 地址、主题色等常量,便于统一修改
- 把项目里反复用的固定信息(比如接口地址、APP 的主色调)都放这一个文件里,不用到处写重复的内容
- 以后要改这些信息(比如接口换地址、换个主题色),只改这一个文件就行,不用翻遍所有代码找
- 看代码的时候,一眼就能从这找到这些常用信息,不用猜 “这个数字 / 地址是啥意思”
在VScode(即Visual Studio Code软件)中打开刚刚创建D:\HarmonyOS\oh_code\demo_gitcode\lib\constants\app_constants.dart文件去写代码(如图所示)
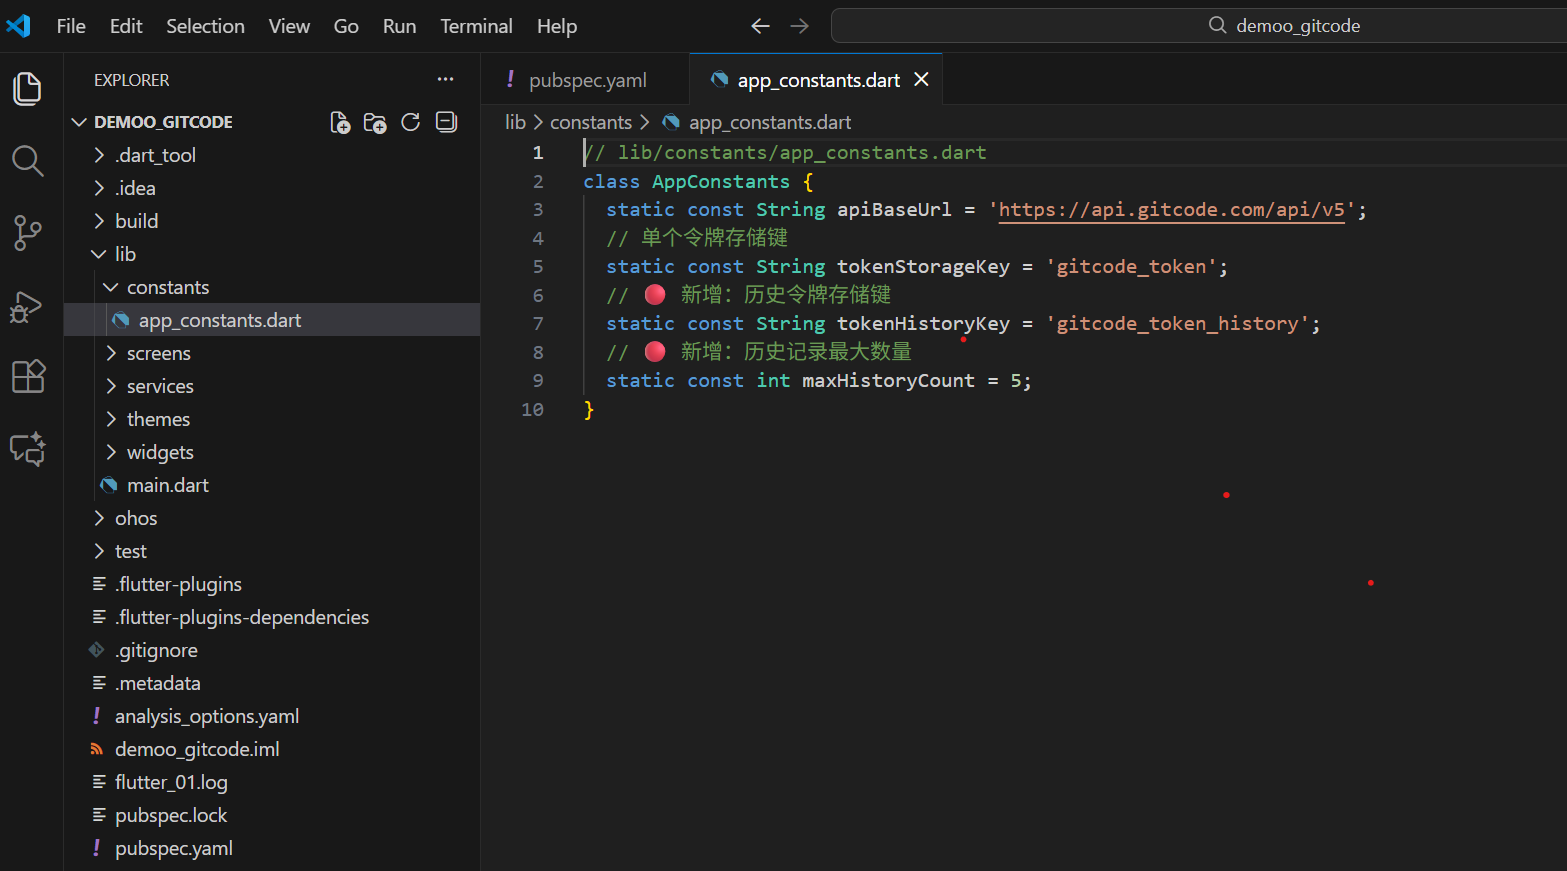
打开后直接在此页面写入如下代码:然后保存(save)
// lib/constants/app_constants.dart
class AppConstants {
  static const String apiBaseUrl = 'https://api.gitcode.com/api/v5';
  // 单个令牌存储键
  static const String tokenStorageKey = 'gitcode_token';
  // 🔴 新增:历史令牌存储键
  static const String tokenHistoryKey = 'gitcode_token_history';
  // 🔴 新增:历史记录最大数量
  static const int maxHistoryCount = 5;
}
2. 毛玻璃二次元主题(themes/app_theme.dart)
作用:定义应用的整体风格,包括颜色、字体、组件样式,重点实现毛玻璃效果。
- 把 APP 的 “颜值风格” 都统一装在这个文件里 —— 比如整体色调、用什么字体、按钮 / 卡片长啥样
- 专门在这里实现 “毛玻璃模糊感” 的效果,让 APP 界面看起来像二次元里那种通透的风格
- 以后想换风格(比如调个颜色、改个字体),直接改这个文件就行
在VScode(即Visual Studio Code软件)中打开刚刚创建"D:\HarmonyOS\oh_code\demo_gitcode\lib\themes\app_theme.dart"文件,直接写入以下代码:记得保存(save)
// SPDX-License-Identifier: Apache-2.0
import 'package:flutter/material.dart';

/// 毛玻璃二次元主题配置
class AppTheme {
    /// 字体大小:超大
  static const double fontSizeXXLarge = 24;

  /// 字体大小:大
  static const double fontSizeXLarge = 18;

  /// 字体大小:中
  static const double fontSizeLarge = 16;

  /// 字体大小:中
  static const double fontSizeMedium = 14;

  /// 字体大小:小
  static const double fontSizeSmall = 12;
  /// 主色调(二次元粉紫色)
  static const Color primaryColor = Color(0xFF8B5CF6);

  /// 次要色调(天空蓝)
  static const Color secondaryColor = Color(0xFF38BDF8);

  /// 强调色(樱花粉)
  static const Color accentColor = Color(0xFFEC4899);

  /// 背景色(浅紫灰)
  static const Color backgroundColor = Color(0xFFF5F3FF);

  /// 卡片背景色(半透明白)
  static const Color cardBackgroundColor = Color.fromARGB(200, 255, 255, 255);

  /// 文字主色
  static const Color primaryTextColor = Color(0xFF1E1B4B);

  /// 文字次要色
  static const Color secondaryTextColor = Color(0xFF64748B);

  /// 边框颜色
  static const Color borderColor = Color.fromARGB(50, 139, 92, 246);

  /// 阴影效果
  static const BoxShadow cardShadow = BoxShadow(
    color: Color.fromRGBO(139, 92, 246, 0.1),  // 主题色阴影
    blurRadius: 12,                             // 模糊半径
    offset: Offset(0, 4),                       // 偏移量
  );

  /// 圆角大小
  static const BorderRadius cardBorderRadius = BorderRadius.all(Radius.circular(16));

  /// 构建Material主题
  static ThemeData get themeData => ThemeData(
    // 主色调
    primaryColor: primaryColor,
    // 画布背景色
    scaffoldBackgroundColor: backgroundColor,
    // 卡片主题
    cardTheme: CardTheme(
      color: cardBackgroundColor,
      elevation: 0,
      shape: RoundedRectangleBorder(borderRadius: cardBorderRadius),
      shadowColor: cardShadow.color,
    ),
    // AppBar主题
    appBarTheme: const AppBarTheme(
      backgroundColor: Colors.transparent,  // 透明背景(配合毛玻璃)
      foregroundColor: primaryTextColor,    // 文字颜色
      elevation: 0,                         // 无阴影
      centerTitle: true,                    // 标题居中
    ),
    // 底部导航栏主题
    bottomNavigationBarTheme: BottomNavigationBarThemeData(
      backgroundColor: cardBackgroundColor,  // 半透明背景
      selectedItemColor: primaryColor,       // 选中颜色
      unselectedItemColor: secondaryTextColor, // 未选中颜色
      elevation: 8,                          // 阴影
      type: BottomNavigationBarType.fixed,   // 固定类型
    ),
    // 文字主题
    textTheme: const TextTheme(
      bodyLarge: TextStyle(color: primaryTextColor),
      bodyMedium: TextStyle(color: secondaryTextColor),
      titleLarge: TextStyle(
        fontWeight: FontWeight.bold,
        color: primaryTextColor,
      ),
    ),
    // 按钮主题
    elevatedButtonTheme: ElevatedButtonThemeData(
      style: ElevatedButton.styleFrom(
        backgroundColor: primaryColor,       // 按钮背景色
        foregroundColor: Colors.white,       // 按钮文字色
        shape: RoundedRectangleBorder(borderRadius: cardBorderRadius), // 圆角
        padding: const EdgeInsets.symmetric(horizontal: 20, vertical: 12), // 内边距
      ),
    ),
    // 输入框主题
    inputDecorationTheme: InputDecorationTheme(
      filled: true,                          // 填充背景
      fillColor: cardBackgroundColor,        // 填充色
      border: OutlineInputBorder(
        borderRadius: cardBorderRadius,      // 圆角
        borderSide: BorderSide(color: borderColor), // 边框色
      ),
      enabledBorder: OutlineInputBorder(
        borderRadius: cardBorderRadius,
        borderSide: BorderSide(color: borderColor),
      ),
      focusedBorder: OutlineInputBorder(
        borderRadius: cardBorderRadius,
        borderSide: BorderSide(color: primaryColor, width: 2), // 聚焦边框色
      ),
    ),
  );
}
3. 毛玻璃卡片组件(widgets/glass_card.dart)
作用:封装毛玻璃效果,供各页面复用。
- 把 “毛玻璃卡片” 做成一个可以重复用的 “模板”,不用每个页面都重新写一遍毛玻璃效果的代码
- 不管哪个页面需要这种通透模糊的卡片,直接 “拿” 这个组件来用就行,省得重复干活
- 要是想改毛玻璃的样式(比如模糊程度),只改这一个文件,所有页面用的这个卡片都会一起变
同上在VScode(即Visual Studio Code软件)中打开刚刚创建"D:\HarmonyOS\oh_code\demo_gitcode\lib\widgets\glass_card.dart""文件,直接写入以下代码:记得保存(save)
// SPDX-License-Identifier: Apache-2.0
import 'package:flutter/material.dart';
import 'dart:ui'; // 用于ImageFilter(毛玻璃)
import '../themes/app_theme.dart';

/// 毛玻璃卡片组件
class GlassCard extends StatelessWidget {
  /// 卡片子组件
  final Widget child;

  /// 内边距
  final EdgeInsets padding;

  /// 外边距
  final EdgeInsets margin;

  const GlassCard({
    Key? key,
    required this.child,
    this.padding = const EdgeInsets.all(16),
    this.margin = const EdgeInsets.only(bottom: 16),
  }) : super(key: key);

  @override
  Widget build(BuildContext context) {
    return Container(
      margin: margin,
      // 毛玻璃效果核心:BackdropFilter + ImageFilter.blur
      child: BackdropFilter(
        filter: ImageFilter.blur(sigmaX: 10, sigmaY: 10), // 模糊程度
        child: Container(
          padding: padding,
          decoration: BoxDecoration(
            color: AppTheme.cardBackgroundColor, // 半透明背景
            borderRadius: AppTheme.cardBorderRadius, // 圆角
            boxShadow: [AppTheme.cardShadow], // 阴影
            border: Border.all(
              color: Colors.white.withOpacity(0.2), // 白色描边(增强玻璃感)
              width: 1,
            ),
          ),
          child: child,
        ),
      ),
    );
  }
}
4. 服务层(services/gitcode_service.dart)
作用:处理 API 请求,封装网络逻辑。
- 专门管 “APP 和服务器通信” 的事儿 —— 比如给服务器发请求、收数据这些操作都放在这
- 把发请求的代码打包成 “现成的工具”,其他页面要用的时候直接调用,不用重复写发请求的步骤
- 统一处理网络问题(比如没网、请求失败),不用每个页面都单独写错误处理
同上在VScode(即Visual Studio Code软件)中打开刚刚创建"services\gitcode_service.dart"文件,直接写入以下代码:记得保存(save)
// SPDX-License-Identifier: Apache-2.0
import 'package:dio/dio.dart';
import '../constants/app_constants.dart';

/// GitCode API服务类
class GitCodeService {
  // 单例模式:确保全局只有一个实例
  static final GitCodeService _instance = GitCodeService._internal();
  factory GitCodeService() => _instance;

  late Dio dio; // Dio实例,用于网络请求

  // 内部构造函数
  GitCodeService._internal() {
    // 初始化Dio
    dio = Dio(
      BaseOptions(
        baseUrl: AppConstants.apiBaseUrl, // API基础地址
        connectTimeout: const Duration(seconds: 15), // 连接超时
        receiveTimeout: const Duration(seconds: 15), // 接收超时
        responseType: ResponseType.json, // 响应类型
        contentType: 'application/json; charset=utf-8', // 请求类型
        headers: {
          'Accept': 'application/json', // 接受JSON格式
        },
      ),
    );

    // 添加拦截器(日志、错误处理)
    dio.interceptors.add(
      InterceptorsWrapper(
        // 请求拦截
        onRequest: (options, handler) {
          // 如果有令牌,添加到请求头
          String? token = _accessToken;
          if (token != null && token.isNotEmpty) {
            options.headers['Authorization'] = 'Bearer $token';
          }
          print('🚀 请求: ${options.method} ${options.uri}');
          handler.next(options); // 继续请求
        },
        // 响应拦截
        onResponse: (response, handler) {
          print('✅ 响应: ${response.statusCode} ${response.requestOptions.uri}');
          handler.next(response); // 继续处理响应
        },
        // 错误拦截
        onError: (DioException e, handler) {
          print('❌ 错误: ${e.message}');
          print('❌ 响应状态: ${e.response?.statusCode}');
          print('❌ 响应体: ${e.response?.data}');

          // 统一错误信息
          String errorMsg = '网络请求失败';
          if (e.response?.statusCode == 404) {
            errorMsg = 'API端点不存在';
          } else if (e.response?.statusCode == 401) {
            errorMsg = '无效的访问令牌';
          } else if (e.type == DioExceptionType.connectionTimeout) {
            errorMsg = '网络超时,请检查网络连接';
          }

          // 包装错误
          e = DioException(
            requestOptions: e.requestOptions,
            type: e.type,
            error: errorMsg,
            response: e.response,
          );

          handler.next(e); // 继续处理错误
        },
      ),
    );
  }

  // 令牌存储(全局变量,实际项目建议使用本地存储)
  static String? _accessToken;

  /// 设置访问令牌
  void setToken(String token) {
    _accessToken = token;
  }

  /// 清除访问令牌
  void clearToken() {
    _accessToken = null;
  }

  /// 获取当前用户信息
  Future<Map<String, dynamic>> fetchUserInfo() async {
    try {
      final response = await dio.get('/user'); // 请求用户信息
      return response.data as Map<String, dynamic>; // 返回数据
    } on DioException catch (e) {
      throw Exception(e.error ?? '获取用户信息失败'); // 抛出异常
    }
  }

  /// 获取用户仓库列表
  Future<List<dynamic>> fetchMyRepositories() async {
    try {
      final response = await dio.get(
        '/user/repos',
        queryParameters: {
          'visibility': 'all', // 所有可见性
          'affiliation': 'owner', // 仅自己的仓库
          'page': 1, // 页码
          'per_page': 20, // 每页数量
        },
      );
      return response.data as List<dynamic>; // 返回仓库列表
    } on DioException catch (e) {
      throw Exception(e.error ?? '获取我的仓库失败'); // 抛出异常
    }
  }

  /// 获取动态列表
  Future<List<dynamic>> fetchActivities() async {
    try {
      final response = await dio.get(
        '/events',
        queryParameters: {'page': 1, 'per_page': 20}, // 分页参数
      );
      return response.data as List<dynamic>; // 返回动态列表
    } catch (e) {
      print('⚠️ 动态API调用失败,返回模拟数据: $e');
      // 返回模拟数据(防止API不可用导致崩溃)
      return [
        {
          "id": 1,
          "type": "PushEvent",
          "actor": {"login": "user1", "avatar_url": "https://placehold.co/40x40/8B5CF6/ffffff?text=U1"},
          "repo": {"name": "user1/repo1"},
          "created_at": DateTime.now().subtract(const Duration(hours: 1)).toIso8601String()
        },
        {
          "id": 2,
          "type": "WatchEvent",
          "actor": {"login": "user2", "avatar_url": "https://placehold.co/40x40/38BDF8/ffffff?text=U2"},
          "repo": {"name": "user2/repo2"},
          "created_at": DateTime.now().subtract(const Duration(hours: 2)).toIso8601String()
        },
      ];
    }
  }

  /// 获取热门仓库
  Future<List<dynamic>> fetchHotRepositories() async {
    try {
      final response = await dio.get(
        '/search/repositories',
        queryParameters: {
          'q': 'stars:>100', // 搜索条件:星数>100
          'sort': 'stars', // 按星数排序
          'order': 'desc', // 降序
          'page': 1, // 页码
          'per_page': 10, // 每页数量
        },
      );
      final data = response.data as Map<String, dynamic>;
      return data['items'] as List<dynamic>; // 返回热门仓库列表
    } catch (e) {
      print('⚠️ 热门仓库API调用失败,返回模拟数据: $e');
      // 返回模拟数据
      return [
        {
          "id": 101,
          "name": "flutter-kit",
          "full_name": "google/flutter-kit",
          "description": "Flutter 开发工具包",
          "language": "Dart",
          "stargazers_count": 5000,
          "forks_count": 1200,
          "html_url": "https://gitcode.com/google/flutter-kit"
        },
      ];
    }
  }
}
5. 登录页面(screens/login_screen.dart)
作用:处理用户登录逻辑,获取访问令牌。
同上在VScode(即Visual Studio Code软件)中打开刚刚创建"\screens\login_screen.dart"文件,直接写入以下代码:然后保存(save)
// SPDX-License-Identifier: Apache-2.0
import 'package:flutter/material.dart';
import '../services/gitcode_service.dart';
import '../themes/app_theme.dart';
import '../widgets/glass_card.dart';
import './main_screen.dart';

/// 登录页面
class LoginScreen extends StatefulWidget {
  const LoginScreen({Key? key}) : super(key: key);

  @override
  State<LoginScreen> createState() => _LoginScreenState();
}

class _LoginScreenState extends State<LoginScreen> {
  /// 令牌输入控制器
  final TextEditingController _tokenController = TextEditingController();

  /// 加载状态
  bool _isLoading = false;

  /// 错误信息
  String? _errorMessage;

  /// 登录处理函数
  void _handleLogin() async {
    setState(() {
      _isLoading = true; // 显示加载中
      _errorMessage = null; // 清空错误信息
    });

    final token = _tokenController.text.trim(); // 获取输入的令牌
    if (token.isEmpty) {
      setState(() {
        _isLoading = false;
        _errorMessage = '请输入访问令牌'; // 空令牌提示
      });
      return;
    }

    try {
      // 初始化服务并设置令牌
      final service = GitCodeService();
      service.setToken(token);

      // 验证令牌是否有效(调用用户信息API)
      await service.fetchUserInfo();

      // 登录成功,跳转到主页面
      if (mounted) {
        Navigator.of(context).pushReplacement(
          MaterialPageRoute(builder: (_) => const MainScreen()),
        );
      }
    } catch (e) {
      setState(() {
        _isLoading = false;
        _errorMessage = e.toString(); // 显示错误信息
      });
    }
  }

  @override
  Widget build(BuildContext context) {
    return Scaffold(
      // 背景渐变(增强二次元风格)
      body: Container(
        decoration: const BoxDecoration(
          gradient: LinearGradient(
            begin: Alignment.topLeft,
            end: Alignment.bottomRight,
            colors: [
              Color(0xFFF5F3FF), // 浅紫灰
              Color(0xFFE0E7FF), // 浅蓝紫
            ],
          ),
        ),
        child: SafeArea(
          child: Center(
            child: SingleChildScrollView(
              padding: const EdgeInsets.all(32.0),
              child: Column(
                mainAxisAlignment: MainAxisAlignment.center,
                crossAxisAlignment: CrossAxisAlignment.center,
                children: <Widget>[
                  // Logo区域
                  GlassCard(
                    margin: const EdgeInsets.only(bottom: 32),
                    padding: const EdgeInsets.all(24),
                    child: Column(
                      children: [
                        // Logo图标
                        Container(
                          width: 100,
                          height: 100,
                          decoration: BoxDecoration(
                            color: AppTheme.primaryColor,
                            borderRadius: BorderRadius.circular(20),
                            boxShadow: [AppTheme.cardShadow],
                          ),
                          child: const Icon(
                            Icons.code,
                            size: 60,
                            color: Colors.white,
                          ),
                        ),
                        const SizedBox(height: 16),
                        // 应用标题
                        const Text(
                          'GitCode 客户端',
                          style: TextStyle(
                            fontSize: 28,
                            fontWeight: FontWeight.bold,
                            color: AppTheme.primaryTextColor,
                          ),
                        ),
                        const SizedBox(height: 8),
                        // 副标题
                        const Text(
                          '使用访问令牌登录',
                          style: TextStyle(
                            fontSize: 16,
                            color: AppTheme.secondaryTextColor,
                          ),
                        ),
                      ],
                    ),
                  ),

                  // 登录表单
                  GlassCard(
                    child: Column(
                      children: [
                        // 令牌输入框
                        TextField(
                          controller: _tokenController,
                          obscureText: true, // 密码模式(隐藏令牌)
                          decoration: InputDecoration(
                            labelText: '访问令牌',
                            hintText: 'ghp_xxxxxxxxxxxxxxxxxxxxxxxxxxxxxxxxxxxx',
                            hintStyle: const TextStyle(color: AppTheme.secondaryTextColor),
                            errorText: _errorMessage, // 错误提示
                            prefixIcon: const Icon(Icons.security, color: AppTheme.primaryColor),
                            suffixIcon: IconButton(
                              icon: const Icon(Icons.clear, color: AppTheme.secondaryTextColor),
                              onPressed: () => _tokenController.clear(), // 清空输入
                            ),
                          ),
                          maxLines: 1,
                          textInputAction: TextInputAction.done,
                          onSubmitted: (_) => _handleLogin(), // 回车登录
                        ),

                        const SizedBox(height: 16),
                        // 帮助链接
                        Align(
                          alignment: Alignment.centerRight,
                          child: TextButton(
                            onPressed: () {
                              // 打开获取令牌的帮助页面(预留)
                              print('打开获取令牌帮助');
                            },
                            child: const Text(
                              '如何获取令牌?',
                              style: TextStyle(color: AppTheme.primaryColor),
                            ),
                          ),
                        ),

                        const SizedBox(height: 24),
                        // 登录按钮
                        SizedBox(
                          width: double.infinity,
                          height: 50,
                          child: ElevatedButton.icon(
                            onPressed: _isLoading ? null : _handleLogin, // 加载中禁用
                            icon: _isLoading
                                ? const SizedBox(
                                    width: 20,
                                    height: 20,
                                    child: CircularProgressIndicator(color: Colors.white, strokeWidth: 2),
                                  )
                                : const Icon(Icons.login),
                            label: const Text(
                              '登录',
                              style: TextStyle(fontSize: 16, fontWeight: FontWeight.bold),
                            ),
                          ),
                        ),
                      ],
                    ),
                  ),
                ],
              ),
            ),
          ),
        ),
      ),
    );
  }
}
6. 主页面(screens/main_screen.dart)
作用:底部导航栏,切换不同页面。
- 作为 APP 打开后的 “主界面”,展示底部导航栏(比如首页、我的等按钮)
- 通过底部导航栏,让用户能快速切换到不同功能页面(比如点 “我的” 就跳转到个人中心)
- 承载各功能页面的内容展示,是用户在 APP 里操作的核心入口
- 可以统一管理页面切换时的状态(比如记住用户上次停留的页面
同上在VScode(即Visual Studio Code软件)中打开刚刚创建"\screens\main_screen.dart"文件,直接写入以下代码:然后保存(save)
// SPDX-License-Identifier: Apache-2.0
import 'dart:ui'; // 用于 ImageFilter(毛玻璃效果)
import 'package:flutter/material.dart';
import './home_screen.dart';
import './repo_screen.dart';
import './profile_screen.dart';
import '../themes/app_theme.dart';

/// 主页面(底部导航)
class MainScreen extends StatefulWidget {
  const MainScreen({Key? key}) : super(key: key);

  @override
  State<MainScreen> createState() => _MainScreenState();
}

class _MainScreenState extends State<MainScreen> {
  /// 当前选中的页面索引
  int _selectedIndex = 0;

  /// 页面列表
  static const List<Widget> _widgetOptions = <Widget>[
    HomeScreen(),      // 首页动态
    RepoScreen(),      // 仓库页
    ProfileScreen(),   // 个人中心
  ];

  /// 导航栏点击事件
  void _onItemTapped(int index) {
    setState(() {
      _selectedIndex = index; // 更新选中索引
    });
  }

  @override
  Widget build(BuildContext context) {
    return Scaffold(
      // 背景渐变
      body: Container(
        decoration: const BoxDecoration(
          gradient: LinearGradient(
            begin: Alignment.topLeft,
            end: Alignment.bottomRight,
            colors: [
              Color(0xFFF5F3FF),
              Color(0xFFE0E7FF),
            ],
          ),
        ),
        child: _widgetOptions.elementAt(_selectedIndex), // 显示当前选中页面
      ),
      // 底部导航栏
      bottomNavigationBar: Container(
        // 毛玻璃效果
        child: BackdropFilter(
          filter: ImageFilter.blur(sigmaX: 10, sigmaY: 10),
          child: BottomNavigationBar(
            items: const <BottomNavigationBarItem>[
              BottomNavigationBarItem(
                icon: Icon(Icons.home_outlined),
                activeIcon: Icon(Icons.home),
                label: '首页',
              ),
              BottomNavigationBarItem(
                icon: Icon(Icons.code_outlined),
                activeIcon: Icon(Icons.code),
                label: '仓库',
              ),
              BottomNavigationBarItem(
                icon: Icon(Icons.person_outlined),
                activeIcon: Icon(Icons.person),
                label: '我的',
              ),
            ],
            currentIndex: _selectedIndex,
            onTap: _onItemTapped,
          ),
        ),
      ),
    );
  }
}
7. 首页动态(screens/home_screen.dart)
作用:显示 GitCode 动态列表。
- 作为主页面里的 “首页内容区”,专门展示 GitCode 平台的动态信息(比如别人的提交、项目更新这些内容)
- 从服务层获取 GitCode 的动态数据,把这些数据整理成列表样式展示给用户看
- 处理列表的交互(比如下拉刷新最新动态、上滑加载更多内容)
- 点击列表里的动态项,能跳转到对应的详情页面(比如项目详情、用户主页)
同上在VScode(即Visual Studio Code软件)中打开刚刚创建"D:\HarmonyOS\oh_code\demo_gitcode\lib\screens\home_screen.dart"文件,直接写入以下代码:记得保存(save)
// SPDX-License-Identifier: Apache-2.0
import 'package:flutter/material.dart';
import '../services/gitcode_service.dart';
import '../themes/app_theme.dart';
import '../widgets/glass_card.dart';

/// 首页动态页面
class HomeScreen extends StatefulWidget {
  const HomeScreen({Key? key}) : super(key: key);

  @override
  State<HomeScreen> createState() => _HomeScreenState();
}

class _HomeScreenState extends State<HomeScreen> {
  /// GitCode服务实例
  final GitCodeService _service = GitCodeService();

  /// 动态列表数据
  List<dynamic> _activities = [];

  /// 加载状态
  bool _isLoading = true;

  /// 错误信息
  String? _errorMessage;

  @override
  void initState() {
    super.initState();
    _fetchActivities(); // 初始化时加载动态
  }

  /// 获取动态列表
  Future<void> _fetchActivities() async {
    setState(() {
      _isLoading = true;
      _errorMessage = null;
    });
    try {
      final activities = await _service.fetchActivities();
      setState(() {
        _activities = activities;
      });
    } catch (e) {
      setState(() {
        _errorMessage = e.toString();
      });
    } finally {
      setState(() {
        _isLoading = false;
      });
    }
  }

  @override
  Widget build(BuildContext context) {
    return Scaffold(
      // 透明AppBar(配合背景渐变)
      appBar: AppBar(
        title: const Text('首页动态'),
        backgroundColor: Colors.transparent,
      ),
      body: RefreshIndicator(
        onRefresh: _fetchActivities, // 下拉刷新
        color: AppTheme.primaryColor,
        backgroundColor: AppTheme.cardBackgroundColor,
        child: _isLoading
            ? const Center(
                child: Column(
                  mainAxisAlignment: MainAxisAlignment.center,
                  children: [
                    CircularProgressIndicator(color: AppTheme.primaryColor),
                    SizedBox(height: 16),
                    Text('加载中...'),
                  ],
                ),
              )
            : _errorMessage != null
                ? Center(
                    child: GlassCard(
                      child: Column(
                        mainAxisAlignment: MainAxisAlignment.center,
                        children: [
                          const Icon(
                            Icons.error_outline,
                            size: 64,
                            color: Colors.red,
                          ),
                          const SizedBox(height: 16),
                          Text(
                            _errorMessage!,
                            textAlign: TextAlign.center,
                            style: const TextStyle(color: AppTheme.secondaryTextColor),
                          ),
                          const SizedBox(height: 16),
                          ElevatedButton(
                            onPressed: _fetchActivities,
                            child: const Text('重试'),
                          ),
                        ],
                      ),
                    ),
                  )
                : _activities.isEmpty
                    ? const Center(
                        child: Column(
                          mainAxisAlignment: MainAxisAlignment.center,
                          children: [
                            Icon(
                              Icons.inbox_outlined,
                              size: 64,
                              color: AppTheme.secondaryTextColor,
                            ),
                            SizedBox(height: 16),
                            Text('暂无动态'),
                          ],
                        ),
                      )
                    : ListView.builder(
                        padding: const EdgeInsets.all(16.0),
                        itemCount: _activities.length,
                        itemBuilder: (context, index) {
                          final activity = _activities[index];
                          return _buildActivityCard(activity); // 构建动态卡片
                        },
                      ),
      ),
    );
  }

  /// 构建动态卡片
  Widget _buildActivityCard(Map<String, dynamic> activity) {
    return GlassCard(
      child: Row(
        crossAxisAlignment: CrossAxisAlignment.start,
        children: [
          // 头像
          CircleAvatar(
            radius: 28,
            backgroundImage: NetworkImage(activity['actor']?['avatar_url'] ?? ''),
            backgroundColor: AppTheme.secondaryColor.withOpacity(0.1),
          ),
          const SizedBox(width: 16),

          // 内容区域
          Expanded(
            child: Column(
              crossAxisAlignment: CrossAxisAlignment.start,
              children: [
                // 用户名和操作
                RichText(
                  text: TextSpan(
                    children: [
                      TextSpan(
                        text: '${activity['actor']?['login'] ?? '未知用户'} ',
                        style: const TextStyle(
                          fontWeight: FontWeight.bold,
                          color: AppTheme.primaryTextColor,
                          fontSize: AppTheme.fontSizeMedium,
                        ),
                      ),
                      TextSpan(
                        text: _getActivityMessage(activity), // 获取操作描述
                        style: TextStyle(
                          color: AppTheme.secondaryTextColor,
                          fontSize: AppTheme.fontSizeMedium,
                        ),
                      ),
                    ],
                  ),
                ),

                // 仓库名
                Padding(
                  padding: const EdgeInsets.symmetric(vertical: 4),
                  child: Text(
                    '仓库: ${activity['repo']?['name'] ?? '未知仓库'}',
                    style: TextStyle(
                      color: AppTheme.secondaryTextColor,
                      fontSize: AppTheme.fontSizeSmall,
                    ),
                  ),
                ),

                // 时间
                Text(
                  _formatTime(activity['created_at']), // 格式化时间
                  style: TextStyle(
                    color: AppTheme.secondaryTextColor,
                    fontSize: AppTheme.fontSizeSmall,
                  ),
                ),
              ],
            ),
          ),

          // 操作图标
          Icon(
            _getActivityIcon(activity), // 获取操作图标
            color: AppTheme.secondaryTextColor,
            size: 20,
          ),
        ],
      ),
    );
  }

  /// 获取操作描述
  String _getActivityMessage(Map<String, dynamic> activity) {
    final type = activity['type'] ?? 'unknown';
    switch (type) {
      case 'PushEvent':
        return '提交了代码';
      case 'WatchEvent':
        return '点赞了仓库';
      case 'FollowEvent':
        return '关注了用户';
      case 'IssuesEvent':
        return '创建了Issue';
      default:
        return '进行了操作';
    }
  }

  /// 获取操作图标
  IconData _getActivityIcon(Map<String, dynamic> activity) {
    final type = activity['type'] ?? 'unknown';
    switch (type) {
      case 'PushEvent':
        return Icons.code;
      case 'WatchEvent':
        return Icons.star_outline;
      case 'FollowEvent':
        return Icons.person_add_outlined;
      case 'IssuesEvent':
        return Icons.assignment_outlined;
      default:
        return Icons.notification_add_outlined;
    }
  }

  /// 格式化时间
  String _formatTime(String? timeStr) {
    if (timeStr == null) return '';
    final date = DateTime.parse(timeStr);
    final now = DateTime.now();
    final difference = now.difference(date);

    if (difference.inMinutes < 1) {
      return '刚刚';
    } else if (difference.inMinutes < 60) {
      return '${difference.inMinutes}分钟前';
    } else if (difference.inHours < 24) {
      return '${difference.inHours}小时前';
    } else if (difference.inDays < 30) {
      return '${difference.inDays}天前';
    } else {
      return '${date.month}/${date.day}';
    }
  }
}
8. 仓库页面(screens/repo_screen.dart)
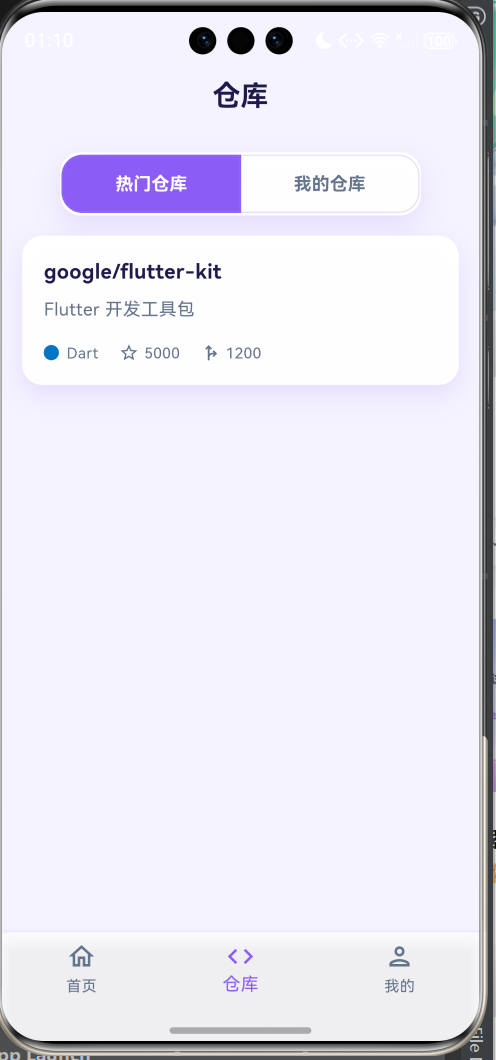
作用:显示热门仓库和我的仓库。
同上在VScode(即Visual Studio Code软件)中打开刚刚创建"screens\repo_screen.dart"文件,直接写入如以下代码:记得保存(save)
// SPDX-License-Identifier: Apache-2.0
import 'package:flutter/material.dart';
import '../services/gitcode_service.dart';
import '../themes/app_theme.dart';
import '../widgets/glass_card.dart';

/// 仓库页面
class RepoScreen extends StatefulWidget {
  const RepoScreen({Key? key}) : super(key: key);

  @override
  State<RepoScreen> createState() => _RepoScreenState();
}

class _RepoScreenState extends State<RepoScreen> {
  /// GitCode服务实例
  final GitCodeService _service = GitCodeService();

  /// 是否显示我的仓库(false: 热门仓库,true: 我的仓库)
  bool _showMyRepos = false;

  /// 仓库列表数据
  List<dynamic> _repos = [];

  /// 加载状态
  bool _isLoading = true;

  /// 错误信息
  String? _errorMessage;

  @override
  void initState() {
    super.initState();
    _fetchRepos(); // 初始化时加载仓库
  }

  /// 获取仓库列表
  Future<void> _fetchRepos() async {
    setState(() {
      _isLoading = true;
      _errorMessage = null;
    });
    try {
      final repos = _showMyRepos
          ? await _service.fetchMyRepositories() // 我的仓库
          : await _service.fetchHotRepositories(); // 热门仓库
      setState(() {
        _repos = repos;
      });
    } catch (e) {
      setState(() {
        _errorMessage = e.toString();
      });
    } finally {
      setState(() {
        _isLoading = false;
      });
    }
  }

  @override
  Widget build(BuildContext context) {
    return Scaffold(
      appBar: AppBar(
        title: const Text('仓库'),
        backgroundColor: Colors.transparent,
      ),
      body: RefreshIndicator(
        onRefresh: _fetchRepos, // 下拉刷新
        color: AppTheme.primaryColor,
        backgroundColor: AppTheme.cardBackgroundColor,
        child: Column(
          children: [
            // 切换标签(热门/我的)
            GlassCard(
              margin: const EdgeInsets.all(16),
              padding: EdgeInsets.zero,
              child: ToggleButtons(
                isSelected: [!_showMyRepos, _showMyRepos],
                onPressed: (index) {
                  setState(() {
                    _showMyRepos = index == 1; // 切换标签
                    _fetchRepos(); // 重新加载数据
                  });
                },
                borderRadius: AppTheme.cardBorderRadius,
                selectedBorderColor: AppTheme.primaryColor,
                selectedColor: Colors.white,
                fillColor: AppTheme.primaryColor,
                color: AppTheme.secondaryTextColor,
                borderColor: AppTheme.borderColor,
                constraints: const BoxConstraints(
                  minHeight: 44.0,
                  minWidth: 140.0,
                ),
                children: const [
                  Padding(
                    padding: EdgeInsets.symmetric(horizontal: 20),
                    child: Text(
                      '热门仓库',
                      style: TextStyle(fontWeight: FontWeight.bold),
                    ),
                  ),
                  Padding(
                    padding: EdgeInsets.symmetric(horizontal: 20),
                    child: Text(
                      '我的仓库',
                      style: TextStyle(fontWeight: FontWeight.bold),
                    ),
                  ),
                ],
              ),
            ),

            // 仓库列表
            Expanded(
              child: _isLoading
                  ? const Center(
                      child: Column(
                        mainAxisAlignment: MainAxisAlignment.center,
                        children: [
                          CircularProgressIndicator(color: AppTheme.primaryColor),
                          SizedBox(height: 16),
                          Text('加载中...'),
                        ],
                      ),
                    )
                  : _errorMessage != null
                      ? Center(
                          child: GlassCard(
                            child: Column(
                              mainAxisAlignment: MainAxisAlignment.center,
                              children: [
                                const Icon(
                                  Icons.error_outline,
                                  size: 64,
                                  color: Colors.red,
                                ),
                                const SizedBox(height: 16),
                                Text(
                                  _errorMessage!,
                                  textAlign: TextAlign.center,
                                  style: const TextStyle(color: AppTheme.secondaryTextColor),
                                ),
                                const SizedBox(height: 16),
                                ElevatedButton(
                                  onPressed: _fetchRepos,
                                  child: const Text('重试'),
                                ),
                              ],
                            ),
                          ),
                        )
                      : _repos.isEmpty
                          ? const Center(
                              child: Column(
                                mainAxisAlignment: MainAxisAlignment.center,
                                children: [
                                  Icon(
                                    Icons.inbox_outlined,
                                    size: 64,
                                    color: AppTheme.secondaryTextColor,
                                  ),
                                  SizedBox(height: 16),
                                  Text('暂无仓库'),
                                ],
                              ),
                            )
                          : ListView.builder(
                              padding: const EdgeInsets.symmetric(horizontal: 16),
                              itemCount: _repos.length,
                              itemBuilder: (context, index) {
                                final repo = _repos[index];
                                return _buildRepoCard(repo); // 构建仓库卡片
                              },
                            ),
            ),
          ],
        ),
      ),
    );
  }

  /// 构建仓库卡片
  Widget _buildRepoCard(Map<String, dynamic> repo) {
    return GlassCard(
      child: Column(
        crossAxisAlignment: CrossAxisAlignment.start,
        children: [
          // 仓库名称
          Text(
            repo['full_name'] ?? 'N/A',
            style: const TextStyle(
              fontSize: AppTheme.fontSizeLarge,
              fontWeight: FontWeight.bold,
              color: AppTheme.primaryTextColor,
            ),
          ),
          const SizedBox(height: 8),

          // 仓库描述
          Text(
            repo['description'] ?? '无描述',
            style: TextStyle(
              fontSize: AppTheme.fontSizeMedium,
              color: AppTheme.secondaryTextColor,
            ),
            maxLines: 2,
            overflow: TextOverflow.ellipsis,
          ),

          const SizedBox(height: 16),

          // 仓库信息(语言、星数、fork数)
          Row(
            children: [
              // 语言
              if (repo['language'] != null)
                Row(
                  children: [
                    Container(
                      width: 12,
                      height: 12,
                      decoration: BoxDecoration(
                        color: _getLanguageColor(repo['language']), // 语言颜色
                        borderRadius: BorderRadius.circular(6),
                      ),
                    ),
                    const SizedBox(width: 6),
                    Text(
                      repo['language'] ?? '',
                      style: TextStyle(
                        fontSize: AppTheme.fontSizeSmall,
                        color: AppTheme.secondaryTextColor,
                      ),
                    ),
                  ],
                ),

              const SizedBox(width: 16),

              // 星数
              Row(
                children: [
                  const Icon(
                    Icons.star_outline,
                    size: 16,
                    color: AppTheme.secondaryTextColor,
                  ),
                  const SizedBox(width: 4),
                  Text(
                    (repo['stargazers_count'] ?? 0).toString(),
                    style: TextStyle(
                      fontSize: AppTheme.fontSizeSmall,
                      color: AppTheme.secondaryTextColor,
                    ),
                  ),
                ],
              ),

              const SizedBox(width: 16),

              // Fork数
              Row(
                children: [
                  const Icon(
                    Icons.fork_right_outlined,
                    size: 16,
                    color: AppTheme.secondaryTextColor,
                  ),
                  const SizedBox(width: 4),
                  Text(
                    (repo['forks_count'] ?? 0).toString(),
                    style: TextStyle(
                      fontSize: AppTheme.fontSizeSmall,
                      color: AppTheme.secondaryTextColor,
                    ),
                  ),
                ],
              ),
            ],
          ),
        ],
      ),
    );
  }

  /// 获取语言对应的颜色
  Color _getLanguageColor(String? language) {
    switch (language?.toLowerCase()) {
      case 'dart':
        return const Color(0xFF0175C2);
      case 'python':
        return const Color(0xFF3776AB);
      case 'java':
        return const Color(0xFFB07219);
      case 'go':
        return const Color(0xFF00ADD8);
      case 'javascript':
        return const Color(0xFFF7DF1E);
      case 'typescript':
        return const Color(0xFF3178C6);
      case 'c++':
        return const Color(0xFFF34B7D);
      case 'c#':
        return const Color(0xFF178600);
      default:
        return AppTheme.secondaryTextColor;
    }
  }
}
9. 个人中心(screens/profile_screen.dart)
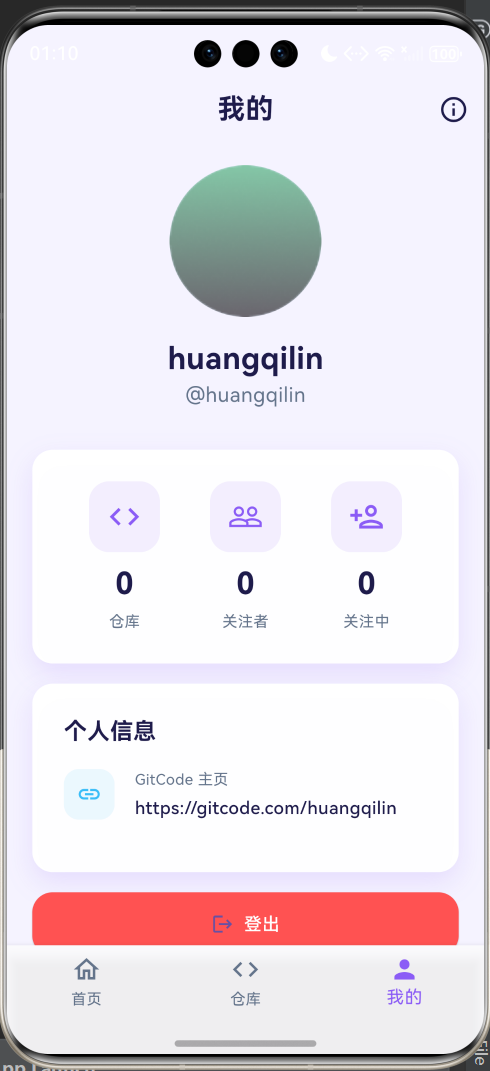
作用:显示用户个人信息。
- 展示当前登录用户的个人信息(比如头像、昵称、账号等)
- 提供个人相关的功能入口(比如修改个人资料、退出登录等)
- 从服务层获取用户的个人数据并展示,支持信息的编辑和更新
同上在VScode(即Visual Studio Code软件)中打开刚刚创建"D:\HarmonyOS\oh_code\demo_gitcode\lib\screens\profile_screen.dart"文件,直接写入如以下代码:然后记得保存(save)
// SPDX-License-Identifier: Apache-2.0
import './login_screen.dart';
import 'package:flutter/material.dart';
import '../services/gitcode_service.dart';
import '../themes/app_theme.dart';
import '../widgets/glass_card.dart';
/// 个人中心页面
class ProfileScreen extends StatefulWidget {
const ProfileScreen({Key? key}) : super(key: key);
@override
State<ProfileScreen> createState() => _ProfileScreenState();
}
class _ProfileScreenState extends State<ProfileScreen> {
/// GitCode服务实例
final GitCodeService _service = GitCodeService();
/// 用户信息
Map<String, dynamic>? _userInfo;
/// 加载状态
bool _isLoading = true;
/// 错误信息
String? _errorMessage;
@override
void initState() {
super.initState();
_fetchUserInfo(); // 初始化时加载用户信息
}
/// 获取用户信息
Future<void> _fetchUserInfo() async {
setState(() {
_isLoading = true;
_errorMessage = null;
});
try {
final userInfo = await _service.fetchUserInfo();
setState(() {
_userInfo = userInfo;
});
} catch (e) {
setState(() {
_errorMessage = e.toString();
});
} finally {
setState(() {
_isLoading = false;
});
}
}
@override
Widget build(BuildContext context) {
return Scaffold(
appBar: AppBar(
title: const Text('我的'),
backgroundColor: Colors.transparent,
actions: [
IconButton(
icon: const Icon(Icons.settings_outlined),
onPressed: () {
// 打开设置页面(预留)
print('打开设置');
},
),
],
),
body: RefreshIndicator(
onRefresh: _fetchUserInfo, // 下拉刷新
color: AppTheme.primaryColor,
backgroundColor: AppTheme.cardBackgroundColor,
child: _isLoading
? const Center(
child: Column(
mainAxisAlignment: MainAxisAlignment.center,
children: [
CircularProgressIndicator(color: AppTheme.primaryColor),
SizedBox(height: 16),
Text('加载中...'),
],
),
)
: _errorMessage != null
? Center(
child: GlassCard(
child: Column(
mainAxisAlignment: MainAxisAlignment.center,
children: [
const Icon(
Icons.error_outline,
size: 64,
color: Colors.red,
),
const SizedBox(height: 16),
Text(
_errorMessage!,
textAlign: TextAlign.center,
style: const TextStyle(color: AppTheme.secondaryTextColor),
),
const SizedBox(height: 16),
ElevatedButton(
onPressed: () {
// 清除令牌并返回登录页
_service.clearToken();
Navigator.of(context).pushReplacement(
MaterialPageRoute(builder: (_) => const LoginScreen()),
);
},
child: const Text('重新登录'),
),
],
),
),
)
: _userInfo == null
? const Center(
child: Text('未能获取用户信息'),
)
: SingleChildScrollView(
padding: const EdgeInsets.all(20.0),
child: Column(
crossAxisAlignment: CrossAxisAlignment.center,
children: <Widget>[
// 用户信息卡片
GlassCard(
margin: const EdgeInsets.only(bottom: 24),
padding: const EdgeInsets.all(24.0),
child: Column(
crossAxisAlignment: CrossAxisAlignment.center,
children: [
// 头像
CircleAvatar(
radius: 60,
backgroundImage: NetworkImage(_userInfo!['avatar_url'] ?? ''),
backgroundColor: AppTheme.secondaryColor.withOpacity(0.1),
),
const SizedBox(height: 16),
// 用户名
Text(
_userInfo!['name'] ?? _userInfo!['login'] ?? '匿名用户',
style: const TextStyle(
fontSize: AppTheme.fontSizeXXLarge,
fontWeight: FontWeight.bold,
color: AppTheme.primaryTextColor,
),
),
// 登录名
Text(
'@${_userInfo!['login']}',
style: TextStyle(
fontSize: AppTheme.fontSizeLarge,
color: AppTheme.secondaryTextColor,
),
),
const SizedBox(height: 16),
// 简介
if (_userInfo!['bio'] != null)
Text(
_userInfo!['bio'] ?? '',
textAlign: TextAlign.center,
style: TextStyle(
fontSize: AppTheme.fontSizeMedium,
color: AppTheme.secondaryTextColor,
),
),
],
),
),
// 统计信息卡片
GlassCard(
margin: const EdgeInsets.only(bottom: 24),
padding: const EdgeInsets.all(24.0),
child: Row(
mainAxisAlignment: MainAxisAlignment.spaceAround,
children: [
_buildStatItem(
'仓库',
_userInfo!['public_repos'] ?? 0,
Icons.code_outlined,
),
_buildStatItem(
'关注者',
_userInfo!['followers'] ?? 0,
Icons.people_outline,
),
_buildStatItem(
'关注中',
_userInfo!['following'] ?? 0,
Icons.person_add_outlined,
),
],
),
),
// 详细信息卡片
GlassCard(
padding: const EdgeInsets.all(24.0),
child: Column(
crossAxisAlignment: CrossAxisAlignment.start,
children: [
const Text(
'个人信息',
style: TextStyle(
fontSize: AppTheme.fontSizeXLarge,
fontWeight: FontWeight.bold,
color: AppTheme.primaryTextColor,
),
),
const SizedBox(height: 16),
// 邮箱
if (_userInfo!['email'] != null)
_buildInfoItem(
Icons.email_outlined,
'邮箱',
_userInfo!['email'] ?? '未公开',
),
// 位置
if (_userInfo!['location'] != null)
_buildInfoItem(
Icons.location_on_outlined,
'位置',
_userInfo!['location'] ?? '未公开',
),
// 主页
if (_userInfo!['blog'] != null)
_buildInfoItem(
Icons.link_outlined,
'主页',
_userInfo!['blog'] ?? '未公开',
),
// 加入时间
_buildInfoItem(
Icons.calendar_today_outlined,
'加入时间',
_formatDate(_userInfo!['created_at']),
),
],
),
),
const SizedBox(height: 24),
// 登出按钮
SizedBox(
width: double.infinity,
height: 50,
child: ElevatedButton.icon(
onPressed: () {
// 清除令牌并返回登录页
_service.clearToken();
Navigator.of(context).pushReplacement(
MaterialPageRoute(builder: (_) => const LoginScreen()),
);
},
icon: const Icon(Icons.logout),
label: const Text('登出'),
style: ElevatedButton.styleFrom(
backgroundColor: Colors.redAccent,
foregroundColor: Colors.white,
),
),
),
],
),
),
),
);
}
/// 构建统计项
Widget _buildStatItem(String label, int count, IconData icon) {
return Column(
children: [
Container(
width: 56,
height: 56,
decoration: BoxDecoration(
borderRadius: BorderRadius.circular(16),
color: AppTheme.primaryColor.withOpacity(0.1),
),
child: Icon(
icon,
size: 28,
color: AppTheme.primaryColor,
),
),
const SizedBox(height: 8),
Text(
count.toString(),
style: const TextStyle(
fontSize: 24,
fontWeight: FontWeight.bold,
color: AppTheme.primaryTextColor,
),
),
const SizedBox(height: 4),
Text(
label,
style: TextStyle(
fontSize: AppTheme.fontSizeSmall,
color: AppTheme.secondaryTextColor,
),
),
],
);
}
/// 构建信息项
Widget _buildInfoItem(IconData icon, String label, String value) {
return Padding(
padding: const EdgeInsets.only(bottom: 16),
child: Row(
children: [
Container(
width: 40,
height: 40,
decoration: BoxDecoration(
borderRadius: BorderRadius.circular(12),
color: AppTheme.secondaryColor.withOpacity(0.1),
),
child: Icon(
icon,
size: 20,
color: AppTheme.secondaryColor,
),
),
const SizedBox(width: 16),
Column(
crossAxisAlignment: CrossAxisAlignment.start,
children: [
Text(
label,
style: TextStyle(
fontSize: AppTheme.fontSizeSmall,
color: AppTheme.secondaryTextColor,
),
),
const SizedBox(height: 4),
Text(
value,
style: TextStyle(
fontSize: AppTheme.fontSizeMedium,
color: AppTheme.primaryTextColor,
fontWeight: FontWeight.w500,
),
),
],
),
],
),
);
}
/// 格式化日期
String _formatDate(String? dateStr) {
if (dateStr == null) return '';
final date = DateTime.parse(dateStr);
return '${date.year}年${date.month}月${date.day}日';
}
}10. 入口文件(main.dart)
作用:应用的入口点,初始化主题和根组件。
- 是整个 APP 的 “启动开关”—— 打开 APP 时,第一个运行的就是这个文件
- 初始化 APP 的基础配置:比如加载之前定义的毛玻璃主题、初始化核心组件
- 决定 APP 启动后先展示哪个页面(比如先跳登录页,还是直接进主页面)
- 统一配置 APP 的全局设置(比如屏幕适配、全局异常捕获)
在VScode(即Visual Studio Code软件)中打开lib/main.dart文件
(如小博的目录路径"D:\HarmonyOS\oh_code\demo_gitcode\lib\main.dart")
然后再main.dart代码中头部加上如下两行代码:
import './screens/login_screen.dart';
import './themes/app_theme.dart';
整体代码如图: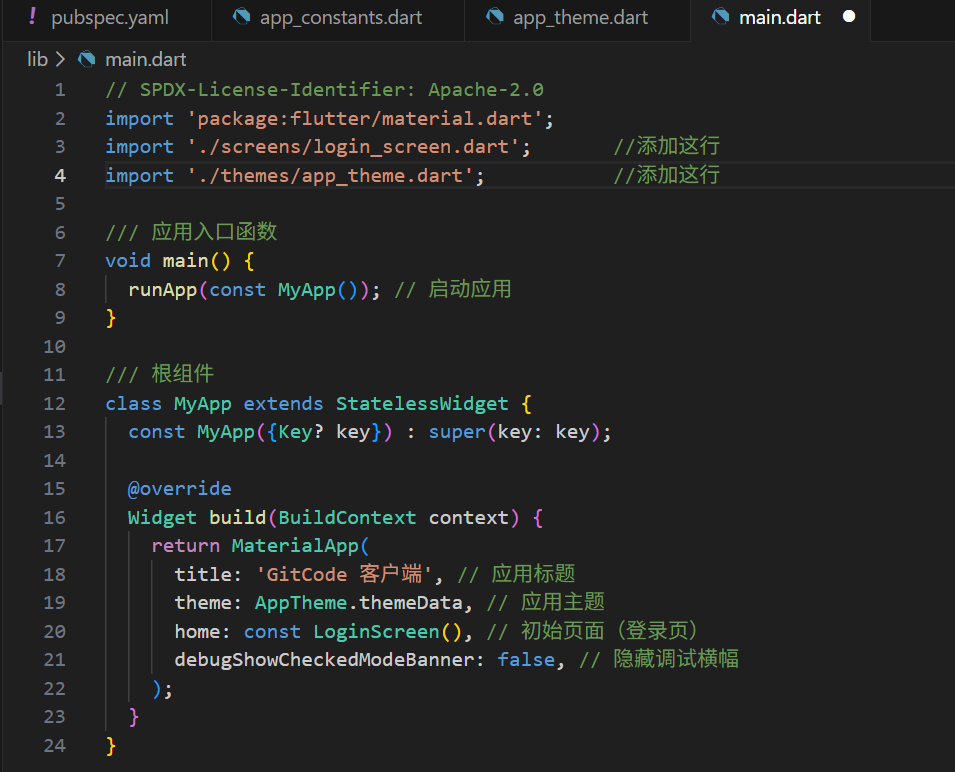
五、运行与测试
(一)添加依赖:在 pubspec.yaml 中添加 dio 依赖:(因为上面添加了组件,需要我们需要添加他的依赖以供代码运行)
-
在VScode中打开项目根目录下(如小博的地址是"D:\HarmonyOS\oh_code\demo_gitcode\pubspec.yaml")然后找到对应位置添加这一行代码“flutter_easyloading: ^3.0.5 # 添加这个”
-
dependencies: flutter: sdk: flutter dio: ^5.7.0 flutter_easyloading: ^3.0.5 # 添加这个 shared_preferences: ^2.3.0 -
如图所示,并且保存即可

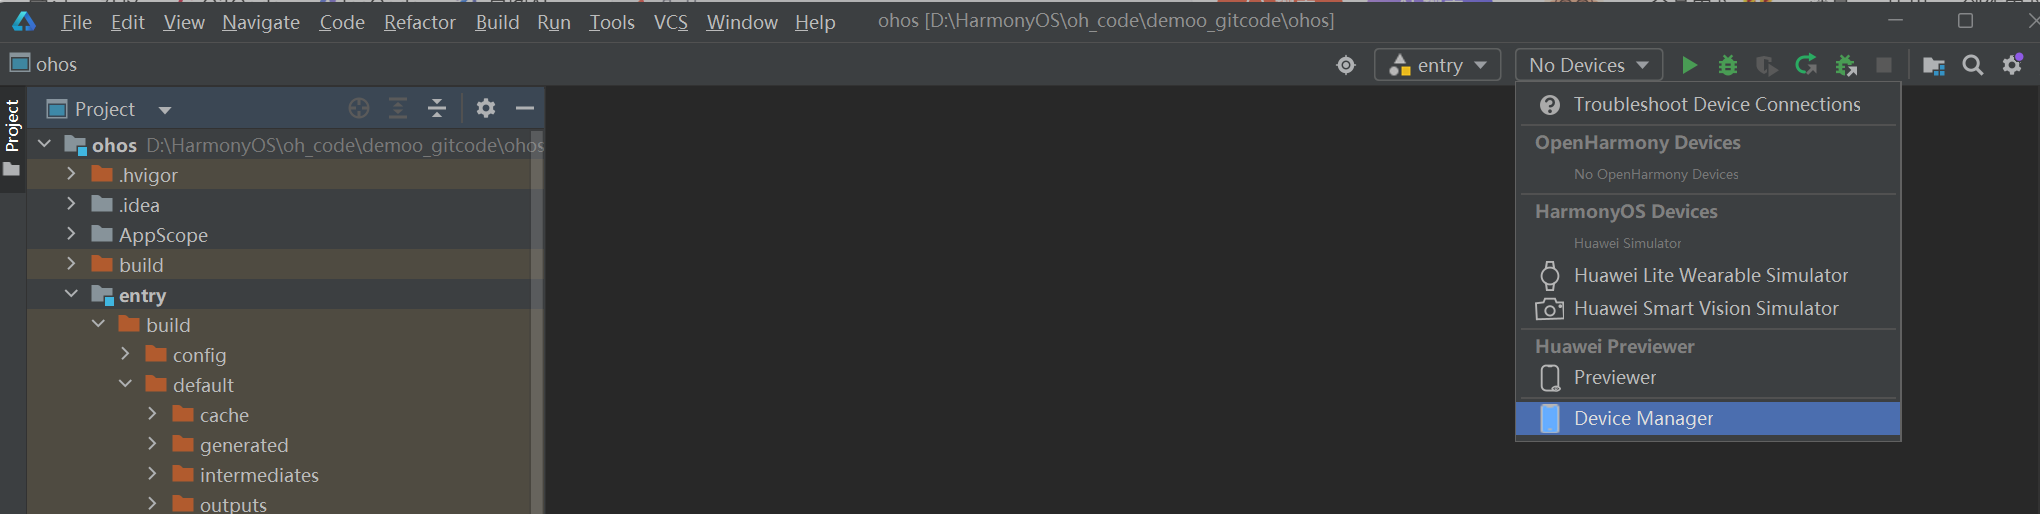
(二)运行
打开软件DevEco Studio,然后在左上角File打开ohos文件(小博的文件地址是"D:\HarmonyOS\oh_code\demo_gitcode\ohos"),点击OK
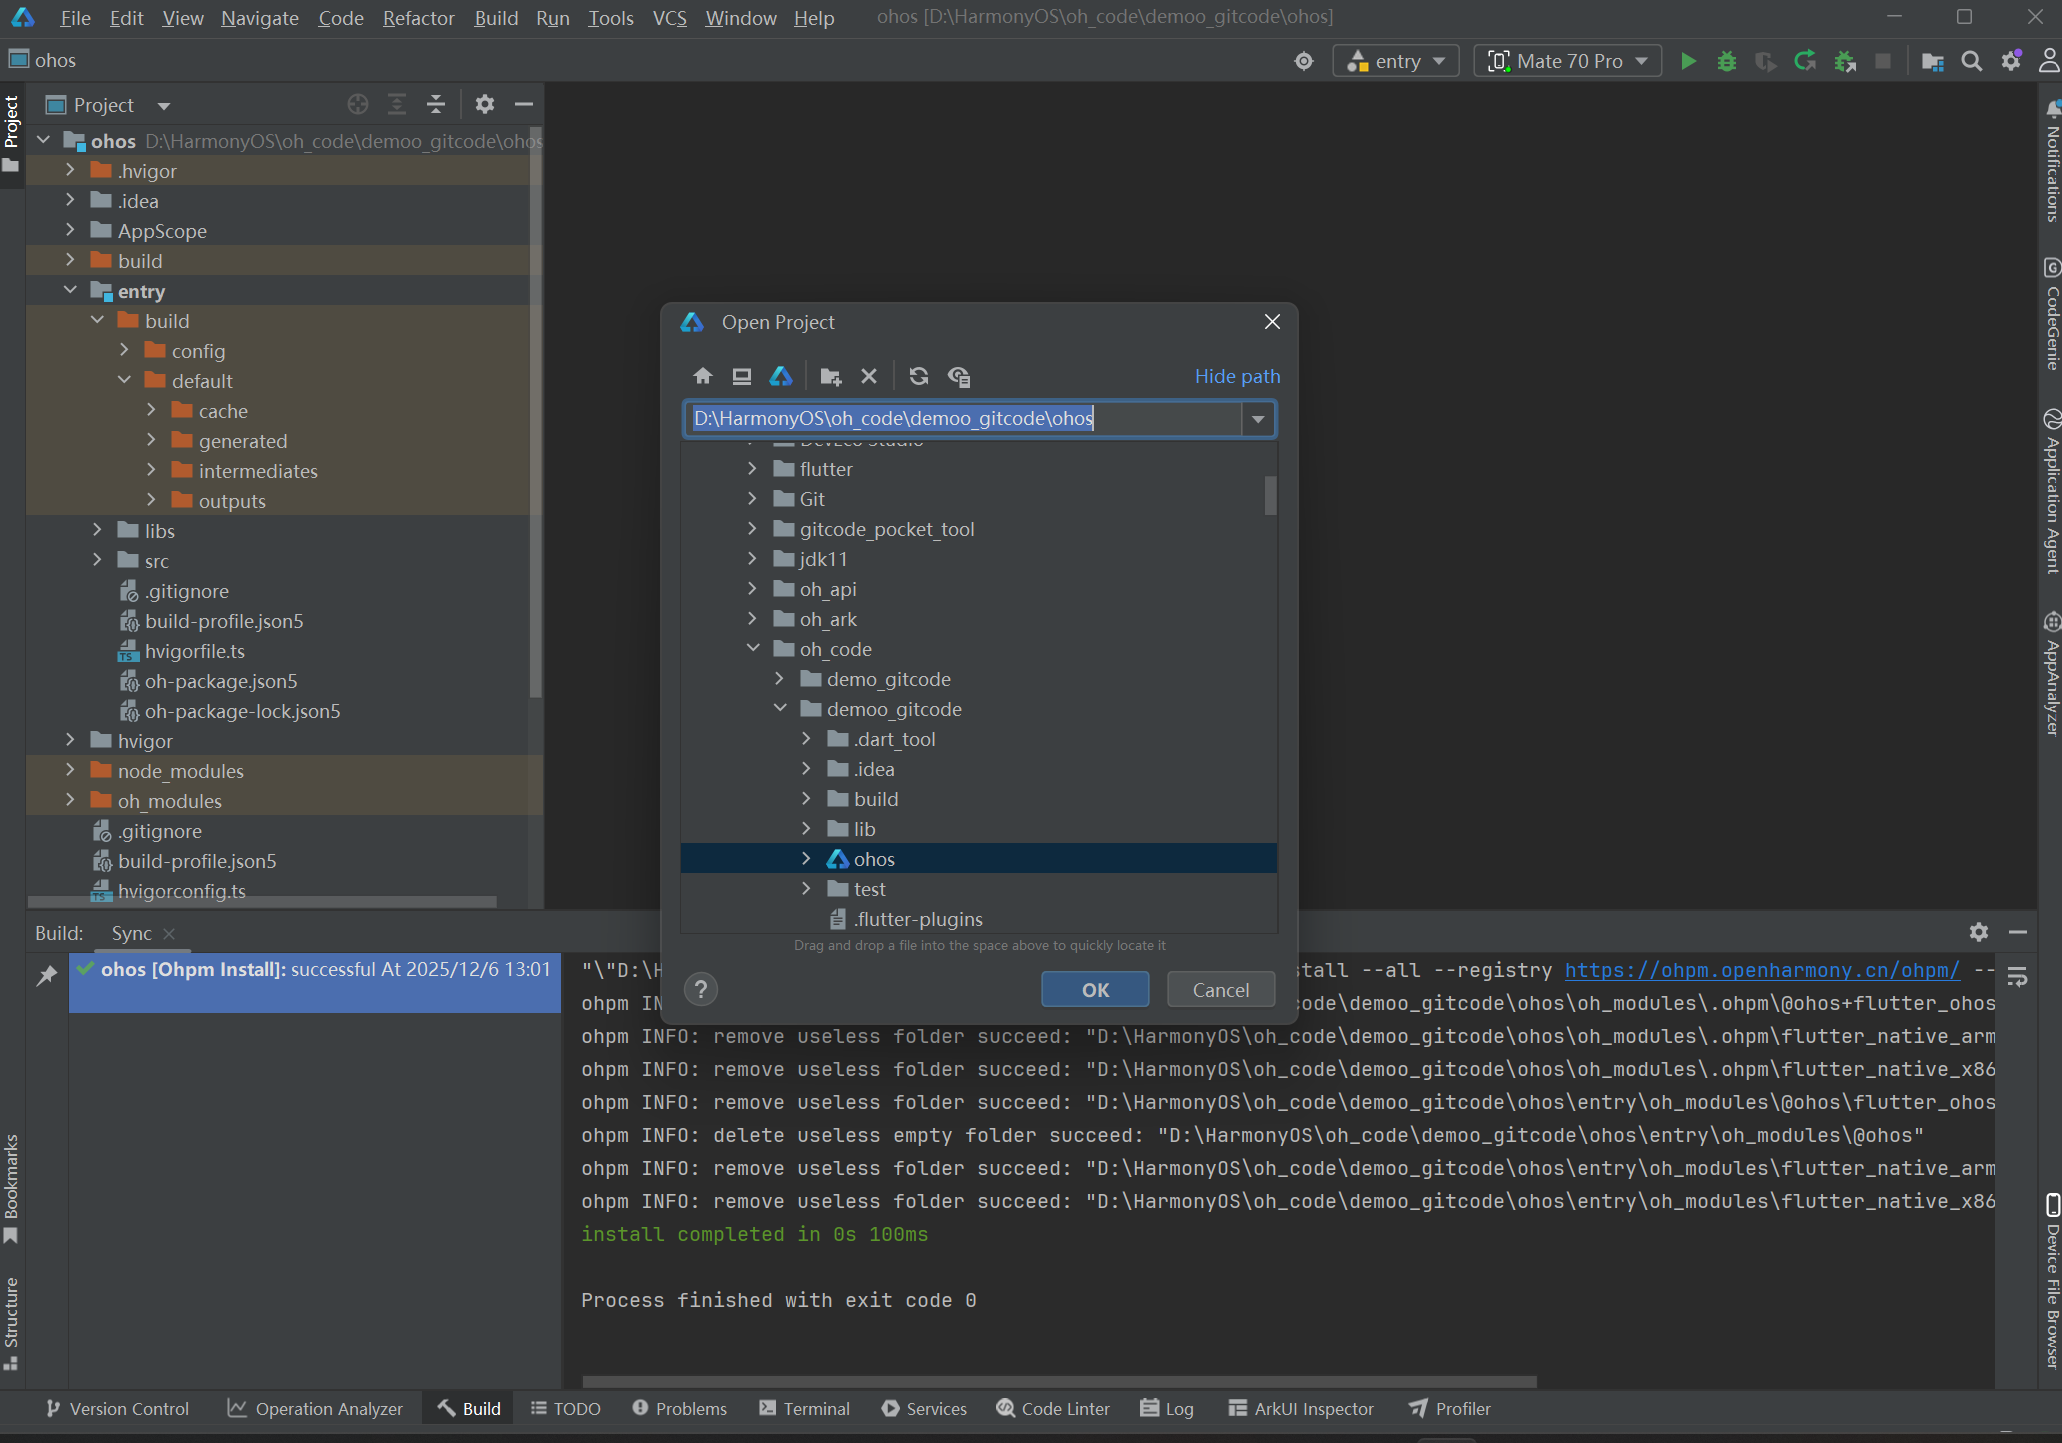
然后点击运行符合运行,如图

(三)测试
打开手机,
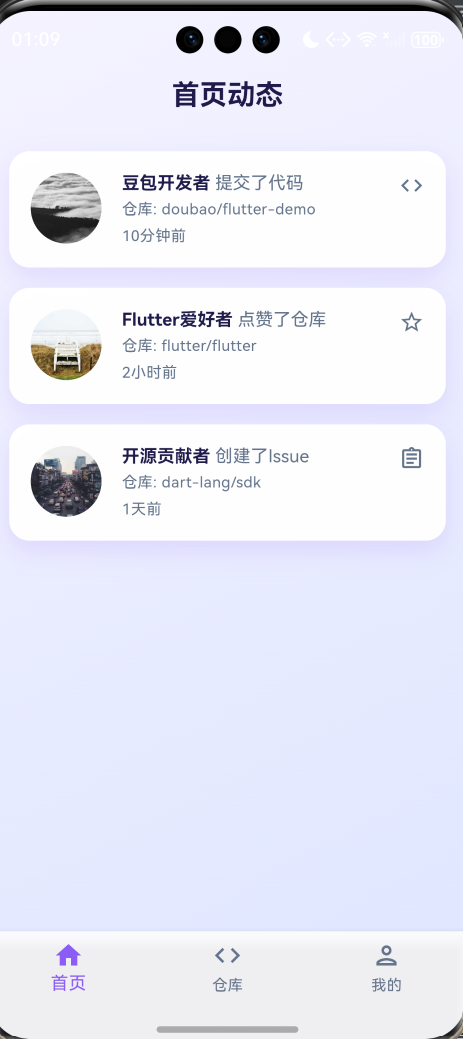
点开你的桌面对应文件就会弹出如下界面
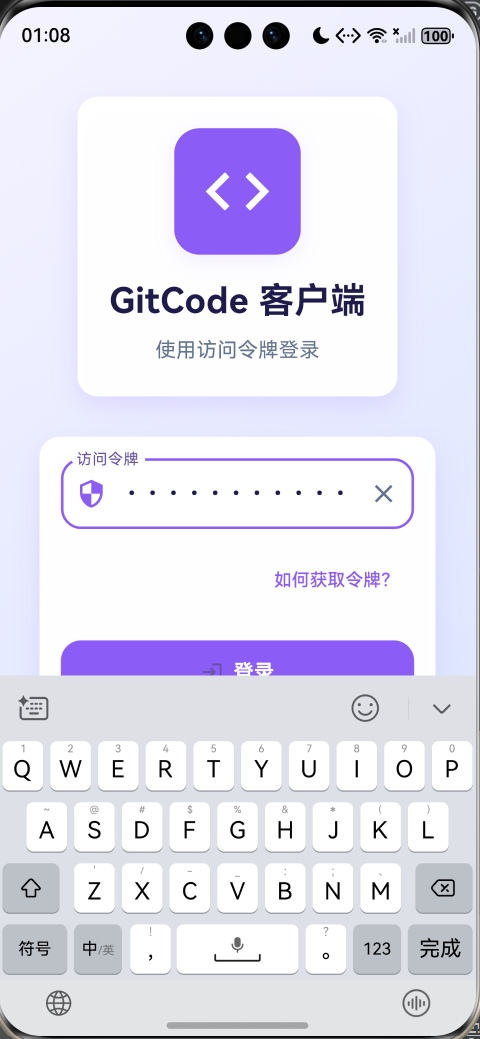
输入你的个人访问令牌然后登录就可以进入如下界面,实现个人账户登录

作为“人工智能6S店”的官方数字引擎,为AI开发者与企业提供一个覆盖软硬件全栈、一站式门户。
更多推荐


 7
7 0
0- 0


 已为社区贡献2条内容

所有评论(0)