
将小智 AI 打造为可扩展、可编程的 “第二大脑“
本文系统介绍了基于小智AI构建"第二大脑"的开发实践,涵盖三大核心项目:1)智能家居控制系统,实现语音指令解析与设备联动;2)AI对话系统,集成意图识别与上下文管理;3)插件化功能扩展系统,支持模块化开发。通过详细的技术架构、代码实现和Prompt工程示例,展示了如何将小智AI打造为可扩展的智能中枢。文章还提供了Docker部署方案和性能监控方案,为开发者构建个性化AI系统提供
·
作为工程师,将小智 AI 打造为可扩展、可编程的 "第二大脑",不仅能大幅提升开发效率,更能构建个性化智能系统。本文将通过智能家居控制、AI 对话系统、功能扩展三大实战项目,结合代码实现、流程图解、Prompt 工程等维度,全面解析基于小智 AI 的开发方法论。
一、技术架构总览
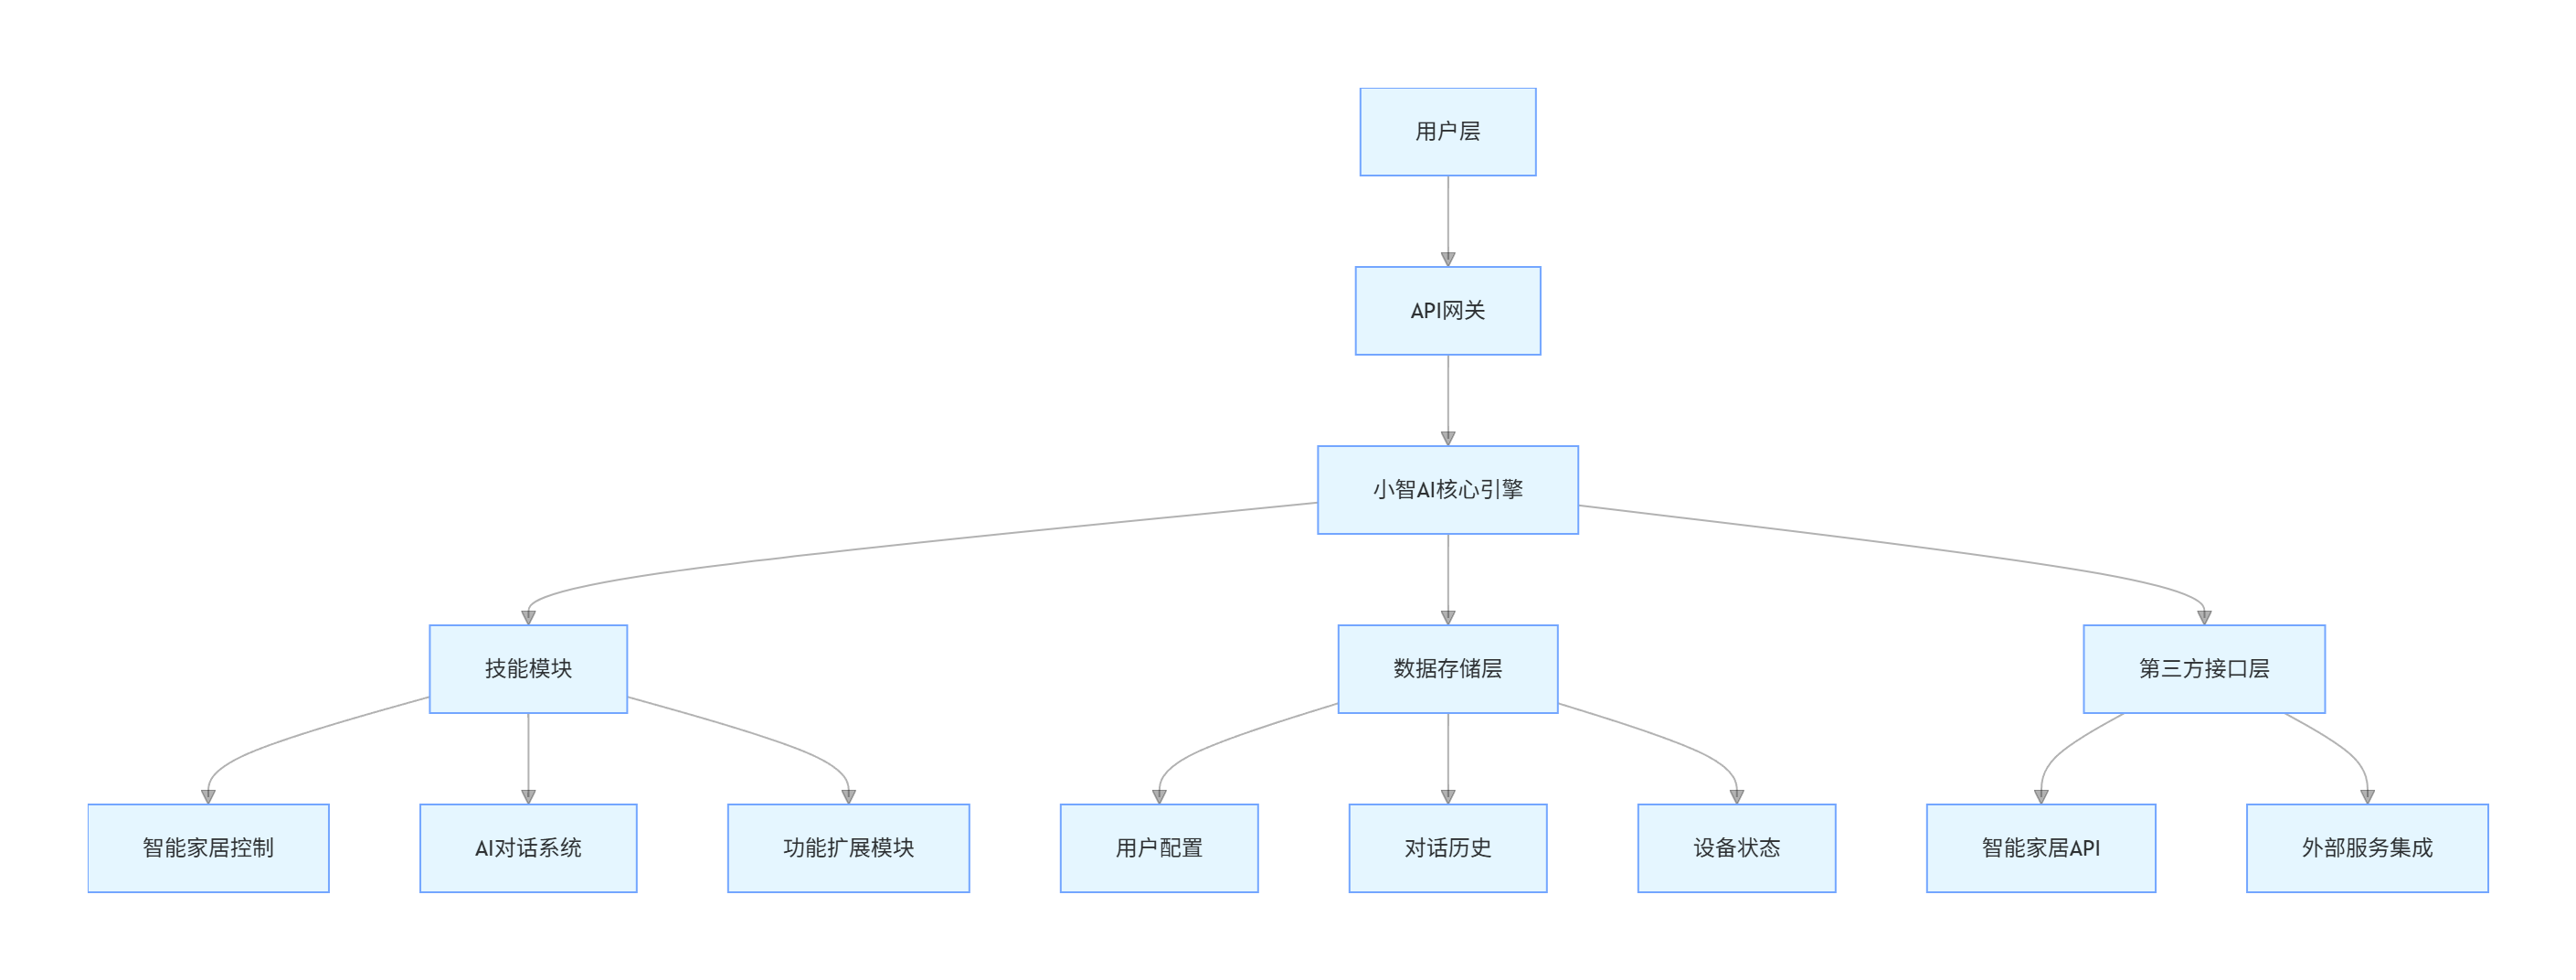
1.1 系统架构图
graph TD
    A[用户层] --> B[API网关]
    B --> C[小智AI核心引擎]
    C --> D[技能模块]
    D --> D1[智能家居控制]
    D --> D2[AI对话系统]
    D --> D3[功能扩展模块]
    C --> E[数据存储层]
    E --> E1[用户配置]
    E --> E2[对话历史]
    E --> E3[设备状态]
    C --> F[第三方接口层]
    F --> F1[智能家居API]
    F --> F2[外部服务集成]
1.2 核心技术栈
| 技术领域 | 推荐选择 | 备选方案 |
|---|---|---|
| 编程语言 | Python 3.9+ | Node.js/Java |
| API 交互 | FastAPI | Flask/Django |
| 数据存储 | SQLite/Redis | MongoDB/PostgreSQL |
| 消息队列 | MQTT | RabbitMQ/Kafka |
| 前端展示 | Vue.js/React | Flutter |
二、实战项目一:智能家居控制系统
2.1 系统设计
2.1.1 功能流程图
flowchart LR
    A[用户指令] --> B{小智AI解析}
    B -->|设备控制| C[生成控制指令]
    B -->|状态查询| D[获取设备状态]
    C --> E[设备控制API]
    D --> F[状态查询API]
    E --> G[智能设备]
    F --> G
    G --> H[返回执行结果]
    H --> I[小智AI结果格式化]
    I --> J[反馈给用户]

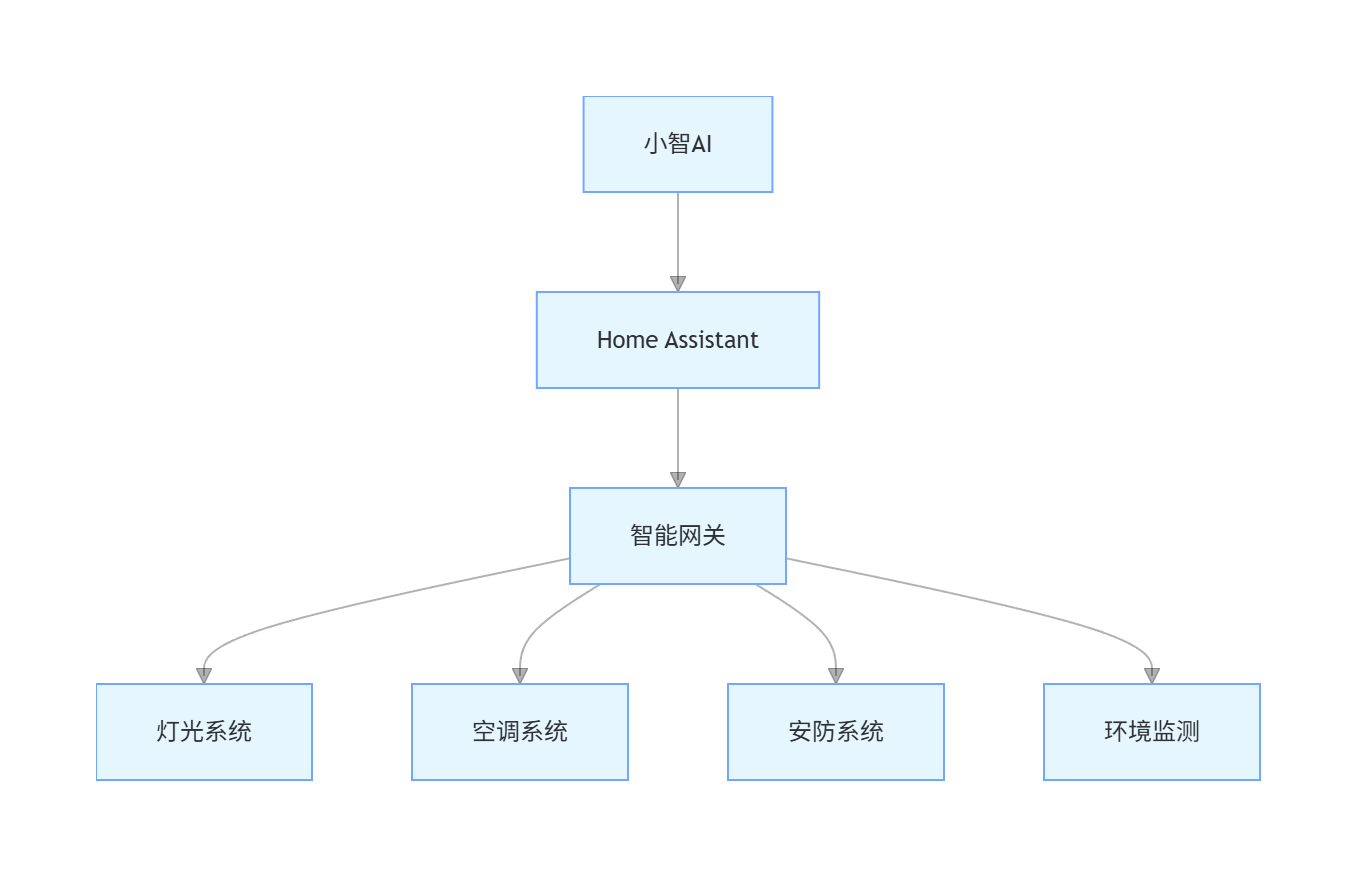
2.1.2 硬件架构
graph TD
    A[小智AI] --> B[Home Assistant]
    B --> C[智能网关]
    C --> D[灯光系统]
    C --> E[空调系统]
    C --> F[安防系统]
    C --> G[环境监测]
2.2 代码实现
2.2.1 小智 AI 交互模块
python
运行
import requests
import json
from datetime import datetime

class XiaoZhiClient:
    def __init__(self, api_key, base_url="https://api.xiaozhi.com/v1"):
        self.api_key = api_key
        self.base_url = base_url
        self.headers = {
            "Authorization": f"Bearer {api_key}",
            "Content-Type": "application/json"
        }

    def send_message(self, message, user_id="default_user", context=None):
        """发送消息给小智AI并获取回复"""
        payload = {
            "message": message,
            "user_id": user_id,
            "context": context or [],
            "timestamp": datetime.now().isoformat()
        }

        response = requests.post(
            f"{self.base_url}/chat/completions",
            headers=self.headers,
            json=payload
        )

        if response.status_code == 200:
            return response.json()
        else:
            raise Exception(f"API请求失败: {response.status_code} - {response.text}")

    def parse_home_command(self, ai_response):
        """解析小智AI返回的智能家居指令"""
        # 提取AI回复中的结构化数据
        try:
            # 假设AI返回的content中包含JSON格式的指令
            content = ai_response.get("choices", [{}])[0].get("message", {}).get("content", "")

            # 使用Prompt工程让AI返回标准化的JSON
            if "{" in content and "}" in content:
                json_start = content.index("{")
                json_end = content.rindex("}") + 1
                command_data = json.loads(content[json_start:json_end])
                return command_data
            else:
                return {"type": "text", "content": content}
        except Exception as e:
            print(f"解析指令失败: {e}")
            return {"type": "text", "content": ai_response}
2.2.2 智能家居控制模块
python
运行
import paho.mqtt.client as mqtt
import json
from typing import Dict, Any

class SmartHomeController:
    def __init__(self, mqtt_broker="localhost", mqtt_port=1883):
        self.mqtt_client = mqtt.Client()
        self.mqtt_broker = mqtt_broker
        self.mqtt_port = mqtt_port
        self.device_states = {}

        # 连接MQTT
        self.mqtt_client.on_connect = self.on_connect
        self.mqtt_client.on_message = self.on_message
        self.mqtt_client.connect(mqtt_broker, mqtt_port, 60)
        self.mqtt_client.loop_start()

    def on_connect(self, client, userdata, flags, rc):
        print(f"MQTT连接成功,状态码: {rc}")
        client.subscribe("smarthome/#")

    def on_message(self, client, userdata, msg):
        """处理设备状态更新"""
        try:
            payload = json.loads(msg.payload.decode())
            self.device_states[msg.topic] = payload
            print(f"设备状态更新: {msg.topic} = {payload}")
        except Exception as e:
            print(f"处理消息失败: {e}")

    def control_device(self, device_type: str, device_id: str, action: str, params: Dict[str, Any] = None):
        """控制智能设备"""
        topic = f"smarthome/{device_type}/{device_id}/command"
        payload = {
            "action": action,
            "params": params or {},
            "timestamp": datetime.now().isoformat()
        }

        result = self.mqtt_client.publish(topic, json.dumps(payload))
        status = result[0]

        if status == 0:
            return {"success": True, "message": f"已发送指令到 {device_type} {device_id}"}
        else:
            return {"success": False, "message": f"发送指令失败,状态码: {status}"}

    def get_device_status(self, device_type: str = None, device_id: str = None):
        """获取设备状态"""
        if device_type and device_id:
            topic = f"smarthome/{device_type}/{device_id}/status"
            return self.device_states.get(topic, {"status": "unknown"})
        elif device_type:
            return {k: v for k, v in self.device_states.items() if k.startswith(f"smarthome/{device_type}/")}
        else:
            return self.device_states
2.2.3 主程序集成
python
运行
def main():
    # 初始化组件
    xiaozhi_client = XiaoZhiClient(api_key="your_api_key_here")
    home_controller = SmartHomeController()

    # 对话循环
    print("智能家居控制系统已启动,输入'exit'退出")

    while True:
        user_input = input("你: ")
        if user_input.lower() == "exit":
            break

        # 发送消息给小智AI
        ai_response = xiaozhi_client.send_message(user_input)

        # 解析指令
        command = xiaozhi_client.parse_home_command(ai_response)

        # 执行指令
        if command.get("type") == "device_control":
            device_type = command.get("device_type")
            device_id = command.get("device_id")
            action = command.get("action")
            params = command.get("params", {})

            result = home_controller.control_device(device_type, device_id, action, params)
            print(f"小智: {result['message']}")

        elif command.get("type") == "status_query":
            device_type = command.get("device_type")
            device_id = command.get("device_id")

            status = home_controller.get_device_status(device_type, device_id)
            print(f"小智: 当前设备状态:\n{json.dumps(status, indent=2)}")

        else:
            print(f"小智: {command.get('content', '无法识别的指令')}")

if __name__ == "__main__":
    main()
2.3 Prompt 工程设计
2.3.1 系统 Prompt
plaintext
你是一个智能家居控制专家,需要解析用户指令并返回标准化的JSON格式响应。

指令类型包括:
1. device_control - 设备控制
2. status_query - 状态查询
3. text - 普通文本回复

返回格式要求:
{
    "type": "指令类型",
    "device_type": "设备类型(如light/aircon/curtain)",
    "device_id": "设备ID(如livingroom/bedroom)",
    "action": "操作动作(如on/off/set_temp)",
    "params": {"参数名": "参数值"},
    "content": "文本回复内容"
}

只返回JSON数据,不要额外解释。如果无法识别为设备控制或状态查询,type设为text。
2.3.2 用户指令示例及响应
| 用户指令 | AI 响应 |
|---|---|
| "打开客厅灯" | {"type":"device_control","device_type":"light","device_id":"livingroom","action":"on","params":{},"content":"已为你打开客厅灯"} |
| "把卧室空调调到 26 度" | {"type":"device_control","device_type":"aircon","device_id":"bedroom","action":"set_temp","params":{"temperature":26},"content":"已将卧室空调温度设置为26度"} |
| "查看所有设备状态" | {"type":"status_query","device_type":"all","device_id":"all","action":"query","params":{},"content":"正在查询所有设备状态..."} |
| "今天天气怎么样" | {"type":"text","content":"今天天气晴朗,气温25-32度"} |
2.4 系统测试与优化
2.4.1 测试用例设计
python
运行
import unittest
from unittest.mock import Mock, patch

class TestSmartHomeSystem(unittest.TestCase):
    def setUp(self):
        self.xiaozhi_client = XiaoZhiClient(api_key="test_key")
        self.home_controller = SmartHomeController(mqtt_broker="test_broker")

    @patch('requests.post')
    def test_message_parsing(self, mock_post):
        # 模拟AI响应
        mock_response = Mock()
        mock_response.status_code = 200
        mock_response.json.return_value = {
            "choices": [{
                "message": {
                    "content": '{"type":"device_control","device_type":"light","device_id":"livingroom","action":"on","params":{}}'
                }
            }]
        }
        mock_post.return_value = mock_response

        # 测试解析
        response = self.xiaozhi_client.send_message("打开客厅灯")
        command = self.xiaozhi_client.parse_home_command(response)

        self.assertEqual(command["type"], "device_control")
        self.assertEqual(command["device_type"], "light")

    def test_device_control(self):
        # 测试设备控制
        result = self.home_controller.control_device("light", "livingroom", "on")
        self.assertTrue(result["success"])

if __name__ == '__main__':
    unittest.main()
三、实战项目二:AI 对话系统
3.1 系统架构设计
3.1.1 对话流程
flowchart LR
    A[用户输入] --> B[意图识别]
    B --> C[上下文管理]
    C --> D[知识检索]
    D --> E[小智AI生成回复]
    E --> F[回复格式化]
    F --> G[用户反馈]
    G --> H[对话历史存储]
    H --> C

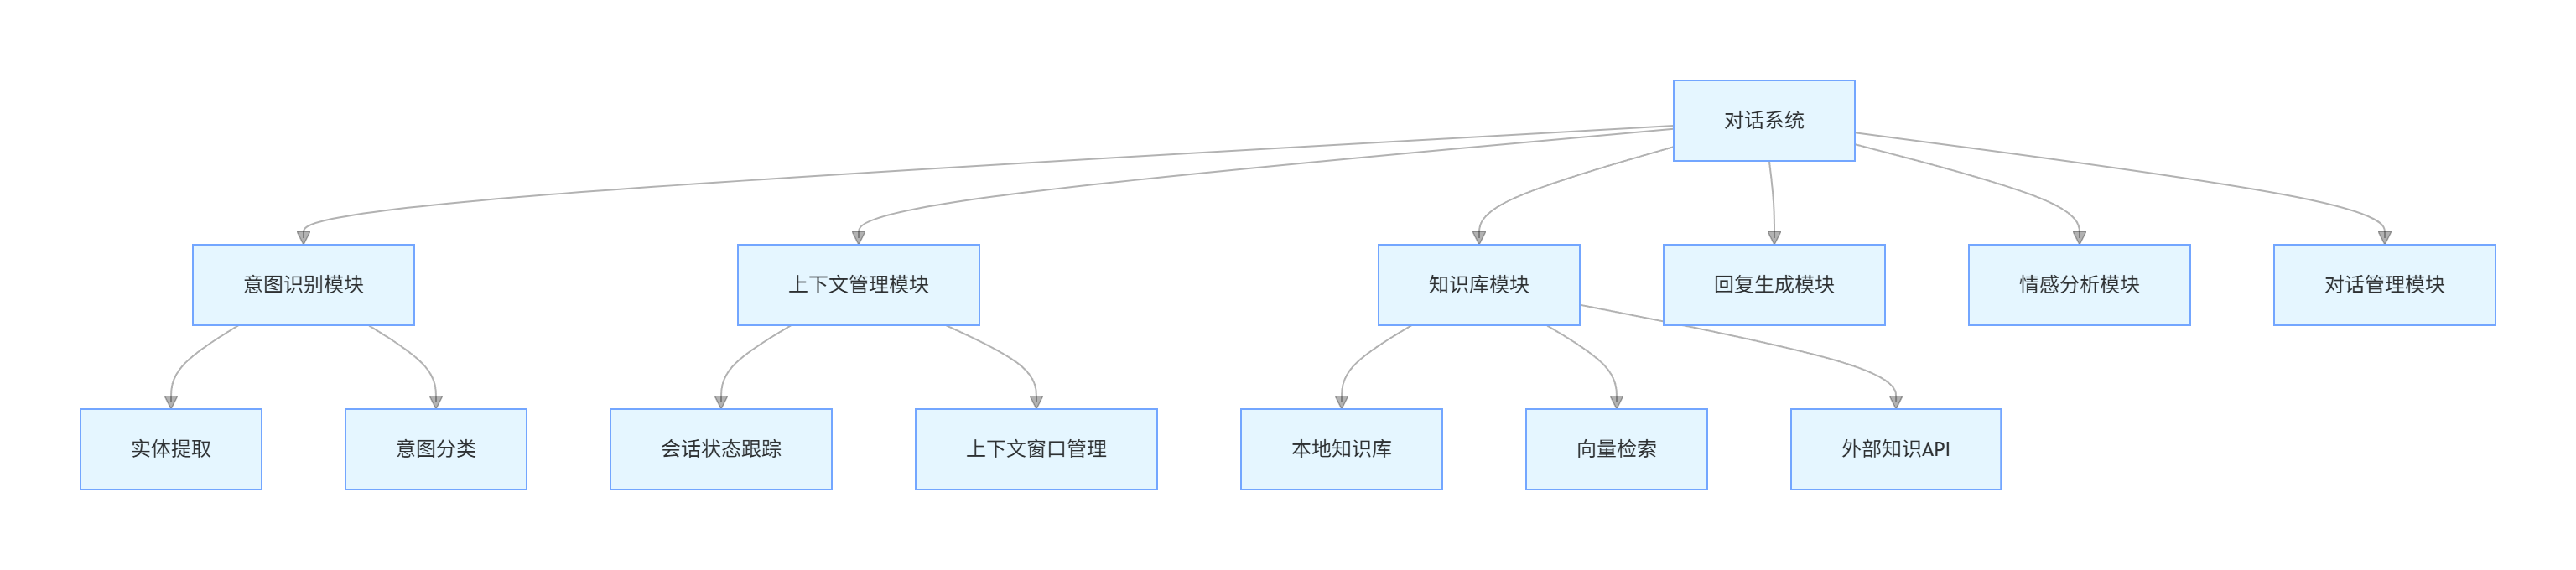
3.1.2 功能模块划分
graph TD
    A[对话系统] --> B[意图识别模块]
    A --> C[上下文管理模块]
    A --> D[知识库模块]
    A --> E[回复生成模块]
    A --> F[情感分析模块]
    A --> G[对话管理模块]

    B --> B1[实体提取]
    B --> B2[意图分类]

    C --> C1[会话状态跟踪]
    C --> C2[上下文窗口管理]

    D --> D1[本地知识库]
    D --> D2[向量检索]
    D --> D3[外部知识API]
3.2 代码实现
3.2.1 上下文管理模块
python
运行
import json
from datetime import datetime
from collections import deque

class ContextManager:
    def __init__(self, max_history=10):
        self.conversations = {}  # {user_id: deque}
        self.max_history = max_history

    def add_message(self, user_id, role, content, metadata=None):
        """添加消息到对话历史"""
        if user_id not in self.conversations:
            self.conversations[user_id] = deque(maxlen=self.max_history)

        message = {
            "role": role,
            "content": content,
            "timestamp": datetime.now().isoformat(),
            "metadata": metadata or {}
        }

        self.conversations[user_id].append(message)

    def get_context(self, user_id, limit=None):
        """获取对话上下文"""
        if user_id not in self.conversations:
            return []

        history = list(self.conversations[user_id])
        if limit:
            history = history[-limit:]

        return history

    def clear_context(self, user_id):
        """清除用户对话历史"""
        if user_id in self.conversations:
            del self.conversations[user_id]

    def get_context_summary(self, user_id, xiaozhi_client):
        """生成上下文摘要"""
        if user_id not in self.conversations or len(self.conversations[user_id]) == 0:
            return "无对话历史"

        history_text = "\n".join([f"{msg['role']}: {msg['content']}"
                                 for msg in self.conversations[user_id]])

        prompt = f"请简要总结以下对话内容,控制在50字以内:\n{history_text}"
        response = xiaozhi_client.send_message(prompt)

        return response.get("choices", [{}])[0].get("message", {}).get("content", "")
3.2.2 意图识别模块
python
运行
import re
from enum import Enum

class IntentType(Enum):
    CHAT = "chat"  # 普通聊天
    KNOWLEDGE = "knowledge"  # 知识查询
    TODO = "todo"  # 待办事项
    CALCULATE = "calculate"  # 计算
    UNKNOWN = "unknown"  # 未知意图

class IntentRecognizer:
    def __init__(self):
        # 意图关键词配置
        self.intent_keywords = {
            IntentType.KNOWLEDGE: ["什么是", "解释", "定义", "原理", "为什么", "如何"],
            IntentType.TODO: ["提醒", "待办", "任务", "计划", "安排"],
            IntentType.CALCULATE: ["计算", "加", "减", "乘", "除", "等于", "+-*/"]
        }

        # 正则表达式模式
        self.patterns = {
            IntentType.CALCULATE: re.compile(r'\d+[\+\-\*\/]\d+'),
            IntentType.TODO: re.compile(r'提醒我.*|记得.*|帮我.*')
        }

    def recognize(self, text):
        """识别用户意图"""
        text_lower = text.lower()

        # 检查关键词
        for intent, keywords in self.intent_keywords.items():
            if any(keyword in text_lower for keyword in keywords):
                return intent

        # 检查正则模式
        for intent, pattern in self.patterns.items():
            if pattern.search(text):
                return intent

        # 默认返回聊天意图
        return IntentType.CHAT

    def extract_entities(self, text, intent):
        """提取实体信息"""
        entities = {"intent": intent.value}

        if intent == IntentType.CALCULATE:
            # 提取计算表达式
            match = self.patterns[IntentType.CALCULATE].search(text)
            if match:
                entities["expression"] = match.group()

        elif intent == IntentType.TODO:
            # 提取待办事项内容
            entities["content"] = text.replace("提醒我", "").replace("记得", "").strip()

        return entities
3.2.3 对话系统主程序
python
运行
class AdvancedChatSystem:
    def __init__(self, api_key):
        self.xiaozhi_client = XiaoZhiClient(api_key)
        self.context_manager = ContextManager(max_history=20)
        self.intent_recognizer = IntentRecognizer()
        self.knowledge_base = KnowledgeBase()
        self.todo_manager = TodoManager()

    def process_message(self, user_id, message):
        """处理用户消息"""
        # 识别意图
        intent = self.intent_recognizer.recognize(message)
        entities = self.intent_recognizer.extract_entities(message, intent)

        # 添加用户消息到上下文
        self.context_manager.add_message(user_id, "user", message, {"intent": intent.value})

        # 根据意图处理
        if intent == IntentType.KNOWLEDGE:
            # 知识查询
            knowledge_result = self.knowledge_base.query(message)
            prompt = f"基于以下知识回答问题:\n{knowledge_result}\n\n问题:{message}"
            ai_response = self.xiaozhi_client.send_message(prompt, user_id,
                                                          self.context_manager.get_context(user_id, 5))

        elif intent == IntentType.TODO:
            # 待办事项管理
            if "添加" in message or "创建" in message:
                self.todo_manager.add_task(user_id, entities.get("content", message))
                ai_response = {"choices": [{"message": {"content": "已添加到你的待办事项列表"}}]}
            else:
                tasks = self.todo_manager.get_tasks(user_id)
                ai_response = {"choices": [{"message": {"content": f"你的待办事项:\n{tasks}"}}]}

        elif intent == IntentType.CALCULATE:
            # 计算处理
            expression = entities.get("expression", "")
            try:
                # 安全的表达式计算
                result = eval(expression)  # 生产环境应使用更安全的计算方式
                ai_response = {"choices": [{"message": {"content": f"{expression} = {result}"}}]}
            except:
                ai_response = self.xiaozhi_client.send_message(message, user_id,
                                                              self.context_manager.get_context(user_id, 5))

        else:
            # 普通聊天
            ai_response = self.xiaozhi_client.send_message(message, user_id,
                                                          self.context_manager.get_context(user_id, 10))

        # 提取AI回复
        ai_message = ai_response.get("choices", [{}])[0].get("message", {}).get("content", "")

        # 添加AI回复到上下文
        self.context_manager.add_message(user_id, "assistant", ai_message)

        return {
            "response": ai_message,
            "intent": intent.value,
            "entities": entities
        }

# 知识库和待办事项管理的简单实现
class KnowledgeBase:
    def query(self, query):
        # 实际应用中可以连接向量数据库或搜索引擎
        return f"关于'{query}'的相关知识..."

class TodoManager:
    def __init__(self):
        self.tasks = {}

    def add_task(self, user_id, task):
        if user_id not in self.tasks:
            self.tasks[user_id] = []
        self.tasks[user_id].append({"task": task, "created": datetime.now().isoformat(), "completed": False})

    def get_tasks(self, user_id):
        return self.tasks.get(user_id, [])

# 使用示例
def chat_demo():
    chat_system = AdvancedChatSystem(api_key="your_api_key_here")

    print("高级AI对话系统已启动(输入'exit'退出)")
    user_id = "test_user_001"

    while True:
        user_input = input("你: ")
        if user_input.lower() == "exit":
            break

        result = chat_system.process_message(user_id, user_input)
        print(f"小智: {result['response']}")
        print(f"[意图: {result['intent']}]")

if __name__ == "__main__":
    chat_demo()
3.3 Prompt 工程优化
3.3.1 多轮对话 Prompt
plaintext
你是一个智能对话助手,需要根据上下文进行连贯的对话。

要求:
1. 保持回复简洁明了,避免冗余
2. 记住对话历史中的关键信息
3. 根据用户意图提供专业回答
4. 对知识类问题提供准确信息
5. 保持友好的语气

当前对话历史:
{context}

用户当前问题:{user_message}
3.3.2 情感分析 Prompt
plaintext
分析用户消息的情感倾向,并返回JSON格式结果:

用户消息:{message}

返回格式:
{
    "sentiment": "positive/negative/neutral",
    "confidence": 0.0-1.0,
    "emotion": "happy/sad/angry/surprise/fear/disgust/neutral",
    "response_strategy": "回应策略建议"
}
3.4 性能优化
3.4.1 缓存机制实现
python
运行
import redis
import hashlib
from functools import wraps

class CacheManager:
    def __init__(self, host="localhost", port=6379, db=0):
        self.redis_client = redis.Redis(host=host, port=port, db=db)

    def get_cache(self, key):
        """获取缓存"""
        value = self.redis_client.get(key)
        if value:
            return json.loads(value)
        return None

    def set_cache(self, key, value, expire=3600):
        """设置缓存"""
        self.redis_client.setex(key, expire, json.dumps(value))

    def cache_decorator(self, expire=3600):
        """缓存装饰器"""
        def decorator(func):
            @wraps(func)
            def wrapper(*args, **kwargs):
                # 创建缓存键
                key_parts = [func.__name__] + list(args) + [f"{k}={v}" for k, v in kwargs.items()]
                key = hashlib.md5("|".join(map(str, key_parts)).encode()).hexdigest()

                # 尝试获取缓存
                cached = self.get_cache(key)
                if cached is not None:
                    return cached

                # 执行函数并缓存结果
                result = func(*args, **kwargs)
                self.set_cache(key, result, expire)
                return result
            return wrapper
        return decorator

# 使用缓存优化知识库查询
cache_manager = CacheManager()

class OptimizedKnowledgeBase(KnowledgeBase):
    @cache_manager.cache_decorator(expire=86400)  # 缓存24小时
    def query(self, query):
        # 优化的知识查询实现
        return super().query(query)
四、实战项目三:功能扩展系统
4.1 插件化架构设计
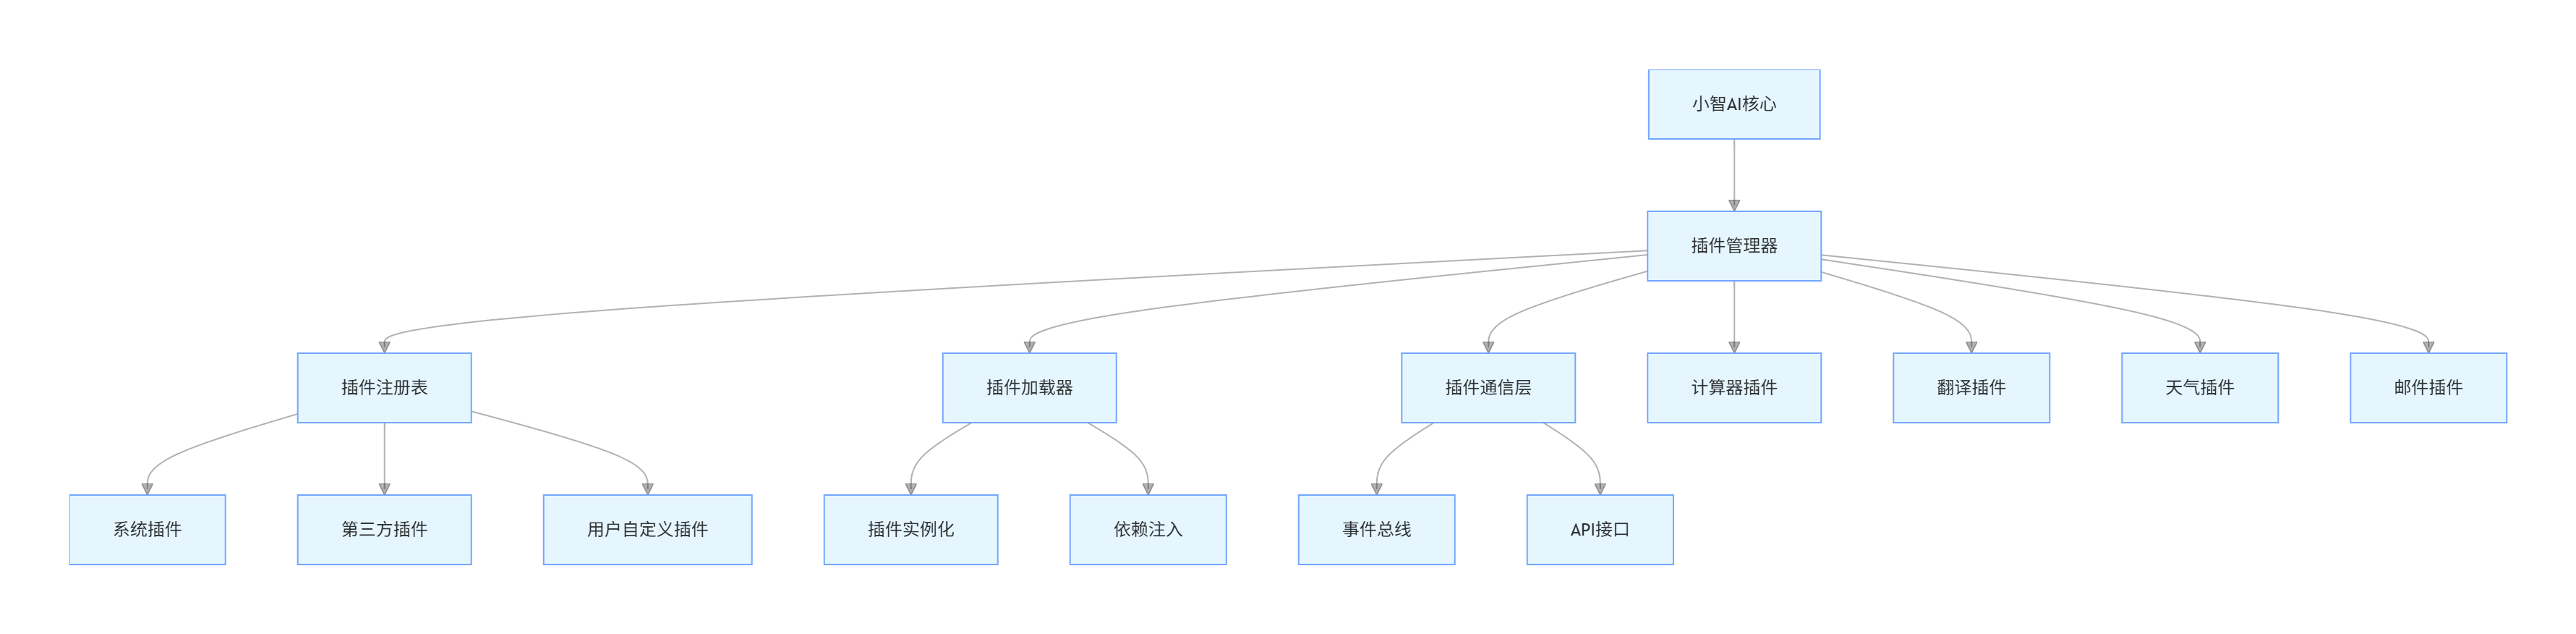
4.1.1 架构图
graph TD
    A[小智AI核心] --> B[插件管理器]
    B --> C[插件注册表]
    B --> D[插件加载器]
    B --> E[插件通信层]

    C --> C1[系统插件]
    C --> C2[第三方插件]
    C --> C3[用户自定义插件]

    D --> F[插件实例化]
    D --> G[依赖注入]

    E --> H[事件总线]
    E --> I[API接口]

    B --> J[计算器插件]
    B --> K[翻译插件]
    B --> L[天气插件]
    B --> M[邮件插件]
4.1.2 插件生命周期
stateDiagram-v2
    [*] --> Uninstalled
    Uninstalled --> Installed: install()
    Installed --> Loaded: load()
    Loaded --> Activated: activate()
    Activated --> Deactivated: deactivate()
    Deactivated --> Loaded: activate()
    Loaded --> Uninstalled: uninstall()
    Activated --> [*]: error
4.2 代码实现
4.2.1 插件基类定义
python
运行
from abc import ABC, abstractmethod
from dataclasses import dataclass
from typing import Dict, Any, Optional

@dataclass
class PluginMetadata:
    """插件元数据"""
    name: str
    version: str
    author: str
    description: str
    plugin_type: str
    dependencies: list = None
    config_schema: Dict[str, Any] = None

class BasePlugin(ABC):
    """插件基类"""

    def __init__(self):
        self.metadata = self.get_metadata()
        self.config = {}
        self.is_active = False

    @abstractmethod
    def get_metadata(self) -> PluginMetadata:
        """获取插件元数据"""
        pass

    @abstractmethod
    def activate(self):
        """激活插件"""
        self.is_active = True

    @abstractmethod
    def deactivate(self):
        """停用插件"""
        self.is_active = False

    @abstractmethod
    def execute(self, command: str, params: Dict[str, Any] = None) -> Any:
        """执行插件功能"""
        pass

    def configure(self, config: Dict[str, Any]):
        """配置插件"""
        self.config.update(config)

    def get_status(self) -> Dict[str, Any]:
        """获取插件状态"""
        return {
            "name": self.metadata.name,
            "version": self.metadata.version,
            "active": self.is_active,
            "config": self.config
        }
4.2.2 插件管理器实现
python
运行
import os
import importlib
import json
from pathlib import Path
from typing import List, Dict, Type

class PluginManager:
    def __init__(self, plugin_dir: str = "plugins"):
        self.plugin_dir = Path(plugin_dir)
        self.plugins: Dict[str, BasePlugin] = {}
        self.plugin_classes: Dict[str, Type[BasePlugin]] = {}

        # 创建插件目录
        self.plugin_dir.mkdir(exist_ok=True)

        # 加载插件
        self.discover_plugins()

    def discover_plugins(self):
        """发现并加载所有插件"""
        # 遍历插件目录
        for plugin_file in self.plugin_dir.glob("*.py"):
            if plugin_file.name.startswith("__"):
                continue

            # 导入插件模块
            module_name = f"plugins.{plugin_file.stem}"
            try:
                module = importlib.import_module(module_name)

                # 查找插件类
                for attr in dir(module):
                    cls = getattr(module, attr)
                    if isinstance(cls, type) and issubclass(cls, BasePlugin) and cls != BasePlugin:
                        self.plugin_classes[cls.get_metadata(None).name] = cls
                        print(f"发现插件: {cls.get_metadata(None).name}")

            except Exception as e:
                print(f"加载插件失败 {plugin_file.name}: {e}")

    def install_plugin(self, plugin_name: str, config: Dict[str, Any] = None) -> bool:
        """安装插件"""
        if plugin_name not in self.plugin_classes:
            return False

        plugin_class = self.plugin_classes[plugin_name]
        plugin_instance = plugin_class()

        if config:
            plugin_instance.configure(config)

        plugin_instance.activate()
        self.plugins[plugin_name] = plugin_instance

        return True

    def uninstall_plugin(self, plugin_name: str) -> bool:
        """卸载插件"""
        if plugin_name not in self.plugins:
            return False

        self.plugins[plugin_name].deactivate()
        del self.plugins[plugin_name]
        return True

    def execute_plugin(self, plugin_name: str, command: str, params: Dict[str, Any] = None) -> Any:
        """执行插件功能"""
        if plugin_name not in self.plugins:
            return {"error": f"插件 {plugin_name} 未安装"}

        if not self.plugins[plugin_name].is_active:
            return {"error": f"插件 {plugin_name} 未激活"}

        try:
            result = self.plugins[plugin_name].execute(command, params)
            return {"result": result}
        except Exception as e:
            return {"error": str(e)}

    def list_plugins(self) -> List[Dict[str, Any]]:
        """列出所有插件"""
        installed = []
        for name, plugin in self.plugins.items():
            installed.append(plugin.get_status())

        available = []
        for name, cls in self.plugin_classes.items():
            if name not in self.plugins:
                metadata = cls.get_metadata(None)
                available.append({
                    "name": metadata.name,
                    "version": metadata.version,
                    "description": metadata.description,
                    "installed": False
                })

        return {"installed": installed, "available": available}
4.2.3 示例插件实现
python
运行
# plugins/calculator_plugin.py
class CalculatorPlugin(BasePlugin):
    def get_metadata(self) -> PluginMetadata:
        return PluginMetadata(
            name="calculator",
            version="1.0.0",
            author="Developer",
            description="提供数学计算功能",
            plugin_type="tool",
            config_schema={"precision": {"type": "int", "default": 2}}
        )

    def activate(self):
        super().activate()
        print("计算器插件已激活")

    def deactivate(self):
        super().deactivate()
        print("计算器插件已停用")

    def execute(self, command: str, params: Dict[str, Any] = None) -> Any:
        if not params:
            return {"error": "缺少计算参数"}

        operation = params.get("operation")
        a = params.get("a")
        b = params.get("b")

        precision = self.config.get("precision", 2)

        try:
            a = float(a)
            b = float(b)

            if operation == "add":
                result = a + b
            elif operation == "subtract":
                result = a - b
            elif operation == "multiply":
                result = a * b
            elif operation == "divide":
                if b == 0:
                    return {"error": "除数不能为零"}
                result = a / b
            else:
                return {"error": f"不支持的操作: {operation}"}

            return {"result": round(result, precision)}

        except ValueError:
            return {"error": "参数必须是数字"}

# plugins/weather_plugin.py
import requests

class WeatherPlugin(BasePlugin):
    def get_metadata(self) -> PluginMetadata:
        return PluginMetadata(
            name="weather",
            version="1.0.0",
            author="Developer",
            description="提供天气查询功能",
            plugin_type="service",
            config_schema={"api_key": {"type": "str", "required": True}, "api_url": {"type": "str", "default": "https://api.weatherapi.com/v1"}}
        )

    def activate(self):
        super().activate()
        if not self.config.get("api_key"):
            raise Exception("需要配置API密钥")
        print("天气插件已激活")

    def deactivate(self):
        super().deactivate()
        print("天气插件已停用")

    def execute(self, command: str, params: Dict[str, Any] = None) -> Any:
        if command == "current":
            city = params.get("city", "beijing")
            api_key = self.config.get("api_key")
            api_url = self.config.get("api_url")

            try:
                response = requests.get(f"{api_url}/current.json",
                                      params={"key": api_key, "q": city})
                response.raise_for_status()

                data = response.json()
                return {
                    "location": data["location"]["name"],
                    "temperature": data["current"]["temp_c"],
                    "condition": data["current"]["condition"]["text"],
                    "humidity": data["current"]["humidity"]
                }
            except Exception as e:
                return {"error": f"获取天气失败: {str(e)}"}

        return {"error": f"不支持的命令: {command}"}
4.2.4 小智 AI 插件集成
python
运行
class PluginEnhancedXiaoZhi:
    def __init__(self, api_key, plugin_dir="plugins"):
        self.xiaozhi_client = XiaoZhiClient(api_key)
        self.plugin_manager = PluginManager(plugin_dir)

        # 初始化系统插件
        self._init_system_plugins()

        # 插件调用Prompt
        self.plugin_prompt = """
分析用户请求是否需要调用插件,如果需要,返回以下JSON格式:
{
    "use_plugin": true/false,
    "plugin_name": "插件名称",
    "command": "插件命令",
    "params": {"参数名": "参数值"},
    "text_response": "如果不需要插件的文本回复"
}

可用插件:
- calculator: 数学计算(operation: add/subtract/multiply/divide, a, b)
- weather: 天气查询(command: current, city)

只返回JSON,不要其他内容。
"""

    def _init_system_plugins(self):
        """初始化系统插件"""
        # 安装计算器插件
        self.plugin_manager.install_plugin("calculator", {"precision": 4})

        # 安装天气插件(需要配置API密钥)
        # self.plugin_manager.install_plugin("weather", {"api_key": "your_weather_api_key"})

    def process_request(self, user_message, user_id="default"):
        """处理用户请求"""
        # 首先让AI判断是否需要调用插件
        plugin_decision = self.xiaozhi_client.send_message(
            f"{self.plugin_prompt}\n\n用户请求:{user_message}",
            user_id=user_id
        )

        # 解析AI的决策
        try:
            decision_data = json.loads(plugin_decision.get("choices", [{}])[0].get("message", {}).get("content", "{}"))

            if decision_data.get("use_plugin"):
                # 调用插件
                plugin_name = decision_data.get("plugin_name")
                command = decision_data.get("command")
                params = decision_data.get("params", {})

                plugin_result = self.plugin_manager.execute_plugin(plugin_name, command, params)

                # 将插件结果交给AI进行自然语言处理
                final_response = self.xiaozhi_client.send_message(
                    f"根据以下插件执行结果,用自然语言回复用户:\n插件结果:{plugin_result}\n用户原始请求:{user_message}",
                    user_id=user_id
                )

                return final_response.get("choices", [{}])[0].get("message", {}).get("content", "")

            else:
                # 直接返回AI的文本回复
                return decision_data.get("text_response", "无法处理你的请求")

        except Exception as e:
            print(f"插件处理失败: {e}")
            # 降级处理:直接使用AI回复
            fallback_response = self.xiaozhi_client.send_message(user_message, user_id=user_id)
            return fallback_response.get("choices", [{}])[0].get("message", {}).get("content", "")

# 使用示例
def plugin_demo():
    enhanced_xiaozhi = PluginEnhancedXiaoZhi(api_key="your_api_key_here")

    print("插件增强版小智AI已启动(输入'exit'退出)")

    while True:
        user_input = input("你: ")
        if user_input.lower() == "exit":
            break

        response = enhanced_xiaozhi.process_request(user_input)
        print(f"小智: {response}")

if __name__ == "__main__":
    plugin_demo()
4.3 插件市场设计
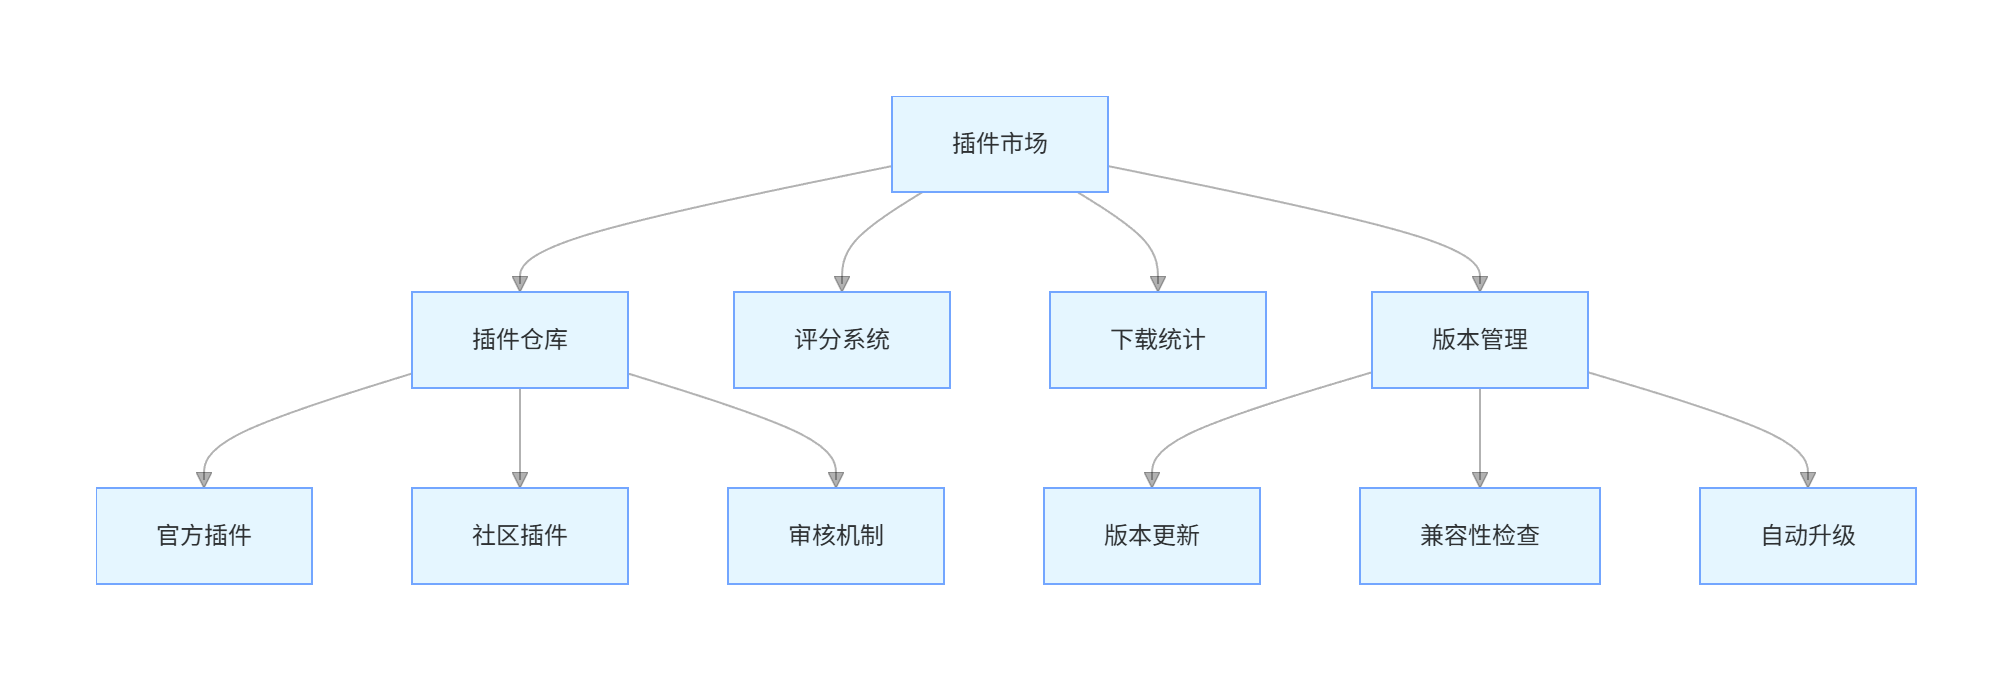
4.3.1 插件市场架构
graph TD
    A[插件市场] --> B[插件仓库]
    A --> C[评分系统]
    A --> D[下载统计]
    A --> E[版本管理]

    B --> B1[官方插件]
    B --> B2[社区插件]
    B --> B3[审核机制]

    E --> E1[版本更新]
    E --> E2[兼容性检查]
    E --> E3[自动升级]
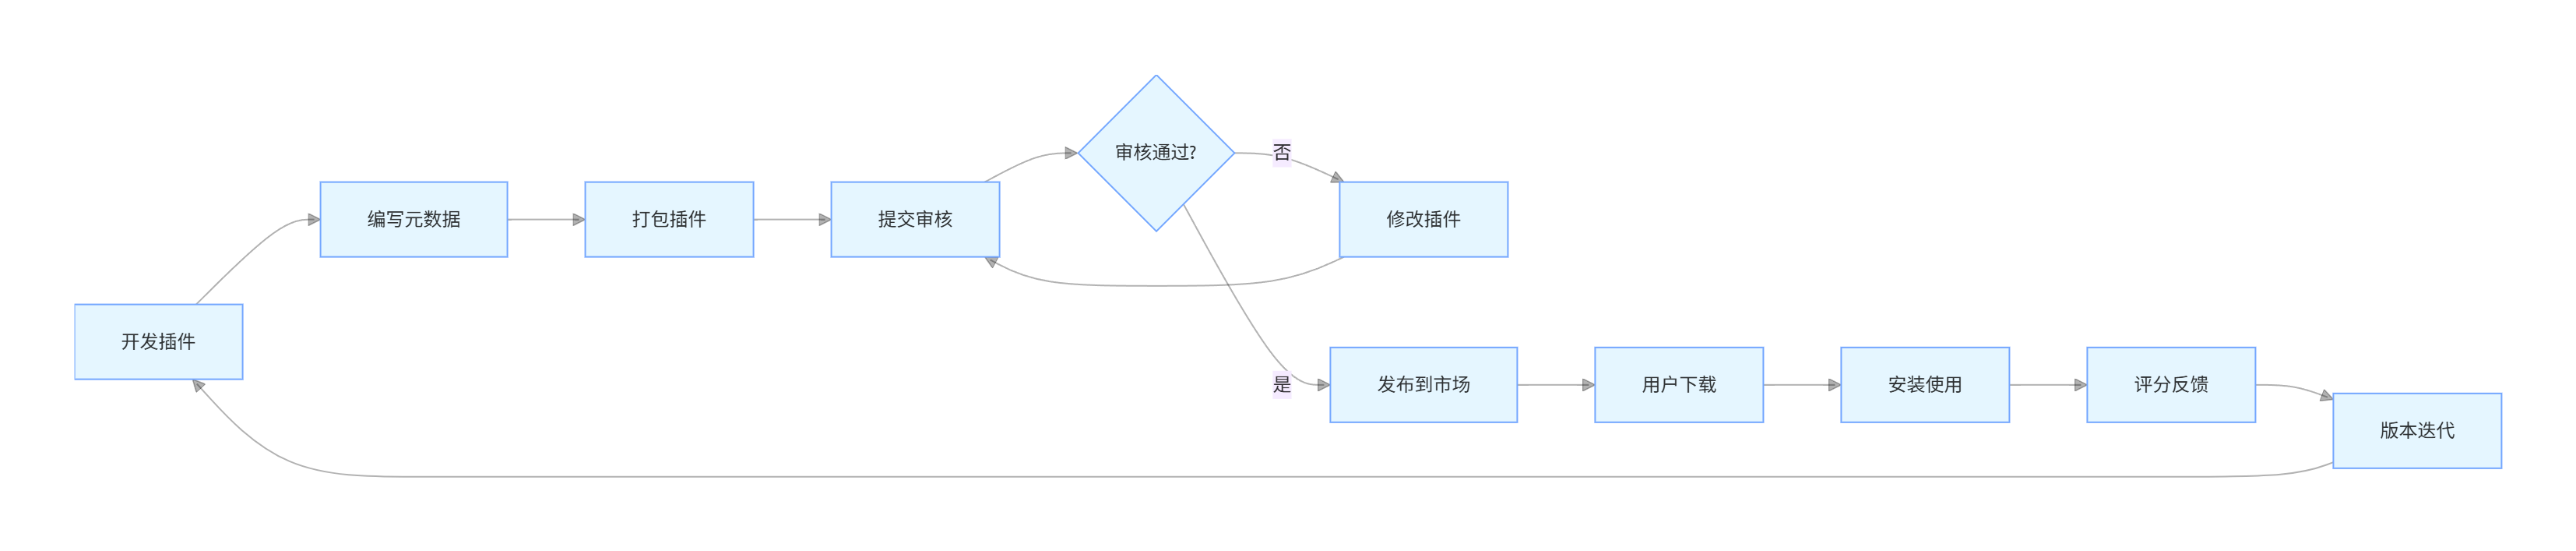
4.3.2 插件发布流程
flowchart LR
    A[开发插件] --> B[编写元数据]
    B --> C[打包插件]
    C --> D[提交审核]
    D --> E{审核通过?}
    E -->|否| F[修改插件]
    E -->|是| G[发布到市场]
    F --> D
    G --> H[用户下载]
    H --> I[安装使用]
    I --> J[评分反馈]
    J --> K[版本迭代]
    K --> A
4.4 安全性设计
4.4.1 插件权限控制
python
运行
class PluginPermission:
    """插件权限类"""
    def __init__(self):
        self.permissions = {
            "network": False,
            "file_system": False,
            "system_info": False,
            "user_data": False
        }

    def grant(self, permission: str):
        """授予权限"""
        if permission in self.permissions:
            self.permissions[permission] = True

    def revoke(self, permission: str):
        """撤销权限"""
        if permission in self.permissions:
            self.permissions[permission] = False

    def check(self, permission: str) -> bool:
        """检查权限"""
        return self.permissions.get(permission, False)

# 在插件基类中集成权限控制
class SecureBasePlugin(BasePlugin):
    def __init__(self):
        super().__init__()
        self.permissions = PluginPermission()

    def execute(self, command: str, params: Dict[str, Any] = None) -> Any:
        """安全的执行方法"""
        # 权限检查示例
        if command == "network_request" and not self.permissions.check("network"):
            raise PermissionError("插件没有网络访问权限")

        return self._execute(command, params)

    @abstractmethod
    def _execute(self, command: str, params: Dict[str, Any] = None) -> Any:
        """实际执行逻辑"""
        pass
五、系统部署与运维
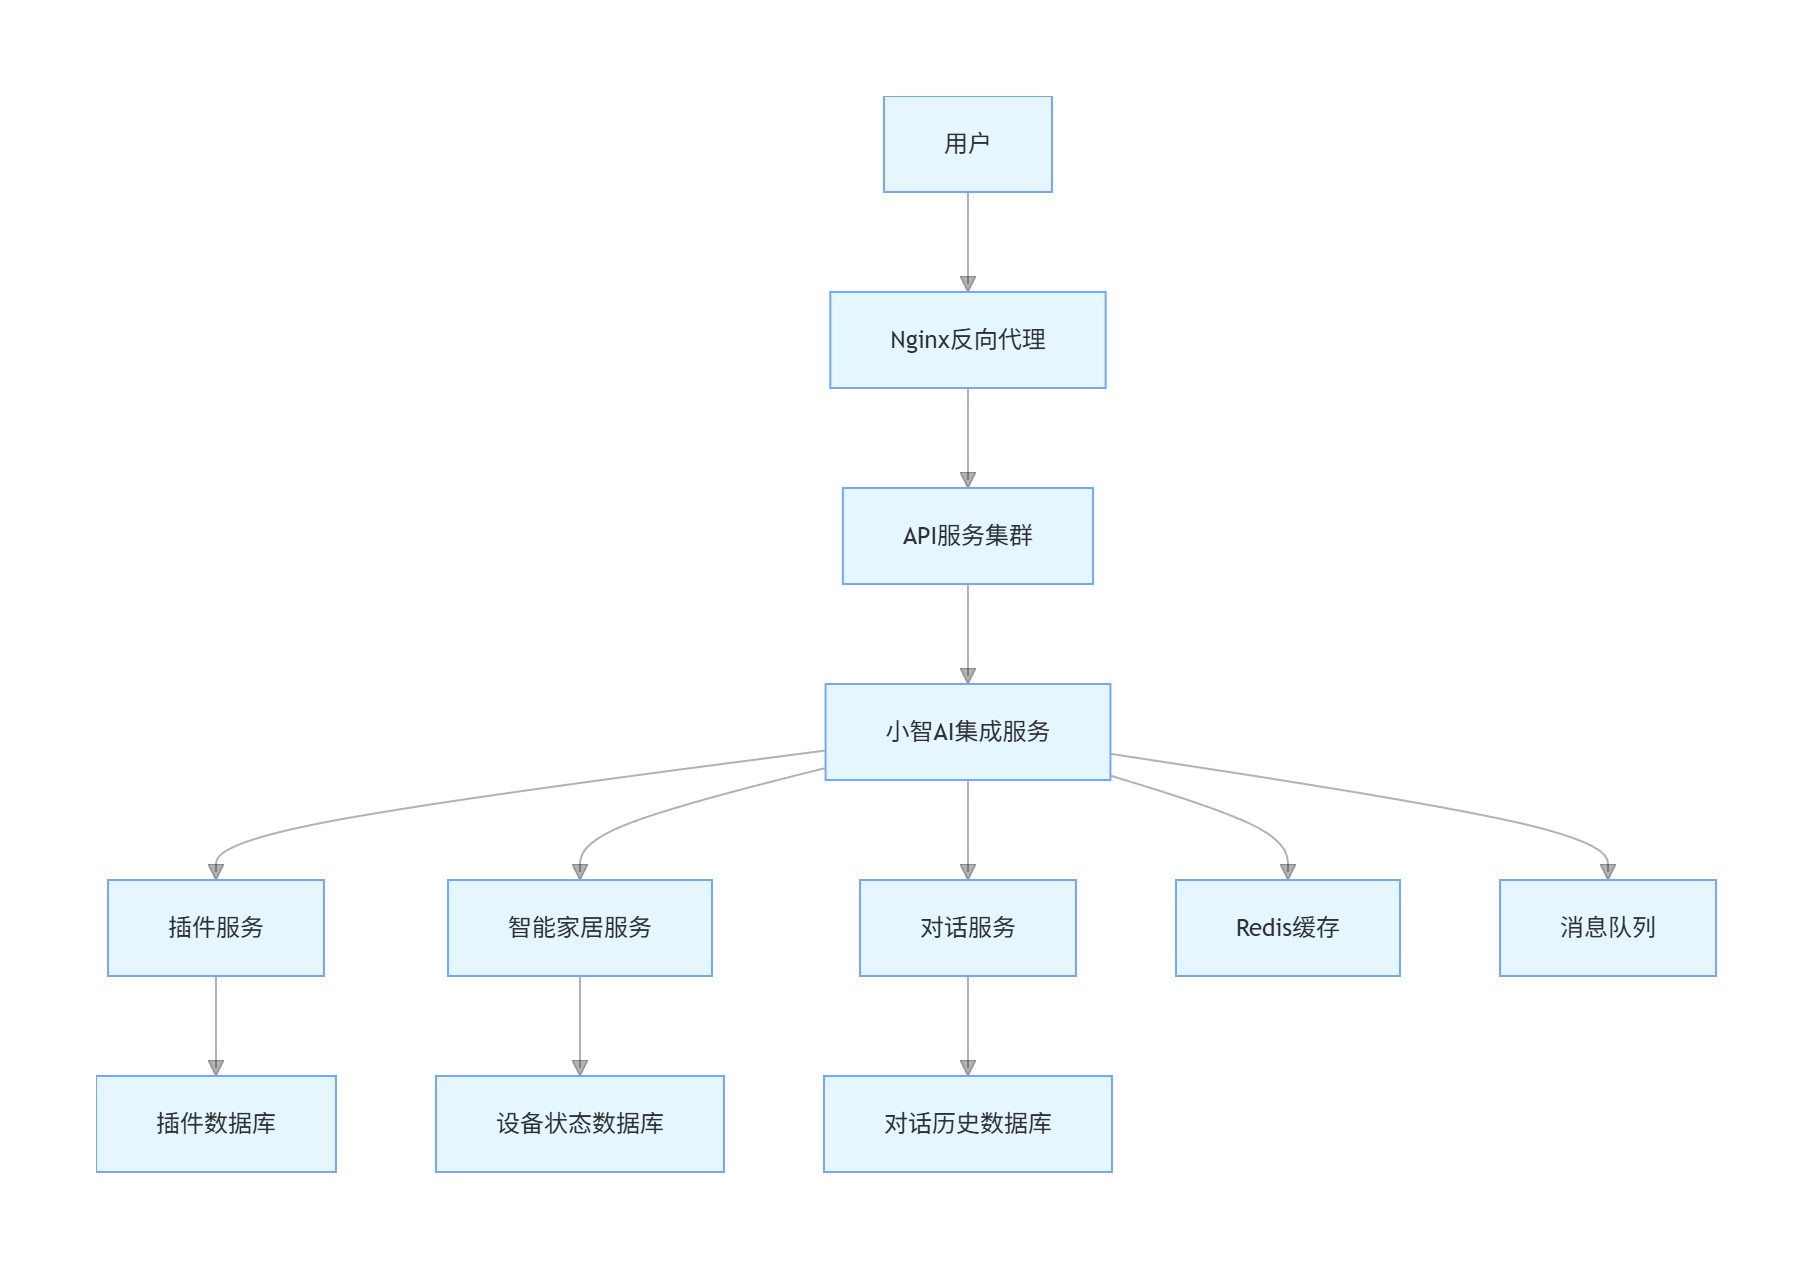
5.1 部署架构
graph TD
    A[用户] --> B[Nginx反向代理]
    B --> C[API服务集群]
    C --> D[小智AI集成服务]
    D --> E[插件服务]
    D --> F[智能家居服务]
    D --> G[对话服务]

    E --> H[插件数据库]
    F --> I[设备状态数据库]
    G --> J[对话历史数据库]

    D --> K[Redis缓存]
    D --> L[消息队列]
5.2 Docker 部署配置
dockerfile
# Dockerfile
FROM python:3.9-slim

WORKDIR /app

COPY requirements.txt .
RUN pip install --no-cache-dir -r requirements.txt

COPY . .

ENV PYTHONUNBUFFERED=1
ENV API_KEY=your_api_key_here

EXPOSE 8000

CMD ["uvicorn", "main:app", "--host", "0.0.0.0", "--port", "8000"]
yaml
# docker-compose.yml
version: '3'

services:
  app:
    build: .
    ports:
      - "8000:8000"
    depends_on:
      - redis
      - mqtt
    environment:
      - REDIS_HOST=redis
      - MQTT_BROKER=mqtt

  redis:
    image: redis:alpine
    ports:
      - "6379:6379"

  mqtt:
    image: eclipse-mosquitto
    ports:
      - "1883:1883"
    volumes:
      - ./mosquitto/config:/mosquitto/config
5.3 监控与日志
python
运行
import logging
from logging.handlers import RotatingFileHandler
import time
from dataclasses import dataclass

@dataclass
class PerformanceMetrics:
    """性能指标"""
    request_id: str
    start_time: float
    end_time: float = None
    latency: float = None
    success: bool = True
    error: str = None

class MonitoringSystem:
    def __init__(self, log_file="app.log"):
        # 配置日志
        self.logger = logging.getLogger("xiaozhi_app")
        self.logger.setLevel(logging.INFO)

        # 文件处理器
        file_handler = RotatingFileHandler(log_file, maxBytes=10*1024*1024, backupCount=5)
        formatter = logging.Formatter('%(asctime)s - %(name)s - %(levelname)s - %(message)s')
        file_handler.setFormatter(formatter)

        # 控制台处理器
        console_handler = logging.StreamHandler()
        console_handler.setFormatter(formatter)

        self.logger.addHandler(file_handler)
        self.logger.addHandler(console_handler)

        # 性能指标存储
        self.performance_metrics = []

    def track_performance(self, request_id: str) -> PerformanceMetrics:
        """开始跟踪性能"""
        metrics = PerformanceMetrics(request_id=request_id, start_time=time.time())
        self.performance_metrics.append(metrics)
        return metrics

    def finish_tracking(self, metrics: PerformanceMetrics, success: bool = True, error: str = None):
        """完成性能跟踪"""
        metrics.end_time = time.time()
        metrics.latency = metrics.end_time - metrics.start_time
        metrics.success = success
        metrics.error = error

        self.logger.info(f"请求 {metrics.request_id} 完成,耗时: {metrics.latency:.3f}s,成功: {success}")

    def log_error(self, message: str, exc_info=None):
        """记录错误"""
        self.logger.error(message, exc_info=exc_info)

    def log_info(self, message: str):
        """记录信息"""
        self.logger.info(message)

    def get_performance_stats(self) -> dict:
        """获取性能统计"""
        if not self.performance_metrics:
            return {"total_requests": 0}

        total = len(self.performance_metrics)
        success = len([m for m in self.performance_metrics if m.success])
        avg_latency = sum(m.latency for m in self.performance_metrics if m.latency) / total

        return {
            "total_requests": total,
            "success_rate": success / total,
            "average_latency": avg_latency,
            "errors": len([m for m in self.performance_metrics if not m.success])
        }
六、总结与展望
通过以上三个实战项目,我们展示了如何将小智 AI 打造为强大的 "第二大脑" 系统:
- 智能家居控制:实现了语音控制、设备状态管理、自动化场景等功能
- AI 对话系统:构建了上下文感知、意图识别、知识增强的智能对话能力
- 功能扩展系统:设计了插件化架构,支持无限扩展功能模块
未来发展方向
- 多模态交互:集成语音、图像、视频等多种交互方式
- 强化学习优化:通过用户反馈持续优化 AI 响应质量
- 边缘计算部署:支持本地部署,提高响应速度和隐私保护
- 联邦学习:在保护隐私的前提下进行模型优化
- 跨平台集成:与更多第三方服务和设备生态系统对接
开发建议
- 模块化设计:保持代码的模块化和可扩展性
- API 版本控制:确保 API 的向后兼容性
- 安全性优先:重视数据安全和隐私保护
- 用户体验:持续优化用户交互体验
- 文档完善:提供详细的开发文档和 API 说明
通过持续迭代和优化,基于小智 AI 的 "第二大脑" 系统将成为个人和企业的智能中枢,赋能各种应用场景。

作为“人工智能6S店”的官方数字引擎,为AI开发者与企业提供一个覆盖软硬件全栈、一站式门户。
更多推荐


 55
55 0
0- 0


 已为社区贡献5条内容

所有评论(0)