
开源鸿蒙跨平台开发学习笔记 】DAY06:Flutter组件详解
虽然本小鱼开始对 Flutter 一点点也了解,但是这几天看了很多博客/文档,小鱼对Flutter的总结是:1个widget类、 2种状态类型,4棵渲染树。Widget不仅是按钮、文本等UI“控件”,也包括布局、手势检测、主题等功能性组件,整个App的界面和功能都通过 Widget 嵌套 Widget 的方式组合而成。Flutter中“万物皆为Widget” widget 的功能是“描述一个UI元
虽然本小鱼开始对 Flutter 一点点也了解,但是这几天看了很多博客/文档,小鱼对Flutter的总结是:1个widget类、 2种状态类型,4棵渲染树。
一、Widget类
Widget不仅是按钮、文本等UI“控件”,也包括布局、手势检测、主题等功能性组件,整个App的界面和功能都通过 Widget 嵌套 Widget 的方式组合而成。
Flutter中“万物皆为Widget”
widget 的功能是“描述一个UI元素的配置信息”,Widget 其实并不是表示最终绘制在设备屏幕上的显示元素,配置信息就是Widget 接收的参数。对于 Text 来讲,文本的内容、对齐方式、文本样式都是它的配置信息。
Widget是一个抽象类,最核心的就是定义了createElement()接口。
@immutable
abstract class Widget extends DiagnosticableTree {
  /// Initializes [key] for subclasses.
  const Widget({this.key});

  final Key? key;

  @protected
  @factory
  Element createElement();

  /// A short, textual description of this widget.
  @override
  String toStringShort() {
    final String type = objectRuntimeType(this, 'Widget');
    return key == null ? type : '$type-$key';
  }

  @override
  void debugFillProperties(DiagnosticPropertiesBuilder properties) {
    super.debugFillProperties(properties);
    properties.defaultDiagnosticsTreeStyle = DiagnosticsTreeStyle.dense;
  }

  @override
  @nonVirtual
  bool operator ==(Object other) => super == other;

  @override
  @nonVirtual
  int get hashCode => super.hashCode;

  static bool canUpdate(Widget oldWidget, Widget newWidget) {
    return oldWidget.runtimeType == newWidget.runtimeType && oldWidget.key == newWidget.key;
  }


  static int _debugConcreteSubtype(Widget widget) {
    return widget is StatefulWidget
        ? 1
        : widget is StatelessWidget
        ? 2
        : 0;
  }
}
@immutable:代表 Widget 是不可变的,因为 Flutter 中如果属性发生变化则会重新构建Widget树,即重新创建新的 Widget 实例来替换旧的 Widget 实例,一旦 Widget 自己的属性变了自己就会被替换,允许 Widget 的属性变化是没有意义的。
widget类继承自DiagnosticableTree,DiagnosticableTree即“诊断树”,主要作用是提供调试信息。
Key: 这个key属性类似于 React/Vue 中的key,主要的作用是决定是否在下一次build时复用旧的 widget ,决定的条件在canUpdate()方法中
createElement():Flutter 框架在构建UI树时,会先调用此方法生成对应节点的Element对象。此方法是 Flutter 框架隐式调用的,在我们开发过程中基本不会调用到。
debugFillProperties(...) 复写父类的方法,主要是设置诊断树的一些特性。
canUpdate(...)是一个静态方法,它主要用于在 widget 树重新build时复用旧的 widget ,只要newWidget与oldWidget的runtimeType和key同时相等时就会用new widget去更新Element对象的配置,否则就会创建新的Element。
在 Flutter 开发中,一般情况下不用直接继承Widget类来实现一个新组件,通常是通过继承StatelessWidget或StatefulWidget来间接继承widget类来实现
接下来就是2种状态类型。
二、两种状态类型:
1、StatelessWidget
无状态组件(StatelessWidget):状态不可变,UI 仅由外部传入的参数决定。适用场景:静态展示类元素,如标题文本、固定图标、静态按钮(点击无状态变化)。特点:创建后不会主动更新,性能开销小。
StatelessWidget相对比较简单,它继承自widget类,重写了createElement()方法:
abstract class StatelessWidget extends Widget {
  /// Initializes [key] for subclasses.
  const StatelessWidget({super.key});
  @override
  StatelessElement createElement() => StatelessElement(this);

  @protected
  Widget build(BuildContext context);
}

class StatelessElement extends ComponentElement {
  /// Creates an element that uses the given widget as its configuration.
  StatelessElement(StatelessWidget super.widget);

  @override
  Widget build() => (widget as StatelessWidget).build(this);

  @override
  void update(StatelessWidget newWidget) {
    super.update(newWidget);
    assert(widget == newWidget);
    rebuild(force: true);
  }
}
StatelessElement 间接继承自Element类,与StatelessWidget相对应(作为其配置数据)。
StatelessWidget用于不需要维护状态的场景,它通常在build方法中通过嵌套其他 widget 来构建UI,在构建过程中会递归的构建其嵌套的 widget 。
示例:
class StatelessTestPage extends StatelessWidget {
  final String text;
  final Color backgroundColor;

  const StatelessTestPage({
    super.key,
    required this.text,
    required this.backgroundColor,
  });


  @override
  Widget build(BuildContext context) {
    return Center(
      child: Container(
        color: backgroundColor,
        child: Text(text, style: TextStyle(
            fontSize: 16, color: Colors.green, fontWeight: FontWeight.bold)),
      ),
    );
  }
}
2、Context
build方法有一个context参数,它是BuildContext类的一个实例,表示当前 widget 在 widget 树中的上下文,每一个 widget 都会对应一个 context 对象(因为每一个 widget 都是 widget 树上的一个节点)。实际上,context是当前 widget 在 widget 树中位置中执行”相关操作“的一个句柄(handle),比如它提供了从当前 widget 开始向上遍历 widget 树以及按照 widget 类型查找父级 widget 的方法。下面是在子树中获取父级 widget 的一个示例:
 @override
  Widget build(BuildContext context) {
    return Scaffold(
      appBar: AppBar(
        title: Text("context使用"),
      ),
      body: Builder(builder: (context) {
        // 在 widget 树中向上查找最近的父级 `Scaffold`  widget
        Scaffold? scaffold = context.findAncestorWidgetOfExactType<Scaffold>();
        // 直接返回 AppBar的title, 此处实际上是Text("context使用")
        final title = (scaffold?.appBar as AppBar?)?.title;
        return title ?? Text("默认标题"); // 如果title为null,显示默认文本
      }),
    );
  }
3、StatefulWidget
有状态组件(StatefulWidget):包含可变状态(State),状态变化时会触发 UI 重新构建。适用场景:动态交互类元素,如计数器、输入框、下拉列表(选择后需更新显示)。特点:需管理状态生命周期,通过 setState(() {}) 触发 UI 刷新。
abstract class StatefulWidget extends Widget {
  /// Initializes [key] for subclasses.
  const StatefulWidget({super.key});

  /// It is uncommon for subclasses to override this method.
  @override
  StatefulElement createElement() => StatefulElement(this);

  @protected
  @factory
  State createState();
}
StatefulWidget也是继承自widget类,并重写了createElement()方法,不同的是返回的Element 对象并不相同是StatefulElement;此外 StatefulWidget 新增一个接口createState()。
StatefulElement 间接继承自Element类,与StatefulWidget相对应(作为其配置数据)。StatefulElement中可能会多次调用createState()来创建状态(State)对象。
createState() 用于创建和 StatefulWidget 相关的状态,它在StatefulWidget 的生命周期中可能会被多次调用。例如,当一个 StatefulWidget 同时插入到 widget 树的多个位置时,Flutter 框架就会调用该方法为每一个位置生成一个独立的State实例,其实,本质上就是一个StatefulElement对应一个State实例。
State 对象和 StatefulElement 具有一一对应的关系。
4、State
State 中存储了与其对应的 StatefulWidget 状态,可以:
- 在 widget 构建时可以被同步读取。
- 在 widget 生命周期中可以被改变,当State被改变时,可以手动调用其setState()方法通知Flutter 框架状态发生改变,Flutter 框架在收到消息后,会重新调用其build方法重新构建 widget 树,从而达到更新UI的目的。
State 中有两个常用属性:
- widget:与该 State 实例关联的 widget 实例
- context:作用同StatelessWidget 的BuildContext
生命周期:
import 'package:flutter/material.dart';
class CounterWidget extends StatefulWidget {
final int initValue;
const CounterWidget({super.key, required this.initValue});
@override
State<StatefulWidget> createState() {
return CounterWidgetState();
}
}
class CounterWidgetState extends State<CounterWidget> {
int counter = 0;
@override
void initState() {
super.initState();
counter = widget.initValue;
print("CounterWidget initState");
}
@override
Widget build(BuildContext context) {
print("CounterWidget build");
return Scaffold(
body: Center(
child: TextButton(
onPressed: () => setState(() => ++counter),
child: Text('$counter'),
),
),
);
}
@override
void didUpdateWidget(covariant CounterWidget oldWidget) {
super.didUpdateWidget(oldWidget);
print("CounterWidget didUpdateWidget");
}
@override
void deactivate() {
super.deactivate();
print("CounterWidget deactivate");
}
@override
void dispose() {
super.dispose();
print("CounterWidget dispose");
}
@override
void reassemble() {
super.reassemble();
print("CounterWidget reassemble");
}
@override
void didChangeDependencies() {
super.didChangeDependencies();
print("CounterWidget didChangeDependencies");
}
}
class StateLifecycleTest extends StatelessWidget{
const StateLifecycleTest({Key? key}) : super(key: key);
@override
Widget build(BuildContext context) {
return CounterWidget(initValue: 0,);
}
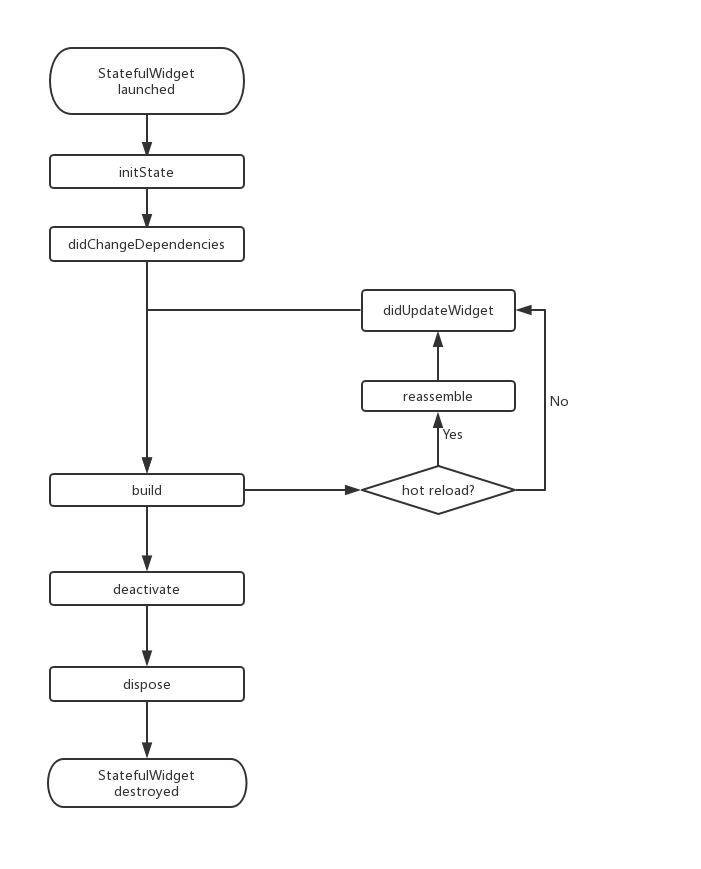
}打开包含此组件的页面,可以看到,在StatefulWidget插入到 widget 树时首先initState方法会被调用。
I  CounterWidget initState
I  CounterWidget didChangeDependencies
I  CounterWidget build
接下来,我们在 widget 树中移除CounterWidget,将 StateLifecycleTest 的 build方法改为:
class StateLifecycleTest extends StatelessWidget{
  const StateLifecycleTest({Key? key}) : super(key: key);

  @override
  Widget build(BuildContext context) {
    // return CounterWidget(initValue: 0,);
    return Text("xxx");
  }
}
热重载,日志如下:
I  CounterWidget reassemble
I  CounterWidget deactivate
I CounterWidget disposeinitState:当 widget 第一次插入到 widget 树时会被调用,对于每一个State对象,Flutter 框架只会调用一次该回调
didChangeDependencies():当State对象的依赖发生变化时会被调用
build():此回调读者现在应该已经相当熟悉了,它主要是用于构建 widget 子树的,会在如下场景被调用:
- 在调用
initState()之后。 - 在调用
didUpdateWidget()之后。 - 在调用
setState()之后。 - 在调用
didChangeDependencies()之后。 - 在State对象从树中一个位置移除后(会调用deactivate)又重新插入到树的其他位置之后。
reassemble():此回调是专门为了开发调试而提供的,在热重载(hot reload)时会被调用,此回调在Release模式下永远不会被调用。
deactivate():当 State 对象从树中被移除时,会调用此回调。
dispose():当 State 对象从树中被永久移除时调用;通常在此回调中释放资源。
StatefulWidget 生命周期:
三、四棵渲染树
Widget 只是描述一个UI元素的配置信息,真正的布局、绘制 Flutter 框架的处理流程如下:
- 根据 Widget 树生成一个 Element 树,Element 树中的节点都继承自
Element类。 - 根据 Element 树生成 Render 树(渲染树),渲染树中的节点都继承自
RenderObject类。 - 根据渲染树生成 Layer 树,然后上屏显示,Layer 树中的节点都继承自
Layer类。
Center(
      child: Container(
        color: backgroundColor,
        child: Text(text, style: TextStyle(
            fontSize: 16, color: Colors.green, fontWeight: FontWeight.bold)),
      ),
    );
Container 设置了背景色,Container 内部会创建一个新的 ColoredBox 来填充背景
Image 内部会通过 RawImage 来渲染图片、Text 内部会通过 RichText 来渲染文本,所以最终的 Widget树、Element 树、渲染树结构如图:
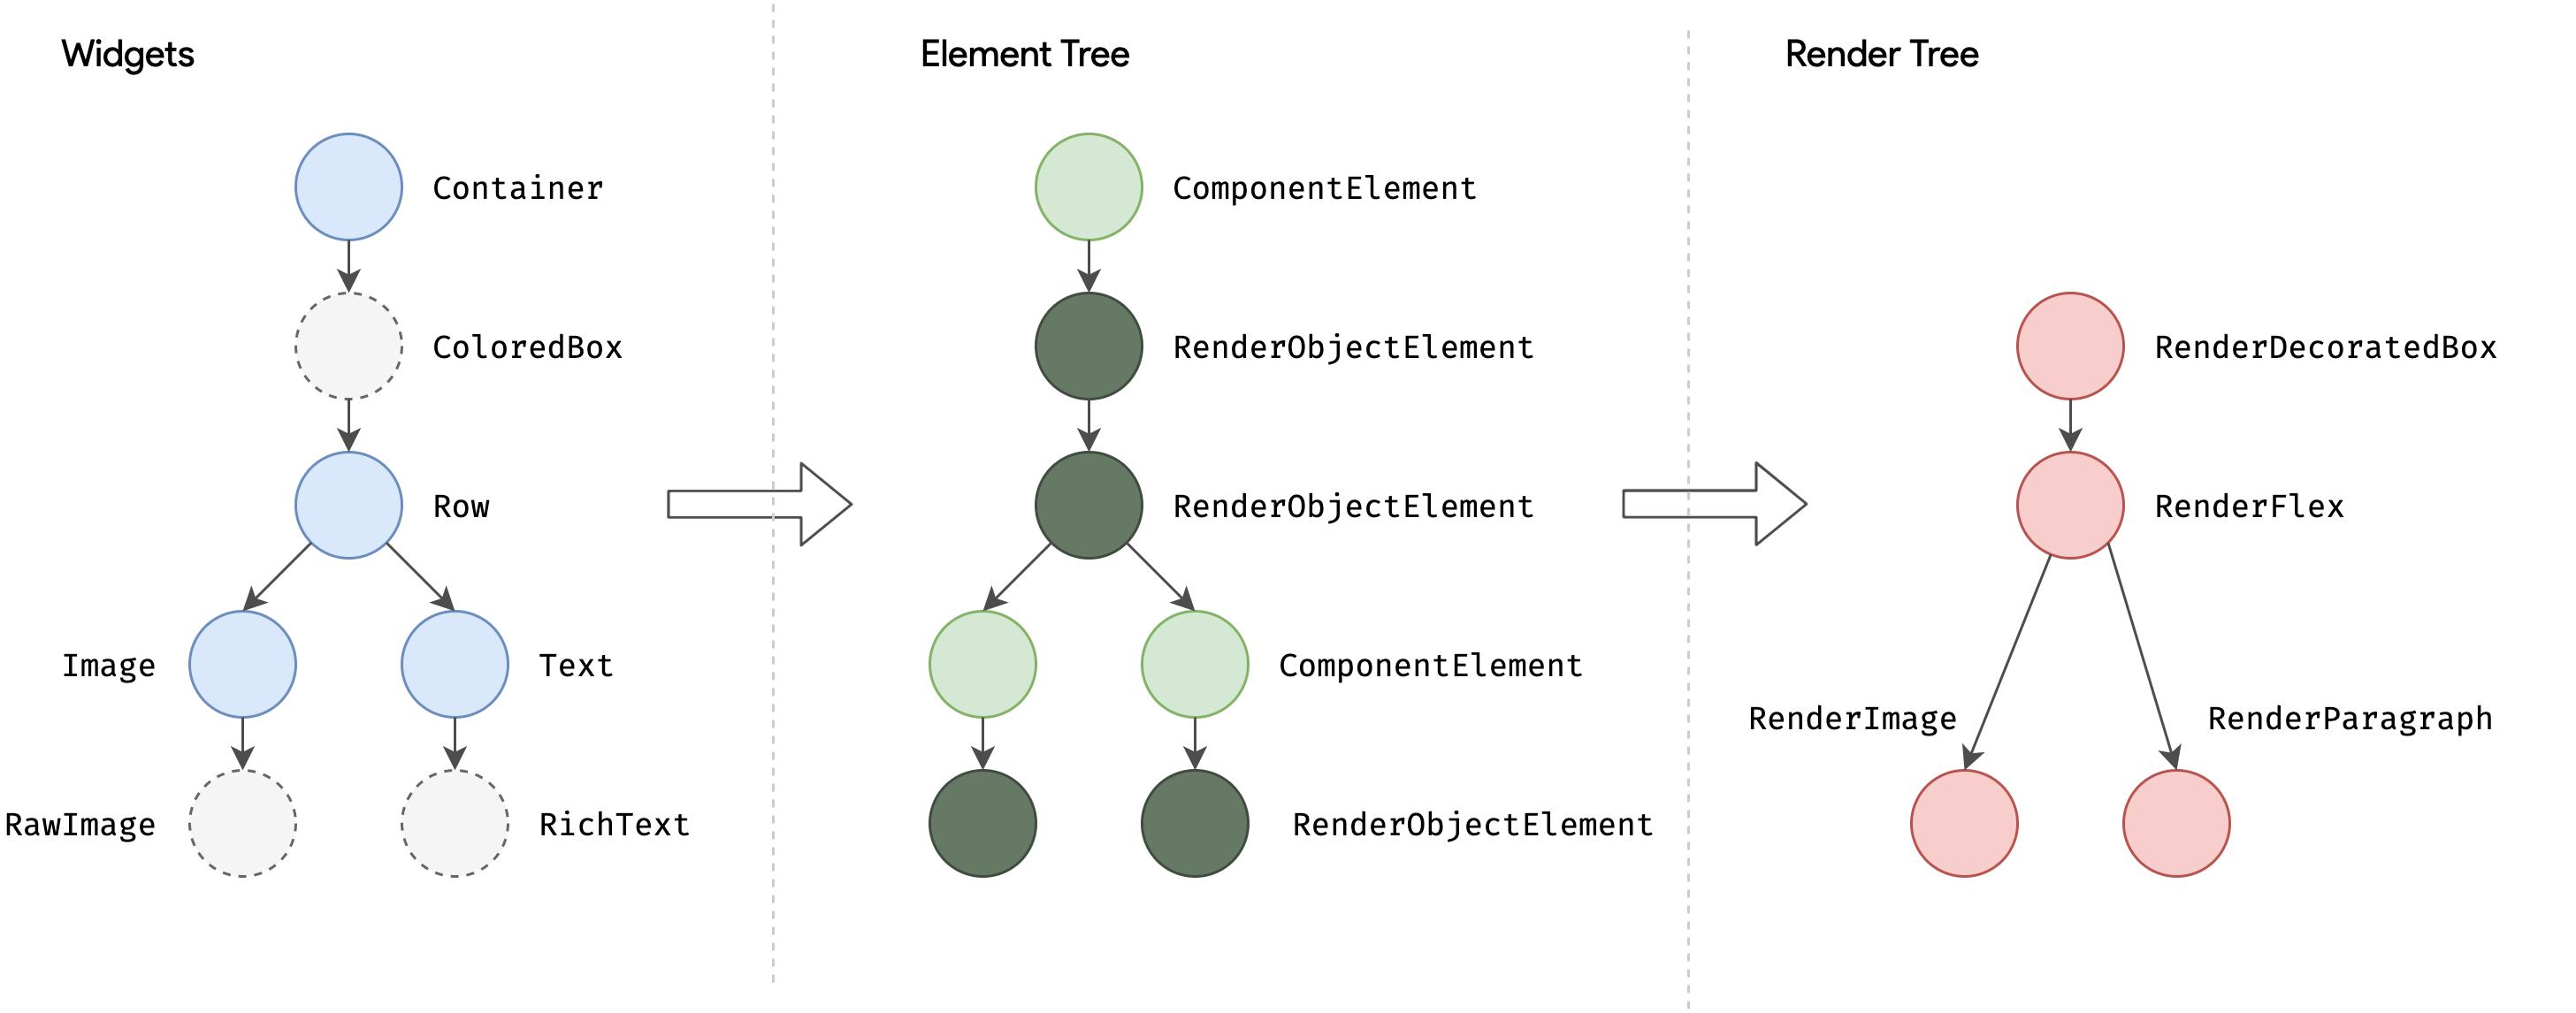
Widget树 --> Element 树 --> 渲染树 --> Layer树 --> 显示到屏幕
四、遇到的问题
日志不打印
Mate40如下:

Mate 60如下:

DeepSeek问了,浏览器搜了,也没解决问题 ... 还好本小鱼灵机一动,Android Studio打开android项目,运行,就看到日志啦

里面的部分图片来源于博客或者文档,如有侵权请联系删除~

作为“人工智能6S店”的官方数字引擎,为AI开发者与企业提供一个覆盖软硬件全栈、一站式门户。
更多推荐

 15
15 0
0- 0


 已为社区贡献4条内容

所有评论(0)