
鸿蒙PC 使用 Electron 实现截图功能详解
本文详细介绍了如何在 Electron 应用中实现截图功能,包括窗口截图和屏幕截图两种模式。实现方案使用 Electron 原生 API,无需额外依赖,具有良好的跨平台兼容性。
鸿蒙PC 使用 Electron 实现截图功能详解
问题背景
在桌面应用开发中,截图功能是一个常见且重要的需求。无论是用于用户反馈、错误报告、内容分享,还是系统监控和演示,截图功能都能大大提升应用的实用性和用户体验。
为什么需要截图功能?
-
用户反馈和错误报告:用户可以通过截图快速记录问题,帮助开发者快速定位和解决问题
-
内容分享:用户可以快速捕获应用界面或屏幕内容,方便分享给他人
-
文档制作:在制作教程、文档时,截图是必不可少的工具
-
系统监控:对于系统监控类应用,截图功能可以记录系统状态
-
演示和展示:在演示应用功能时,截图可以快速保存关键界面
需求分析
-
窗口截图:捕获当前应用窗口的完整内容
-
屏幕截图:捕获整个屏幕或指定屏幕的内容
-
实时预览:捕获后立即显示截图预览
-
保存功能:将截图保存为图片文件(PNG格式)
-
跨平台兼容:在 Windows、macOS、Linux 以及鸿蒙PC平台上都能正常工作
-
高质量输出:确保截图清晰,支持高分辨率显示
技术挑战
-
平台差异:不同操作系统的屏幕捕获机制不同
-
权限问题:某些平台需要用户授权才能进行屏幕捕获
-
性能优化:大分辨率截图可能占用大量内存,需要优化处理
-
多屏幕支持:需要支持多显示器环境
-
鸿蒙平台适配:需要确保在鸿蒙PC平台上也能正常工作
实现方案
方案对比
| 方案 | 优点 | 缺点 | 适用场景 |
|---|---|---|---|
| webContents.capturePage() | 简单可靠,无需权限,捕获窗口内容 | 只能捕获当前窗口 | 窗口截图,推荐使用 |
| desktopCapturer API | 可捕获屏幕和窗口,功能强大 | 需要用户授权(某些平台) | 屏幕截图,推荐使用 |
| 系统命令(screencapture/scrot) | 可获取系统级截图 | 需要解析输出,平台差异大 | 特殊需求 |
| 第三方截图库 | 功能完整 | 增加依赖,可能过度设计 | 复杂场景 |
最终方案
采用Electron原生API组合方案:
-
窗口截图:使用
webContents.capturePage()API-
无需用户授权
-
捕获当前窗口的完整内容
-
支持高分辨率输出
-
-
屏幕截图:使用
desktopCapturerAPI-
可捕获整个屏幕
-
支持多显示器
-
需要用户授权(某些平台)
-
-
数据格式:使用 PNG 格式
-
无损压缩
-
支持透明背景
-
跨平台兼容
-
-
数据传输:使用 base64 编码
-
便于在进程间传输
-
可直接用于
<img>标签显示 -
易于保存为文件
-
方案优势
-
✅ 跨平台兼容:使用 Electron 原生 API,支持 Windows、macOS、Linux 和鸿蒙PC平台
-
✅ 无需额外依赖:使用 Electron 内置 API,轻量级
-
✅ 高质量输出:支持高分辨率截图,清晰度好
-
✅ 用户体验好:实时预览,一键保存
-
✅ 功能完整:支持窗口截图和屏幕截图两种模式
代码实现
1. 主进程实现(main.js)
在主进程中实现截图功能的核心逻辑:
const { app, BrowserWindow, ipcMain, powerMonitor, Notification, dialog, desktopCapturer } = require('electron');
const path = require('path');
const fs = require('fs');
const os = require('os');
const { exec } = require('child_process');
const { promisify } = require('util');
const execAsync = promisify(exec);
// 全局变量:主窗口
let mainWindow = null;
// 捕获当前窗口截图
ipcMain.handle('capture-window', async (event) => {
console.log('收到捕获窗口截图请求');
try {
if (!mainWindow || mainWindow.isDestroyed()) {
return { success: false, error: '主窗口不可用' };
}
// 使用webContents.capturePage()捕获当前窗口
const image = await mainWindow.webContents.capturePage();
// 转换为PNG格式的Buffer
const buffer = image.toPNG();
// 转换为base64
const base64 = buffer.toString('base64');
const dataUrl = `data:image/png;base64,${base64}`;
console.log('窗口截图已捕获,尺寸:', image.getSize());
return {
success: true,
dataUrl: dataUrl,
width: image.getSize().width,
height: image.getSize().height
};
} catch (error) {
console.error('捕获窗口截图失败:', error);
return { success: false, error: error.message };
}
});
// 获取可用的屏幕源(用于全屏截图)
ipcMain.handle('get-screen-sources', async (event) => {
console.log('收到获取屏幕源请求');
try {
const sources = await desktopCapturer.getSources({
types: ['screen', 'window'],
thumbnailSize: { width: 0, height: 0 }
});
console.log('可用的屏幕源数量:', sources.length);
return {
success: true,
sources: sources.map(source => ({
id: source.id,
name: source.name,
thumbnail: source.thumbnail.toDataURL()
}))
};
} catch (error) {
console.error('获取屏幕源失败:', error);
return { success: false, error: error.message };
}
});
// 捕获屏幕截图
ipcMain.handle('capture-screen', async (event, sourceId) => {
console.log('收到捕获屏幕截图请求,源ID:', sourceId);
try {
// 获取屏幕源,设置较大的thumbnailSize以获取高质量截图
const sources = await desktopCapturer.getSources({
types: ['screen'],
thumbnailSize: { width: 1920, height: 1080 } // 设置较大的尺寸以获取高质量截图
});
let targetSource = null;
if (sourceId) {
targetSource = sources.find(s => s.id === sourceId);
}
// 如果没有指定源ID或找不到,使用第一个屏幕源
if (!targetSource && sources.length > 0) {
targetSource = sources[0];
}
if (!targetSource) {
return { success: false, error: '未找到可用的屏幕源' };
}
// 获取屏幕缩略图(NativeImage对象)
const thumbnail = targetSource.thumbnail;
// 转换为PNG格式的Buffer,然后转为base64
const buffer = thumbnail.toPNG();
const base64 = buffer.toString('base64');
const dataUrl = `data:image/png;base64,${base64}`;
const size = thumbnail.getSize();
console.log('屏幕截图已捕获,源:', targetSource.name, '尺寸:', size.width, 'x', size.height);
return {
success: true,
dataUrl: dataUrl,
width: size.width,
height: size.height,
sourceName: targetSource.name
};
} catch (error) {
console.error('捕获屏幕截图失败:', error);
return { success: false, error: error.message };
}
});
关键点说明:
-
窗口截图:
-
使用
webContents.capturePage()捕获当前窗口 -
返回
NativeImage对象,可转换为 PNG Buffer -
无需用户授权,简单可靠
-
-
屏幕截图:
-
使用
desktopCapturer.getSources()获取屏幕源 -
设置
thumbnailSize为较大值(1920x1080)以获取高质量截图 -
支持多显示器环境
-
-
数据格式:
-
使用 PNG 格式,无损压缩
-
转换为 base64 编码,便于传输和显示
-
2. 预加载脚本(preload.js)
在预加载脚本中暴露安全的 API 给渲染进程:
const { contextBridge, ipcRenderer } = require('electron');
contextBridge.exposeInMainWorld('electronAPI', {
// ... 其他API ...
// 捕获当前窗口截图
captureWindow: () => {
return ipcRenderer.invoke('capture-window');
},
// 获取屏幕源
getScreenSources: () => {
return ipcRenderer.invoke('get-screen-sources');
},
// 捕获屏幕截图
captureScreen: (sourceId) => {
return ipcRenderer.invoke('capture-screen', sourceId);
},
// 保存图片(从base64数据)
saveImage: (base64Data, defaultFileName) => {
return ipcRenderer.invoke('save-image', base64Data, defaultFileName);
}
});
关键点说明:
-
使用
contextBridge安全地暴露 API -
使用
ipcRenderer.invoke()进行异步通信 -
所有 API 都返回 Promise,便于使用 async/await
3. 渲染进程实现(index.html)
在渲染进程中实现用户界面和交互逻辑:
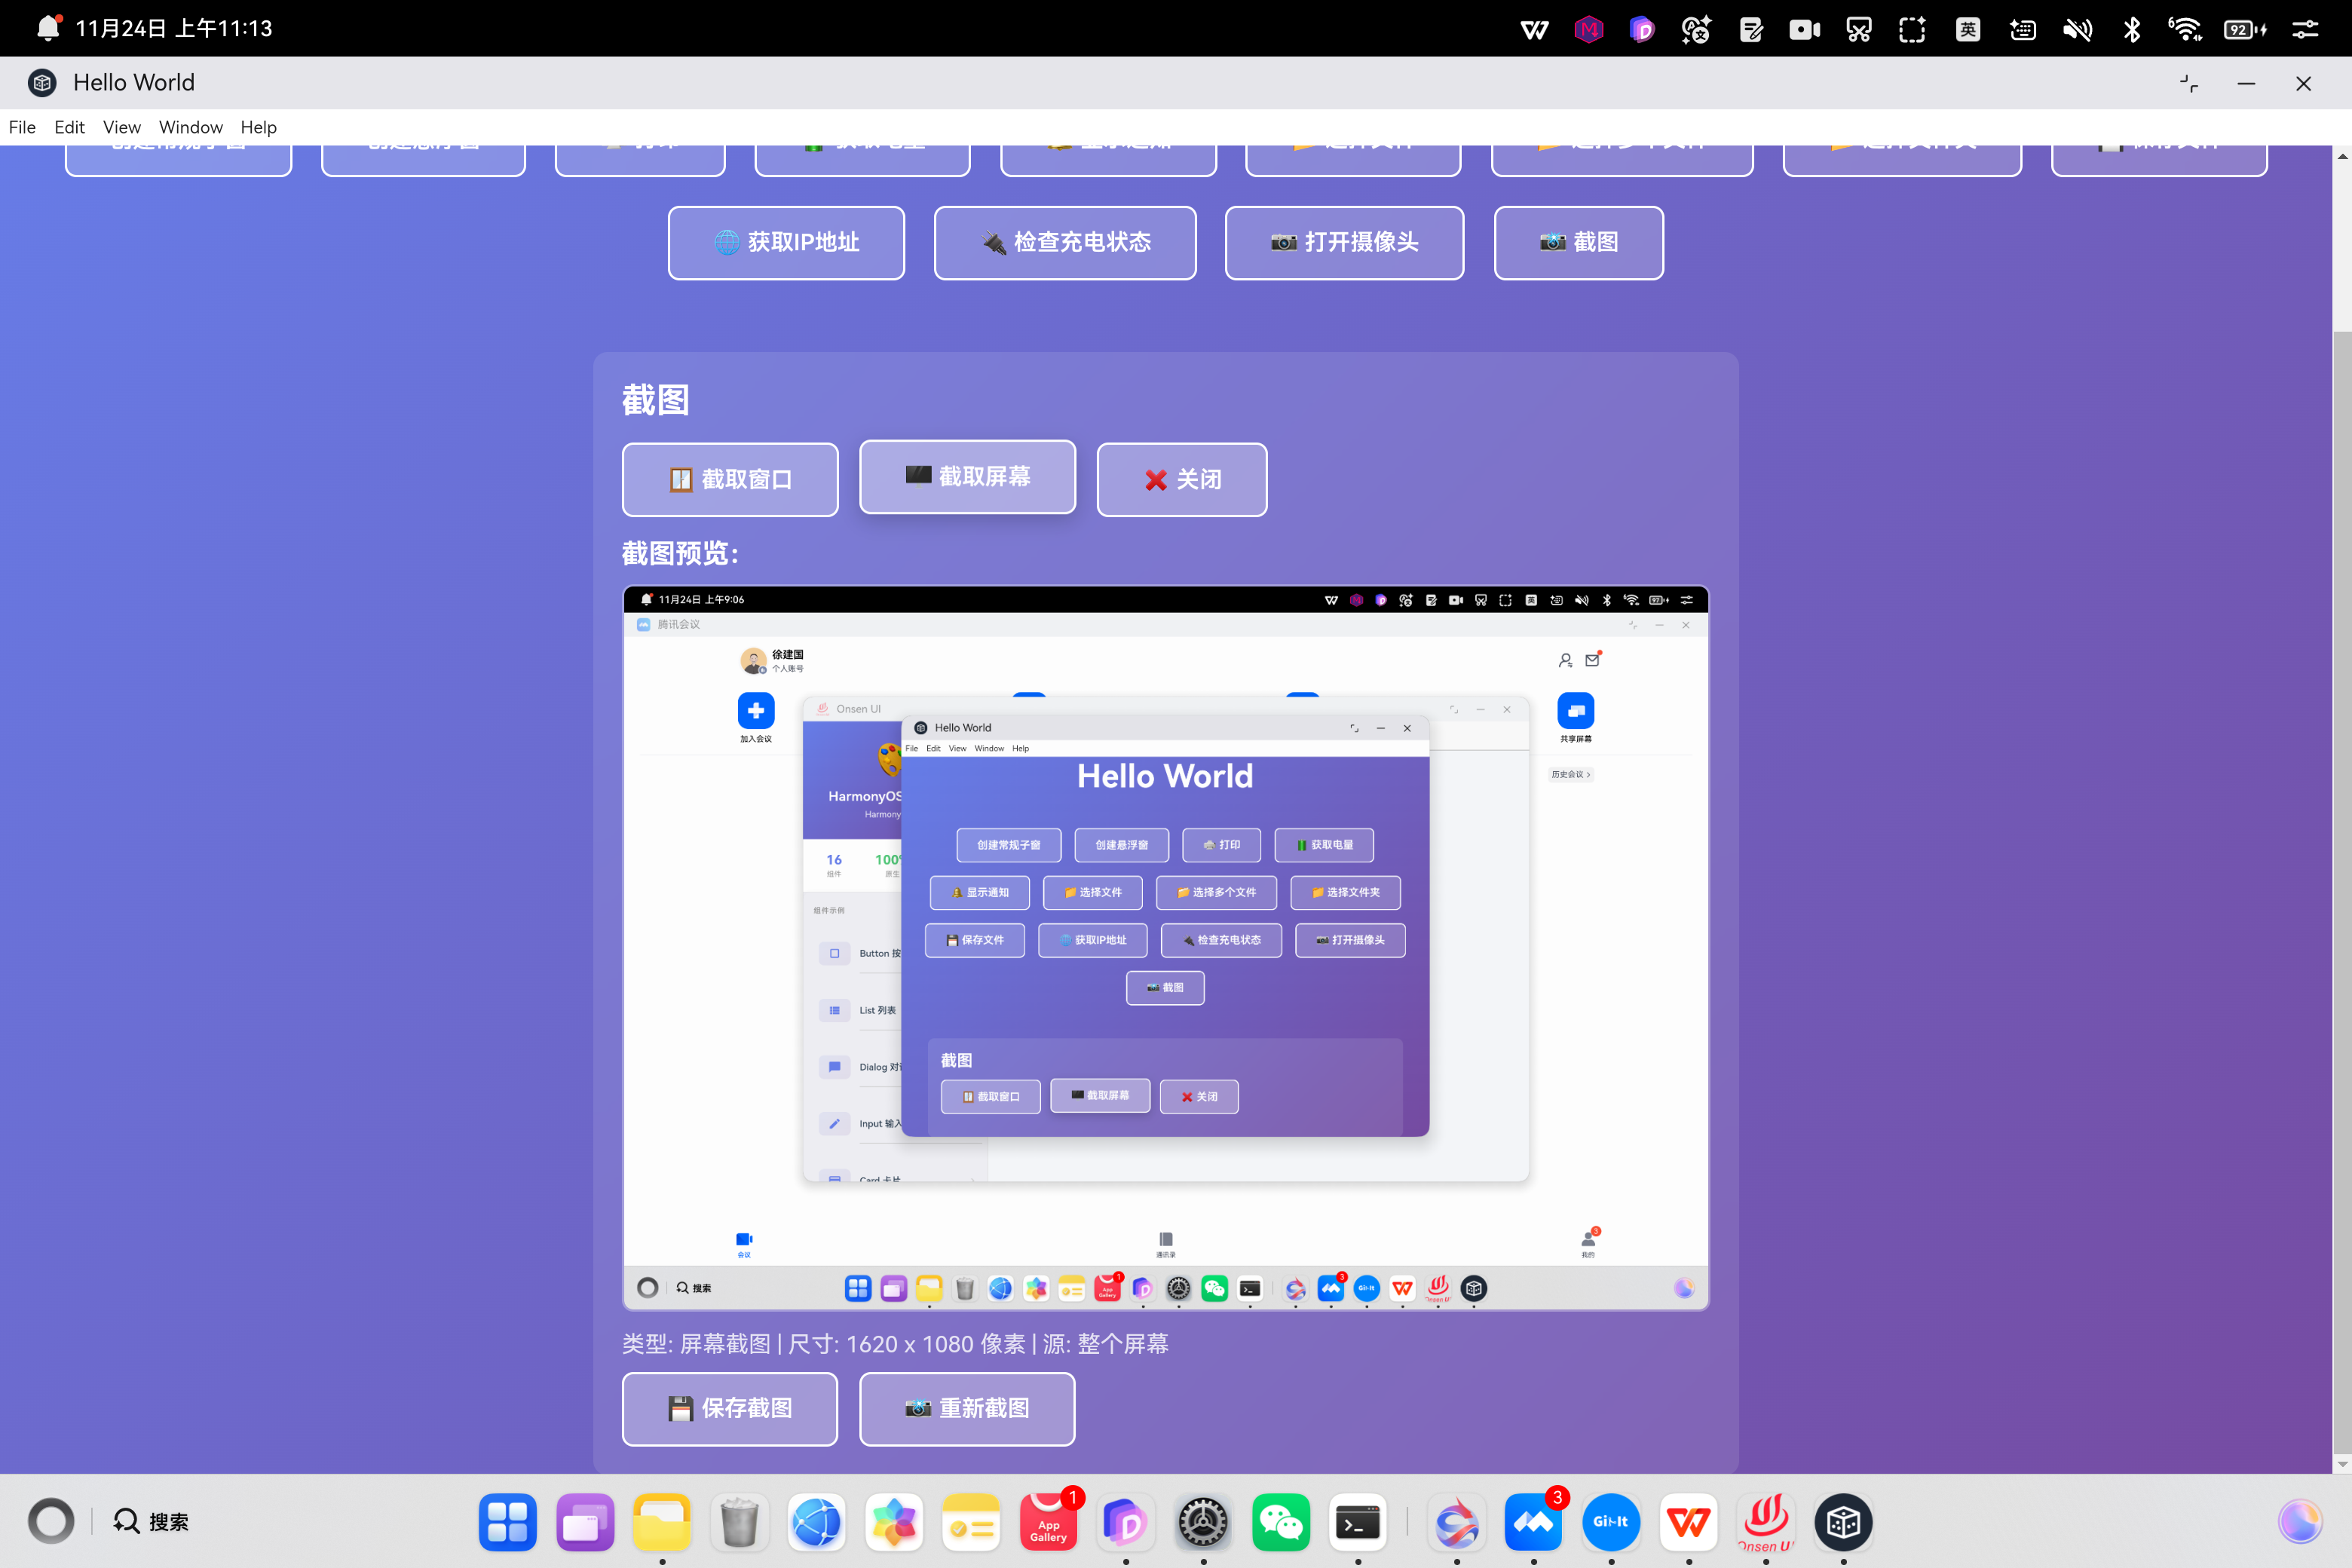
3.1 HTML 结构
<!-- 截图按钮 --> <button οnclick="captureScreenshot()">📸 截图</button> <!-- 截图容器 --> <div id="screenshot-container" style="display: none; margin-top: 20px; padding: 20px; background: rgba(255, 255, 255, 0.1); border-radius: 10px; color: white; backdrop-filter: blur(10px); max-width: 800px; width: 90%;"> <h2 style="margin-bottom: 15px;">截图</h2> <div id="screenshot-controls" style="margin-bottom: 15px;"> <button οnclick="captureWindow()" style="margin-right: 10px;">🪟 截取窗口</button> <button οnclick="captureScreen()" style="margin-right: 10px;">🖥️ 截取屏幕</button> <button οnclick="closeScreenshot()">❌ 关闭</button> </div> <div id="screenshot-preview" style="margin-top: 15px; display: none;"> <h3 style="margin-bottom: 10px;">截图预览:</h3> <img id="screenshot-image" style="max-width: 100%; border-radius: 8px; border: 2px solid rgba(255, 255, 255, 0.3);"> <div style="margin-top: 10px; color: rgba(255, 255, 255, 0.8);"> <div id="screenshot-info"></div> </div> <div style="margin-top: 10px;"> <button οnclick="saveScreenshot()" style="margin-right: 10px;">💾 保存截图</button> <button οnclick="retakeScreenshot()">📸 重新截图</button> </div> </div> <div id="screenshot-error" style="display: none; color: #ff6b6b; margin-top: 15px;"></div> </div>
3.2 JavaScript 实现
// 截图相关变量
let currentScreenshotData = null;
let currentScreenshotInfo = null;
// 打开截图功能
function captureScreenshot() {
const screenshotContainer = document.getElementById('screenshot-container');
screenshotContainer.style.display = 'block';
}
// 截取当前窗口
async function captureWindow() {
console.log('截取当前窗口');
const screenshotPreview = document.getElementById('screenshot-preview');
const screenshotImage = document.getElementById('screenshot-image');
const screenshotInfo = document.getElementById('screenshot-info');
const screenshotError = document.getElementById('screenshot-error');
screenshotError.style.display = 'none';
try {
if (window.electronAPI && window.electronAPI.captureWindow) {
const result = await window.electronAPI.captureWindow();
if (result.success) {
currentScreenshotData = result.dataUrl;
currentScreenshotInfo = {
type: '窗口',
width: result.width,
height: result.height
};
screenshotImage.src = result.dataUrl;
screenshotInfo.textContent = `类型: 窗口截图 | 尺寸: ${result.width} x ${result.height} 像素`;
screenshotPreview.style.display = 'block';
console.log('窗口截图已捕获');
} else {
throw new Error(result.error || '截取窗口失败');
}
} else {
throw new Error('截图功能不可用');
}
} catch (error) {
console.error('截取窗口失败:', error);
screenshotError.style.display = 'block';
screenshotError.textContent = `截取窗口失败: ${error.message}`;
screenshotPreview.style.display = 'none';
}
}
// 截取屏幕
async function captureScreen() {
console.log('截取屏幕');
const screenshotPreview = document.getElementById('screenshot-preview');
const screenshotImage = document.getElementById('screenshot-image');
const screenshotInfo = document.getElementById('screenshot-info');
const screenshotError = document.getElementById('screenshot-error');
screenshotError.style.display = 'none';
try {
if (window.electronAPI && window.electronAPI.captureScreen) {
// 不指定sourceId,使用默认屏幕
const result = await window.electronAPI.captureScreen(null);
if (result.success) {
currentScreenshotData = result.dataUrl;
currentScreenshotInfo = {
type: '屏幕',
width: result.width,
height: result.height,
sourceName: result.sourceName
};
screenshotImage.src = result.dataUrl;
screenshotInfo.textContent = `类型: 屏幕截图 | 尺寸: ${result.width} x ${result.height} 像素 | 源: ${result.sourceName ||'默认屏幕'}`;
screenshotPreview.style.display = 'block';
console.log('屏幕截图已捕获');
} else {
throw new Error(result.error || '截取屏幕失败');
}
} else {
throw new Error('截图功能不可用');
}
} catch (error) {
console.error('截取屏幕失败:', error);
screenshotError.style.display = 'block';
screenshotError.textContent = `截取屏幕失败: ${error.message}`;
screenshotPreview.style.display = 'none';
}
}
// 保存截图
async function saveScreenshot() {
if (!currentScreenshotData) {
alert('没有可保存的截图');
return;
}
try {
// 生成文件名(带时间戳)
const timestamp = new Date().toISOString().replace(/[:.]/g, '-');
const fileName = `screenshot-${timestamp}.png`;
if (window.electronAPI && window.electronAPI.saveImage) {
const result = await window.electronAPI.saveImage(currentScreenshotData, fileName);
if (!result.canceled && result.filePath) {
if (result.saved) {
alert(`截图已保存到:\n${result.filePath}`);
} else {
alert(`请将截图保存到:\n${result.filePath}`);
}
}
} else {
// 降级方案:使用浏览器下载
const link = document.createElement('a');
link.download = fileName;
link.href = currentScreenshotData;
link.click();
alert('截图已下载');
}
} catch (error) {
console.error('保存截图失败:', error);
alert('保存截图失败: ' + error.message);
}
}
// 重新截图
function retakeScreenshot() {
const screenshotPreview = document.getElementById('screenshot-preview');
screenshotPreview.style.display = 'none';
currentScreenshotData = null;
currentScreenshotInfo = null;
console.log('准备重新截图');
}
// 关闭截图
function closeScreenshot() {
const screenshotContainer = document.getElementById('screenshot-container');
const screenshotPreview = document.getElementById('screenshot-preview');
const screenshotError = document.getElementById('screenshot-error');
screenshotContainer.style.display = 'none';
screenshotPreview.style.display = 'none';
screenshotError.style.display = 'none';
currentScreenshotData = null;
currentScreenshotInfo = null;
console.log('截图功能已关闭');
}
关键点说明:
-
状态管理:
-
使用
currentScreenshotData存储当前截图的 base64 数据 -
使用
currentScreenshotInfo存储截图元信息
-
-
错误处理:
-
使用 try-catch 捕获异常
-
显示友好的错误提示
-
记录详细的错误日志
-
-
用户体验:
-
实时预览截图
-
显示截图信息(类型、尺寸等)
-
支持重新截图和保存
-
鸿蒙PC适配度注意点
1. 权限配置
在鸿蒙PC平台上,屏幕截图可能需要特殊权限。确保在 module.json5 中配置了必要的权限:
{
 "requestPermissions": [
  {
     "name": "ohos.permission.CAPTURE_SCREEN",
     "reason": "需要屏幕截图权限",
     "usedScene": {
       "abilities": ["EntryAbility"],
       "when": "inuse"
    }
  }
]
}
注意:某些版本的鸿蒙PC可能不需要显式声明此权限,但建议添加以确保兼容性。
2. desktopCapturer API 兼容性
在鸿蒙PC平台上,desktopCapturer API 的行为可能与标准 Electron 略有不同:
-
权限提示:首次使用屏幕截图功能时,系统可能会弹出权限请求对话框,需要用户授权
-
屏幕源识别:多显示器环境下,屏幕源的命名和识别方式可能与标准平台不同
-
缩略图尺寸:
thumbnailSize参数的实际效果可能受系统限制
建议:
// 在获取屏幕源时,使用较大的thumbnailSize以确保质量
const sources = await desktopCapturer.getSources({
 types: ['screen'],
 thumbnailSize: { width: 1920, height: 1080 } // 根据实际需求调整
});
3. webContents.capturePage() 在鸿蒙PC上的表现
webContents.capturePage() 在鸿蒙PC平台上通常表现良好,但需要注意:
-
窗口状态:确保窗口已完全加载后再进行截图
-
透明窗口:如果窗口有透明背景,截图会包含透明区域
-
性能考虑:大窗口截图可能占用较多内存,建议在截图前检查窗口尺寸
建议:
// 在截图前检查窗口状态
if (!mainWindow || mainWindow.isDestroyed()) {
return { success: false, error: '主窗口不可用' };
}
// 可以添加延迟以确保内容完全渲染
await new Promise(resolve => setTimeout(resolve, 100));
const image = await mainWindow.webContents.capturePage();
4. 内存管理
在鸿蒙PC平台上,大分辨率截图可能占用大量内存:
-
及时清理:截图完成后及时清理不需要的数据
-
限制尺寸:对于超大窗口,可以考虑限制截图尺寸
-
流式处理:对于非常大的截图,考虑使用流式处理而不是一次性加载到内存
建议:
// 在保存截图后清理内存
async function saveScreenshot() {
   // ... 保存逻辑 ...

   // 保存后清理
   if (currentScreenshotData) {
       currentScreenshotData = null;
       currentScreenshotInfo = null;
  }
}
5. 文件保存路径
在鸿蒙PC平台上,文件保存路径可能需要特殊处理:
-
用户目录:使用系统提供的用户目录,而不是硬编码路径
-
权限检查:保存前检查是否有写入权限
-
路径格式:确保路径格式符合鸿蒙系统的要求
建议:
// 使用系统提供的用户目录
const { app } = require('electron');
const userDataPath = app.getPath('pictures'); // 或 'documents', 'downloads' 等
const defaultPath = path.join(userDataPath, `screenshot-${Date.now()}.png`);
6. 错误处理
在鸿蒙PC平台上,某些错误可能与标准平台不同:
-
权限错误:如果用户拒绝权限,会返回特定错误
-
系统限制:某些系统设置可能限制截图功能
-
多显示器:多显示器环境下的行为可能不同
建议:
// 添加详细的错误处理和日志
try {
   const result = await desktopCapturer.getSources({
       types: ['screen'],
       thumbnailSize: { width: 1920, height: 1080 }
  });

   if (result.length === 0) {
       console.warn('未找到可用的屏幕源,可能是权限问题');
       return { success: false, error: '未找到可用的屏幕源,请检查权限设置' };
  }
} catch (error) {
   console.error('获取屏幕源失败:', error);

   // 根据错误类型提供不同的提示
   if (error.message.includes('permission')) {
       return { success: false, error: '需要屏幕截图权限,请在系统设置中授权' };
  }

   return { success: false, error: error.message };
}
7. 测试建议
在鸿蒙PC平台上测试截图功能时,建议:
-
单显示器测试:在单显示器环境下测试基本功能
-
多显示器测试:在多显示器环境下测试屏幕源识别
-
权限测试:测试权限请求和拒绝场景
-
性能测试:测试大分辨率窗口的截图性能
-
内存测试:长时间使用后检查内存占用情况
8. 已知问题和解决方案
| 问题 | 可能原因 | 解决方案 |
|---|---|---|
| 屏幕截图返回空白 | 权限未授权 | 引导用户在系统设置中授权 |
| 截图质量较低 | thumbnailSize 设置过小 | 增大 thumbnailSize 值 |
| 多显示器识别错误 | 屏幕源ID不稳定 | 使用屏幕名称而非ID进行匹配 |
| 内存占用过高 | 大分辨率截图 | 限制最大截图尺寸或使用压缩 |
使用示例
基本使用
// 1. 截取当前窗口
const windowResult = await window.electronAPI.captureWindow();
if (windowResult.success) {
console.log('窗口截图尺寸:', windowResult.width, 'x', windowResult.height);
// 显示截图
document.getElementById('preview').src = windowResult.dataUrl;
}
// 2. 截取屏幕
const screenResult = await window.electronAPI.captureScreen(null);
if (screenResult.success) {
console.log('屏幕截图尺寸:', screenResult.width, 'x', screenResult.height);
// 显示截图
document.getElementById('preview').src = screenResult.dataUrl;
}
// 3. 保存截图
const saveResult = await window.electronAPI.saveImage(
windowResult.dataUrl,
'screenshot.png'
);
if (saveResult.saved) {
console.log('截图已保存到:', saveResult.filePath);
}
高级使用
// 获取所有可用的屏幕源
const sourcesResult = await window.electronAPI.getScreenSources();
if (sourcesResult.success) {
   sourcesResult.sources.forEach(source => {
       console.log('屏幕源:', source.name, 'ID:', source.id);
  });

   // 截取指定的屏幕
   if (sourcesResult.sources.length > 0) {
       const screenResult = await window.electronAPI.captureScreen(
           sourcesResult.sources[0].id
      );
  }
}
总结
本文详细介绍了如何在 Electron 应用中实现截图功能,包括窗口截图和屏幕截图两种模式。实现方案使用 Electron 原生 API,无需额外依赖,具有良好的跨平台兼容性。
核心要点
-
窗口截图:使用
webContents.capturePage(),简单可靠,无需权限 -
屏幕截图:使用
desktopCapturerAPI,功能强大,支持多显示器 -
数据格式:使用 PNG 格式和 base64 编码,便于传输和保存
-
用户体验:实时预览、一键保存、错误提示完善
鸿蒙PC适配要点
-
权限配置:确保配置了必要的屏幕截图权限
-
API兼容性:注意
desktopCapturer在鸿蒙PC上的行为差异 -
内存管理:大分辨率截图需要注意内存占用
-
错误处理:针对鸿蒙PC平台的特殊错误进行适配
-
测试验证:在多种环境下充分测试
扩展建议
-
区域截图:可以扩展支持选择区域进行截图
-
截图编辑:添加标注、裁剪等编辑功能
-
快捷键支持:添加全局快捷键快速截图
-
截图历史:保存截图历史记录
-
云存储集成:支持将截图上传到云存储
通过本文的实现方案,您可以在 Electron 应用中快速集成截图功能,并在鸿蒙PC平台上获得良好的用户体验。
参考资料

作为“人工智能6S店”的官方数字引擎,为AI开发者与企业提供一个覆盖软硬件全栈、一站式门户。
更多推荐

 2
2 0
0- 0


 已为社区贡献6条内容

所有评论(0)